Moist & Flavorful Kefir Sheet Cake

- A Slice of Happiness: Bake Kefir Sheet Cake - Moist & Flavorful
- Essential Ingredients Guide to Bake Your Kefir Sheet Cake
- Mastering Professional Cooking: Tips & Techniques for the Home Baker
- Pro Tips & Secrets for the Moist & Flavorful Kefir Sheet Cake
- Perfect Presentation
- Storage & Make-Ahead Tips
- Creative Variations
- Complete Nutrition Guide
- Expert FAQ Solutions
- 📝 Recipe Card
A Slice of Happiness: Bake Kefir Sheet Cake - Moist & Flavorful
Have you ever baked something that just made your heart skip a beat? i remember the first time i whipped up a kefir cake recipe the kitchen filled with the most amazing aroma, and honestly, i could hardly wait to dig in!
I mean, who wouldn’t want to treat themselves to a slice of something so moist and flavorful ? it connected me to my childhood when my grandma used to bake cakes that brought the whole family together.
Aren’t those the best memories?
Baking a Piece of History
Let’s chat a bit about the kefir sheet cake . this beauty is rooted in a tradition that goes back many, many years.
Kefir, you see, is a fermented milk drink full of probiotic goodness that has made its way into modern kitchens like ours.
Not only does it add a tangy flavor, but it also packs a health punch, making it a great addition to your probiotic desserts roster.
These days, you’ll find this easy baking recipe popping up in homes everywhere. it's not just about flavor; it’s about sharing a slice of joyful indulgence perfect for gatherings, family celebrations, or just a cozy night in.
Honestly, anyone can bake this! it takes about 45 to 60 minutes from start to finish, and you’ll have a cake that serves approximately 12.
Sounds like a deal, right?
Why You’ll Love This Cake
Now, let’s talk about the benefits of making this moist sheet cake . first off, we can’t ignore the nutrition highlights.
Using kefir not only enhances the flavor but also turns your cake into a probiotic rich recipe . whether you are looking for lightened desserts or simply want to enjoy something delicious, this cake will tick all the boxes.
You can serve it at birthday parties, holiday get-togethers, or just because it’s tuesday!
Plus, one of the unique selling points is that you can easily add variations. want a chocolate twist? toss in some cocoa powder.
Need more texture? blueberries or diced apples are perfect for that extra burst of flavor. it’s all about making it your own! and who doesn’t love a cake that’s not only soft and tender but can also be adapted for whatever you have on hand?
The Heart of the Recipe: Ingredients That Matter
For those curious about the cost of this delightful treat, let’s break it down a bit. the ingredients are simple and affordable think all-purpose flour, sugar, butter, and of course, that key player, kefir.
You might even have most of these at home, which makes this a win-win. plus, you’ll yield a generous portion that satisfies a crowd.
And speaking of ingredients, one little trick i’ve learned over the years is to make sure everything is at room temperature before you start mixing.
It really makes a difference in getting that soft and tender cake that everyone craves.
If you want to take it to the next level, consider adding a creamy glaze for cake . trust me, it elevates everything! just whisk together some powdered sugar and a touch of milk or kefir, and drizzle it right on top.
Or go all-in with some fruit toppings for a burst of freshness!
Ready to gather your ingredients? Let’s dive into what you need to whip up this amazing homemade kefir cake .
Stick around as we jump into the juicy details of what it takes to make this cake the star of your dessert table!
Essential Ingredients Guide to Bake Your Kefir Sheet Cake
So, you're ready to bake kefir sheet cake - moist & flavorful ? awesome! but before we dive into that delicious world of baking, let’s talk ingredients.
Having the right stuff is like having the secret password to a delicious dessert party.
Premium Core Components
First up, let's break down premium ingredients . Here’s some important info you need:
Measurements: for our cake, you'll need 2 cups (240g) of all-purpose flour , 1 ½ cups (300g) of sugar , and 1 cup (240ml) of plain kefir .
Whatever measurement system you favor, this recipe has you covered. (you can convert, i promise!)
Quality Indicators: Look for fresh kefir —it should have a mild, tangy aroma. For flour, grab a bag that’s free from any lumps. And sugar? White and granulated works perfectly!
Storage guidelines: store your kefir in the fridge and use it within a week for the best taste. as for your flour and sugar, keep them in airtight containers to maximize their shelf life.
Freshness tips: always check expiration dates this can save your cake from turning into a brick! and while you’re at it, see if your eggs are still good by placing them in a bowl of water; if they float, toss 'em.
Signature Seasoning Blend
Next, let’s talk about signature seasonings . This is where the fun starts!
Essential Spice Combinations: While our kefir provides a unique tang, adding a splash of vanilla extract enhances its flavor. Trust me; it’s a game changer.
Herb Selections: For our cake, we keep it simple, but a hint of zest from frutas (like lemon or orange) can bring out the best in your cake!
Flavor Enhancers: Consider adding a pinch of salt to balance the sweetness. It’s like a secret agent in your recipe that makes flavors pop!
Regional Variations: Depending on where you're from, different fruits can spark creativity. Think berries from the North, tropical fruits from the South mix it up!
Smart Substitutions
What happens when you're out of something? No worries!
Common Alternatives: Don’t have kefir? Grab plain yogurt or buttermilk they work like magic!
Dietary Modifications: Need a dairy-free option? Coconut oil swaps out butter beautifully.
Emergency Replacements: As a baking veteran, let me just say if you’re out of eggs, a mashed banana or applesauce can come to the rescue!
Seasonal Options: If it’s summer, toss in some fresh blueberries . In the fall, diced apples or pumpkin spice can spark joy in every bite.
Kitchen Equipment Essentials
Finally, the tools! You don’t want to be caught unprepared, right?
Must have Tools: For our moist sheet cake, you need a 9x13 inch baking pan , mixing bowls, measuring cups, and, if you're fancy, an electric mixer.
Alternative Equipment Options: No mixer? No problem! A whisk and some elbow grease work just fine.
Preparation Tips: Always preheat your oven to 350° F ( 175° C) ; it’s a crucial step! Make sure everything is ready before you start.
Storage Solutions: After your glorious cake bakes, keep it in an airtight container. And be prepared it won’t last long at your next gathering!
Now, with all this insider info under your belt, let’s get to the fun part actually baking your moist and flavorful kefir sheet cake ! happy mixing, and remember, it’s not just about following the recipe; it’s about enjoying the process! got your apron ready?
Let’s roll up those sleeves and make the kitchen our happy place.
Mastering Professional Cooking: Tips & Techniques for the Home Baker
So, you're ready to level up your cooking game? Fantastic! Professional cooking methods can transform your kitchen experience. Let’s dive right into this journey of getting organized, mastering time, and, of course, knocking out that Bake Kefir Sheet Cake - Moist & Flavorful that everyone raves about!
Essential Preparation Steps
Ever heard of mise en place ? it's basically french for “everything in its place.” before you even think about firing up that oven, get all your ingredients sorted out.
Measure your 2 cups of all-purpose flour , your 1 ½ cups of sugar , and everything else. trust me; it saves you from searching for that elusive teaspoon of baking soda in the middle of mixing!
Now, let’s talk time management. set a timer for different stages. for your cake, you’ll want to prep for 15 minutes, then bake it at 350° f for 25- 30 minutes .
That way, you won't find yourself baking away while dinner’s burning! and organization? don’t spread yourself thin. keep your space tidy; it makes cooking way less stressful.
Plus, safety first! always wash your hands and keep that workspace clean to avoid any kitchen accidents.
Step-by-step Process
Ready for the nitty gritty? Here’s how you can make that delightful kefir cake recipe . Grab your mixing bowls because we’re about to get hands-on!
- Preheat your oven to 350° F ( 175° C) .
- Grease and line your 9x13 inch baking pan with parchment.
- In a big bowl, cream together 1/2 cup of softened butter and 1 ½ cups of sugar until it’s fluffy, like a cloud!
- Add 3 large eggs , mixing in one by one. Don't rush it!
- Pour in 1 cup of plain kefir and a splash of vanilla. Blend until smooth.
- In another bowl, whisk 2 cups of flour, 1 tsp of baking powder, 1 tsp of baking soda, and 1/4 tsp of salt together.
- Gradually mix the dry into the wet ingredients until just combined. Overmixing is a no-no, folks!
- Pour it into the prepared pan and smooth out the top.
- Bake for 25- 30 minutes . Check for doneness by inserting a toothpick; it should come out clean.
Cool it for about 10 minutes in the pan , then transfer to a wire rack. if you want that creamy glaze? just whisk 1 cup of powdered sugar with a few tablespoons of milk or more kefir, and drizzle it over your cooled cake.
Expert Techniques
You might be wondering what sets professional cooks apart? it’s about nailing those critical steps. make sure your ingredients are at room temperature.
This little trick does wonders for your batter, keeping it light and airy. also, keep an eye on your cake as it bakes; if it starts to brown too much, cover it with foil.
That's a pro move right there!
Quality checkpoints? keep an eye on that texture! the batter should be smooth and shiny, not stiff. and if a recipe goes awry, don't stress.
Taste as you go if it’s bland, a pinch more salt can work wonders.
Success Strategies
Let’s chat about common mistakes. overmixing your cake batter? guilty as charged! it can lead to a tough cake instead of that soft and tender cake we all swoon over.
It’s easy to do; just mix until combined, and then let it rest.
Want to ensure top-notch results? use room temperature ingredients for the best mixing. and if you’re whipping this together ahead of time, it’s super easy to make your batter a day in advance just wrap it tightly and refrigerate.
Bake it fresh when you’re ready!
And, heck, if it’s a gathering dress it up! Fresh fruit toppings like strawberries or a scoop of ice cream take your moist sheet cake to a whole new level.
Additional Information
There you have it! by mastering these professional cooking methods, you can whip up delicious treats like your bake kefir sheet cake - moist & flavorful effortlessly.
With just a bit of practice and these insider tips, you’ll become the baking star in your kitchen. now, get ready to impress your friends and family with creamy glazes, fruit toppings, and your newfound skills! happy baking!
Pro Tips & Secrets for the Moist & Flavorful Kefir Sheet Cake
Alright, so you’ve settled on making a moist & flavorful kefir sheet cake . awesome choice! it’s a cake that's not only easy to bake but also packs a delightful punch of tangy kefir goodness.
But let’s talk about some chef's secrets to elevate your baking game.
First off, always, i mean always make sure your ingredients are at room temperature. it helps them mix better, resulting in that soft and tender cake we all crave.
Oh, and don’t overmix! just fold everything in until combined. if you overdo it, you’ll be saying ‘goodbye’ to that fluffy texture.
If you want to save time, prepping your dry ingredients in advance is a great trick. measure out your flour, sugar, and leavening agents the night before.
Trust me, those extra 10 minutes are worth it!
When it comes to flavor enhancement, think citrus! a little lemon or orange zest mixed in can take your cake from "meh" to “oh my gosh!” just a teaspoon or so adds a whole new dimension, and it pairs perfectly with the probiotic rich kefir .
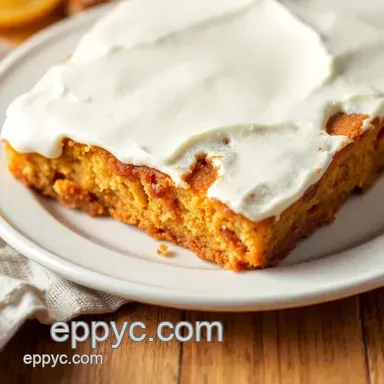
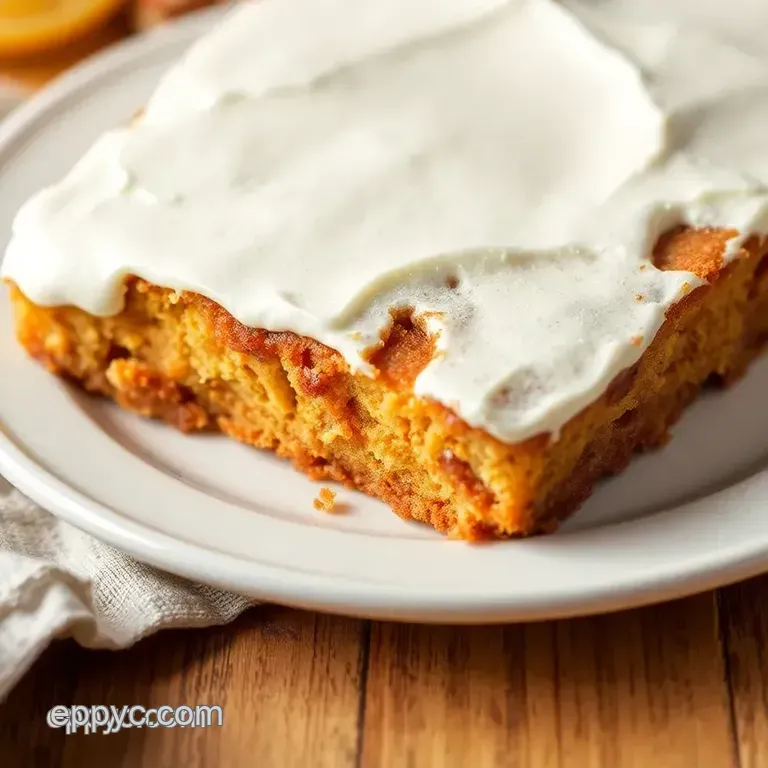
Perfect Presentation
Now, let's sprinkle in some plating techniques . for that insta worthy cake, it’s all about visuals. use a clean knife to slice your cake into squares.
If you’re feeling fancy, take an offset spatula and make each slice stand tall while plating it on colorful dishes.
It really makes those vibrant colors pop!
Garnish ideas? How about a drizzle of that creamy glaze for cake right on top? You can even toss on fresh fruit like strawberries or blueberries for color explosion! They not only look fabulous but add a fresh kick, and honestly, who doesn’t love some fruity goodness?
Looking for that finishing touch? A light dusting of powdered sugar can transform your cake into a delightful treat worthy of a party!
Storage & make-ahead Tips
Got leftovers? no worries! your moist & flavorful kefir sheet cake can last up to 5 days in an airtight container at room temperature.
If you need to extend its life, toss it in the fridge. just remember to wrap it up good, or else it might dry out.
If you want it to stay moist , just reheat a slice in the microwave for about 10-15 seconds . voila, it’s like it just came out of the oven!
Creative Variations
Feeling adventurous? you can totally switch things up! want a chocolate twist? add some cocoa powder to the batter for a totally different take.
Or how about folding in some fresh fruits like blueberries or diced apples? talk about adding some sweet indulgence recipes to your arsenal!
If you're wanting to make this a little healthier, try using whole wheat flour instead of all-purpose. it’s a great way to sneak in some extra fiber, and it’s perfect for any dietary modifications .
Complete Nutrition Guide
Now, let’s chat about the complete nutrition guide for this bad boy. each piece of this kefir cake recipe is packed with about 210 calories and only 3g of protein .
Adding some fruit on top increases those vitamins, too! with all the kefir benefits , you’re getting probiotics that are great for gut health.
So, it’s not just a dessert; it’s a little health boost on a plate!
Expert FAQ Solutions
You might have a few lingering questions. like, “what if my cake doesn’t rise?” don’t worry, that can happen. most times it's because your baking powder or soda is old.
Always double check those expiration dates, folks! and if your sheet cake seems dense, you might’ve overmixed don’t sweat it, just remember to keep things gentle next time.
Final Thoughts
So there you have it! with these tips, your moist & flavorful kefir sheet cake will not only impress but will also be an unforgettable treat.
Whether you’re showing off at a gathering or just treating yourself at home, it’s a sweet indulgence that fits right in.
Get ready to bake your heart out, and remember, have fun with it! the best moments in the kitchen are the ones that involve a little laughter and a lot of love.
Happy baking, my friend!
Bake Kefir Sheet Cake Moist Flavorful