Decadent Chocolate Ice Cream Pops
- Look into into Decadence: Make Homemade Ice Cream Pops with Chocolate
- The Sweet Origin of Ice Cream Pops
- Why Chocolate Pops Are a Game-Changer
- Perfect for Summer and Special Occasions
- Transitioning to the Yummy Details
- Essential Ingredients Guide for Homemade Chocolate Ice Cream Pops
- Professional Cooking Method: The Art of Making Decadent Ice Cream Pops
- Pro Tips & Secrets for the Perfect Ice Cream Pops
- Perfect Presentation: Eye-Catching Treats
- Storage & Make-Ahead: Convenience is Key
- Creative Variations: Let Loose with Flavor!
- Complete Nutrition Guide: Treats That Are a Bit Guilt-Free!
- In Closing: Go Make Some Pops!
- Frequently Asked Questions
- 📝 Recipe Card
Look into into Decadence: Make Homemade Ice Cream Pops with Chocolate
Oh my gosh, have you ever taken a bite of something so chocolatey it felt like a warm hug? i’ll never forget the first time i had a chocolate popsicle on a hot summer day.
My friends and i were at the park, and i swear, that popsicle was like magic. it was creamy, rich, and seriously all i could think about.
Fast forward to now i've finally cracked the code to make homemade ice cream pops with chocolate that would make any summer day unforgettable!
The Sweet Origin of Ice Cream Pops
Ice cream has been around for centuries, with roots dating back to ancient china. but it wasn't until the 20th century that ice cream pops became the cool kids on the block! nowadays, they’re all the rage at parties, barbecues, or just any ol’ day when you need a little sweet relief.
Crafting these beauties at home isn’t just a fun project; it guarantees that we can control every delicious bite.
You won’t believe how quick and easy they are to make! it usually takes about 15 minutes of active prep time and 2 to 3 hours in the freezer.
And guess what? you don’t even need to cook anything. now, who doesn't love that kind of no-cook dessert recipe? this one yields around 6 pops , so it’s perfect for sharing or indulging all by yourself!
Why Chocolate Pops Are a Game Changer
Let’s get real for a moment. these easy ice cream pops come with a slew of benefits beyond just taste.
First off, they’re totally customizable. you can toss in your favorite nut or a swirl of fruit to create an explosion of flavor.
Plus, it’s totally a guilt free way to tackle those chocolate cravings! you can even swap the heavy cream for dairy-free ice cream options for a healthier spin or to accommodate an allergy.
When it comes to nutrition, these pops are satisfying without being overly heavy. each one packs a tasty punch with a decent amount of creaminess and sweetness without crashing your sugar levels.
Feeling bad for your body? just take it easy on the toppings or try integrating healthy ice cream alternatives . you can also skip the chocolate coating for a lighter treat although, let’s be honest, that crunch is part of the experience!
Perfect for Summer and Special Occasions
Whether you’re hosting a summer cookout or just looking for a refreshing summer snack , homemade chocolate ice cream pops are perfect.
These treats are not only appealing to kids but also adults talk about a kid-friendly dessert recipe that gets everyone involved! you can dress them up for an occasion with a sprinkle of crushed nuts or drizzle some caramel sauce.
Seriously, imagine serving these pops during a backyard bbq. everyone’s gathered, the kids are running wild, and you pull out a tray of these decadent chocolate ice cream pops .
They'll be the stars of the show! plus, they make for fantastic frozen desserts for parties .
Transitioning to the Yummy Details
So how do we get to this frozen heaven? it all comes down to a few key ingredients. you’ll need some heavy cream, cocoa powder for that rich chocolate flavor, and, of course, your ice pop molds.
Trust me on this once you get the hang of ice cream making at home , you won’t want to stop! next up, we’ll delve into the specific ingredients so you can start whipping up these treats and satisfy every last chocolate craving.
They are just a few hours away!
Essential Ingredients Guide for Homemade Chocolate Ice Cream Pops
Ah, summer! it’s the season when ice cream dreams come alive especially when you can make homemade ice cream pops with chocolate .
There's just something so satisfying about a pop that’s creamy and delicious, right? let’s dive into the essential ingredients you’ll need to create those dreamy frozen chocolate treats that everyone can enjoy!
Premium Core Components
When it comes to your chocolate dessert ideas , it all starts with high-quality ingredients. Here’s what you should keep in mind:
Heavy cream : you’ll need about 2 cups (480 ml) . look for heavy cream that has the highest fat content around 36% or more.
This will give you that creamy chocolate ice cream we’re all craving.
Whole Milk : Grab 1 cup (240 ml) . Whole milk is your best bet for richness. Don’t try to skimp here; wateriness isn’t going to help your frozen delights.
Granulated Sugar : Measure out 3/4 cup (150 g) . This sweet goodness is essential for balancing out that deep chocolate flavor.
Unsweetened Cocoa Powder : You’ll need 1 cup (95 g) . Always go for a high-quality cocoa powder for bold flavor. Sift for a smoother mix!
Vanilla Extract & Salt : Just 1 teaspoon and 1/4 teaspoon respectively. They enhance everything but pick a good pure vanilla. Trust me, it makes a difference!
Storage tip : Keep your dairy products chilled at all times and check expiration dates regularly.
Signature Seasoning Blend
Alright, here comes the fun part the flavor! While cocoa gives the base its chocolate kick, you can amp it up with these ideas:
Chocolate coating mix : for dipping, you’ll want about 1 cup (175 g) of semisweet or dark chocolate chips. don’t cheap out! get a brand you love, and add 2 tablespoons (30 ml) of coconut oil for smooth dipping.
Pinches of Sea Salt : A sprinkle on those pops before freezing? Oh my gosh, it’s perfection!
Flavor enhancement : If you’re feeling adventurous, toss in crushed cookies or nuts for texture before freezing.
Smart Substitutions
Now, I get it sometimes the recipe calls for ingredients you just don't have. Here are some easy substitutions :
dairy-free Option : Swap heavy cream with coconut cream for a plant based treat.
Sugar Alternatives : Use honey or maple syrup instead of granulated sugar for a healthier spin.
Flavor Variations : Don’t have cocoa powder? Get creative! Try matcha or strawberry powder. Seriously, it’s like a pop party in your mouth!
Emergency replacements : Out of popsicle sticks? Use spoons or just freeze them in regular muffin tins for a unique treat!
Kitchen Equipment Essentials
Let’s not forget about the must have tools! You don’t need fancy gadgets, just the basics to whip up these easy ice cream pops .
Ice Pop Molds : Obviously! Get ones that are easy to remove. Silicone molds are my fav because they just pop right out.
Mixing Bowls and Whisks : You’ll need a few of these. Whisking up your base is all about that good mix.
Microwave Safe Bowls : For melting that chocolate big deal! It’ll save time and sanity.
Measuring Cups & Spoons : Precision is key, friends. Or at least close enough!
Prep Tip : Always have a clean workspace. It makes the whole process feel less chaotic, and you can really enjoy the idea of making frozen desserts for parties .
All set? cool! these essential ingredients and tools will have you on your way to creating easy summer recipes that satisfy those chocolate cravings like nothing else.
Stay tuned as we jump into the instructions where the real magic happens! let’s get those chocolate popsicles rolling!
Professional Cooking Method: The Art of Making Decadent Ice Cream Pops
So, you wanna whip up some delicious homemade ice cream pops with chocolate , huh? let's dive into it! making these tasty treats isn’t just about throwing some stuff in a mold and calling it a day.
Nah, it’s an art! there are professional methods behind creating these dreamy desserts that anyone can master, i promise!
Essential Preparation Steps
Mise en place is a fancy way of saying “everything in its place.” it’s all about prepping your ingredients before you jump into making your easy ice cream pops .
Gather everything you need heavy cream , cocoa powder , sugar , and let’s not forget those ice pop molds .
Having everything ready makes the process smooth sailing.
Time management? oh boy, you gotta nail this! you’ll want to think ahead, especially since those pops need at least 2 hours in the freezer to get their chill on.
Set alarms, or note your steps! keeping track of time is crucial for achieving creamy perfection.
Getting organized is the next key. dust off your mixing bowl and have your whisk ready. create a little assembly line for the ingredients and tools you’ll use.
It feels like a cooking show, and who doesn’t love that?
Safety first, folks! remember to wash your hands before diving into the chocolate world. and when melting those chocolate chips, be cautious! you’ll want to microwave in 30-second bursts to avoid burning.
Trust me, i’ve been there, and burnt chocolate is a real bummer!
Step-by-step Process
Let’s walk through this! Here’s how you’re gonna create your Decadent Chocolate Ice Cream Pops :
Prepare the ice cream base : in a mixing bowl, combine 2 cups of heavy cream , 1 cup of whole milk , 3/4 cup sugar , 1 cup cocoa powder , 1 teaspoon vanilla extract , and a pinch of salt.
Whisk it up until it’s smooth.
Fill the Molds : Pour your mixture into the molds. Don’t fill to the brim; leave some space for expansion. Slip those popsicle sticks in, and you’re almost there!
Freeze : Place your molds in the freezer for at least 2 hours until it’s solid. Go ahead, do a little happy dance while you wait!
Make the chocolate coating : now for the fun part! grab 1 cup of chocolate chips and 2 tablespoons of coconut oil in a microwave safe bowl.
Microwave this beauty until smooth, again in 30-second increments.
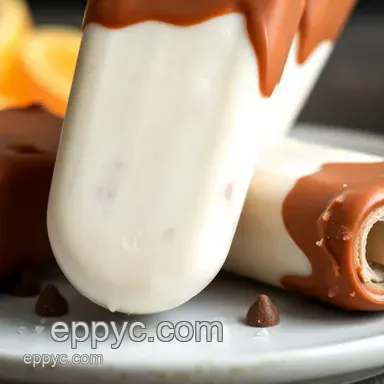
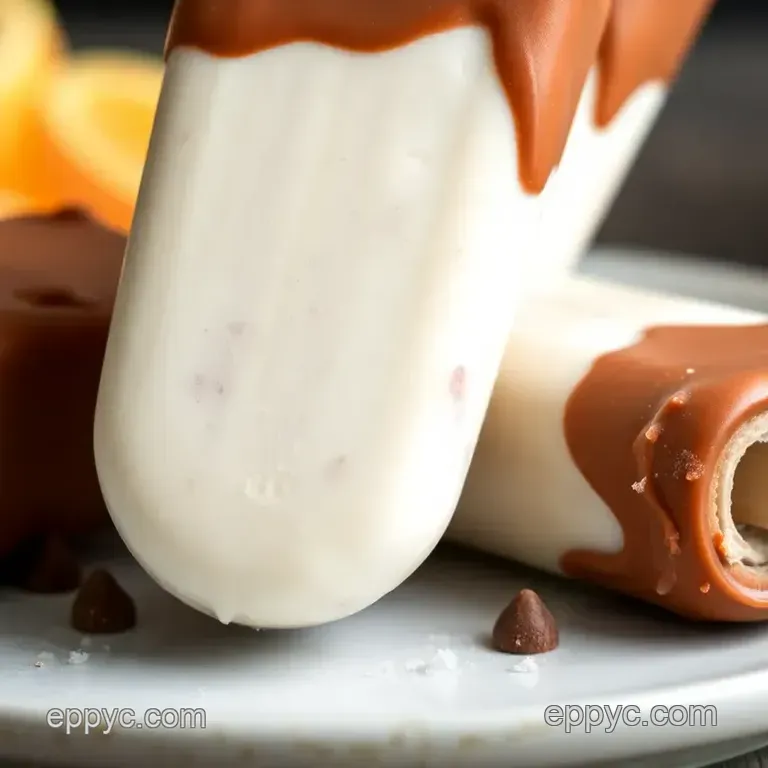
Dip pops : once your pops are frozen solid, dip 'em in the melted chocolate. yep, full-on dunk them, let any excess drip off.
This part will make you feel like a kid again!
Set Coating : Place your chocolate coated pops on a parchment lined sheet and slide ‘em back in the freezer for another 10 minutes to set the coating.
Serve and Enjoy : Dig right in or stash them in an airtight container. They can live in the freezer if you want to save them for later if you have that kind of willpower!
Expert Techniques
Let’s talk about not just making ice cream, but mastering it. the key here is controlling your temperatures. if your chocolate gets too hot, it’s game over.
Use low heat. your pops need to freeze at a steady temperature to achieve that creamy, dreamy texture think 22° f (- 6° c) .
Pay attention to timing, too! those visual cues are super important. if your pops look solid and sturdy, you're good to go.
If they’re still soft in the center, put them back in until they firm up.
Success Strategies
A lot of folks mess this part up so listen close! Don’t skip the cooling times; they're non-negotiable. Also, check your chocolate coating! It should be warm but not hot.
Quality assurance tips ? always taste your ice cream base before freezing to make sure it hits the sweet spot.
Want to make it even healthier? go for dairy-free ice cream options for those fun nights.
To make-ahead these bad boys, whip up your mixture the night before and freeze, so they’re ready whenever you need some sweet relief.
And there you have it! your pathway to mastering professional cooking methods while making homemade ice cream pops with chocolate .
Remember, it's all about experimentation and finding what works for you. now, if you're itching for more cool tricks and tips on ice cream making, stay tuned! we'll dive into some additional information soon to make your summer desserts even more epic!
Pro Tips & Secrets for the Perfect Ice Cream Pops
Oh my gosh, you guys! if you're ready to make homemade ice cream pops with chocolate , listen up! there are some little tricks i’ve picked up over the years that can take this treat to the next level.
Chef's Personal Insights
First off, always taste as you go. this isn’t just for the ice cream base. when you throw together the chocolate for the coating, give it a quick dip test.
You want it to be rich but not overly sweet.
Time Saving Techniques
If you’re in a hurry (who isn’t?!), just whip up a big batch of the ice cream base and freeze it overnight.
That way, you can whip out custom flavors whenever those late night chocolate cravings kick in.
Flavor Enhancement Tips
Don’t underestimate a pinch of salt in your chocolate mixture. it really makes that flavor pop! honestly, it’s like magic.
Also, vanilla extract isn’t just for ice cream; toss a drop in your chocolate coating for an extra layer of yum!
Presentation Advice
When it comes to food, presentation is everything! Try to plate these pops on a colorful plate or board to really make them shine. Visual appeal counts, folks!
Perfect Presentation: Eye-Catching Treats
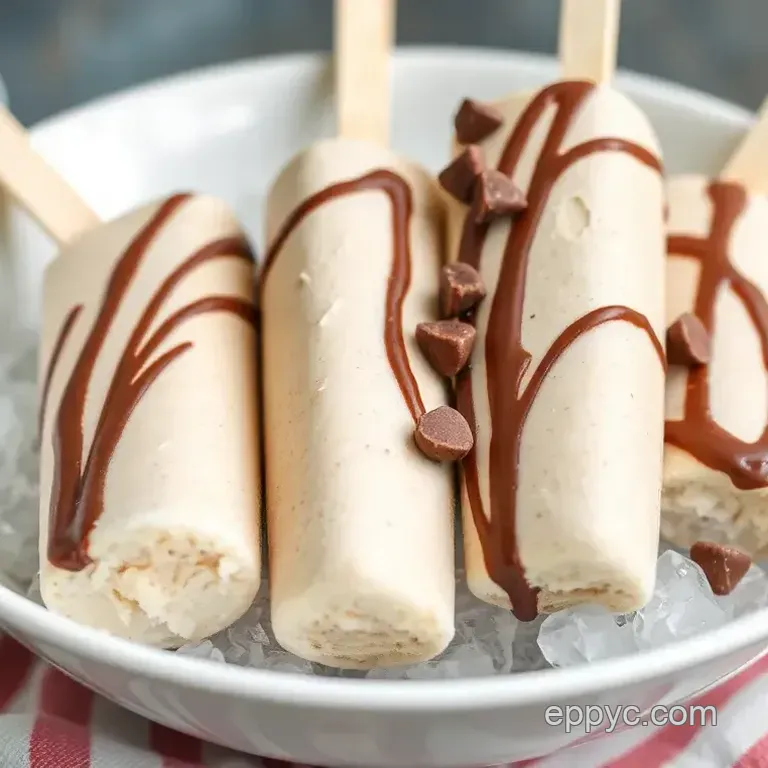
Now let’s talk about plating techniques . Once you’ve coated those creamy chocolate popsicles in divine chocolate layers, drizzle some melted chocolate on top for extra pizazz.
Garnish Ideas
Fancy a bit of crust? throw on some crushed nuts or sprinkles. you can turn your dessert into a mini masterpiece! kids love them, and they make for great frozen desserts for parties .
Color Combinations
Remember that the treat should look just as delicious as it tastes. team chocolate pops with some bright fruits like strawberries or orange slices to add variability and freshness to your dessert platter.
Visual Appeal Tips
Don’t be afraid to go big! Present them in cute ice cream pop molds on a bed of crushed ice, or stick them in mason jars for a rustic vibe.
Storage & make-ahead: Convenience is Key
Let’s be real: ice cream pops are best enjoyed fresh, but they can totally hang out in your freezer!
Storage Guidelines
Keep your pops in an airtight container. Seriously, no one wants freezer burn ruining that creamy chocolate ice cream.
Preservation Methods
Wrap each pop in wax paper before putting them in the container. This helps preserve that luscious flavor and texture. It’s like a little gift waiting for you!
Reheating Instructions
No need to worry about reheating these bad boys are meant to be frozen. just let them sit out for 5 minutes before you dive in.
A little warmth helps the chocolate coating soften, making for a perfect bite.
Freshness Duration
Stored properly, homemade ice cream pops can last up to two weeks in the freezer. But honestly, they won’t last that long if you’re sharing with friends!
Creative Variations: Let Loose with Flavor!
Here comes the fun part: Creative Variations ! Want to mix things up a bit? You can totally do that with this recipe.
Flavor Adaptations
Get adventurous! Mix in some peppermint extract for mint chocolate pops or swirl in peanut butter for a decadent twist.
Dietary Modifications
Don’t sweat if you're dairy-free. Just swap in coconut milk and you’re good to go! Check off that dairy-free ice cream option right off your list.
Seasonal Twists
Take advantage of seasonal fruits! Add in some pureed strawberries in the summer, and in autumn, use a pumpkin spice flavor. Who doesn’t love a little seasonal flair?
Regional Variations
Feeling tropical? Add some coconut flakes for a beachy vibe! You can even try adapting flavors from different cultures think dulce de leche or matcha!
Complete Nutrition Guide: Treats That Are a Bit Guilt Free!
Health conscious folks, I’ve got you covered with a Complete Nutrition Guide .
Detailed Breakdown
Each pop clocks in around 230 calories , and those fats? They’re mostly from the cream which gives that irresistible creamy texture.
Health Benefits
While indulgent, this recipe can be made with healthier ingredients like coconut milk or lower sugar alternatives. Perfect for those who want to satisfy their chocolate cravings without the guilt.
Dietary Considerations
Have a nut allergy? Just skip them! And remember: customizing your flavors means you can cater to anyone's dietary needs.
Portion Guidance
One pop is generally a perfect serving size unless you’re feeling particularly ambitious, then you might want to grab another!
In Closing: Go Make Some Pops!
Honestly, making these easy ice cream pops is just so much fun. you get to play around with flavors, enjoy a cool treat on a warm day, and make homemade ice cream pops with chocolate that are perfect for any occasion.
Now don’t let your pops linger in the freezer too long. grab your favorite molds and get to creating those delicious, creamy chocolate treats.
Happy popping, my friends!
Frequently Asked Questions
How can I make homemade ice cream pops with chocolate without an ice cream machine?
You can easily make homemade ice cream pops with chocolate by using simple ingredients and a mixing bowl. After blending the ingredients, pour the mixture into ice pop molds and freeze until solid. No ice cream machine is needed!
What are some tips for ensuring my chocolate coating is smooth?
To achieve a smooth chocolate coating, melt your chocolate chips with coconut oil in short bursts in the microwave, stirring between each interval. Keeping the melted chocolate warm while dipping the pops also helps create an even coating and prevents it from hardening too quickly.
Can I make dairy-free chocolate ice cream pops?
Absolutely! You can make dairy-free chocolate ice cream pops by substituting heavy cream with coconut cream and whole milk with almond or oat milk. Additionally, make sure the chocolate chips used in the coating are dairy-free.
How should I store my homemade chocolate ice cream pops?
Store your homemade chocolate ice cream pops in an airtight container in the freezer to keep them fresh. For best results, consume them within two weeks. If you use an ice pop bag, make sure they are tightly sealed to avoid freezer burn.
What variations can I try with this chocolate ice cream pop recipe?
Get creative with variations by adding ingredients like crushed cookies, chopped nuts, or swirls of different flavored ice creams. You can also experiment with flavored powders, such as matcha or strawberry, instead of cocoa powder for unique taste experiences.
Are homemade chocolate ice cream pops healthier than store-bought ones?
Generally, homemade chocolate ice cream pops can be healthier than store-bought options as you can control the ingredients and sugar levels. By using natural sweeteners and high-quality ingredients, you can customize them to fit your dietary preferences while reducing preservatives and artificial flavors.
Make Homemade Ice Cream Pops With Chocolate