Quick and Easy Vanilla Bean Paste Recipe
- Look into into the World of Vanilla Bean Paste
- The Scoop on Vanilla Bean Paste
- Why You'll Love This Recipe
- The Great Vanilla Showdown
- But Wait, There’s More!
- Essential Ingredients Guide: A Deep look into
- Mastering Professional Cooking: Your Guide to Vanilla Bean Paste
- Additional Recipe Information: Elevate Your Vanilla Game
- 📝 Recipe Card
Look into into the World of Vanilla Bean Paste
Ever been in the middle of baking, just to realize you're out of vanilla extract? yeah, i’ve totally been there.
The first time it happened, i felt my heart drop. vanilla is the magic ingredient in so many desserts! but what if i told you that you could make vanilla bean paste in 10 minutes ? seriously, it’s like your kitchen has its own party trick! trust me; you’ll want to stick around for this one.
The Scoop on Vanilla Bean Paste
So, where does this amazing concoction come from? let me take you on a quick history ride! vanilla beans have roots tracing back to ancient mexico, where the totonac people guarded this fragrant crop.
Fast forward a few centuries, and now we’re drenching our desserts in it, thanks to the spanish settlers who introduced it to the world.
Today, it’s everywhere from the classic french vanilla ice cream to our favorite cupcakes. the best part? we're making it at home now.
Wondering how long it’ll take? like i mentioned, just 10 minutes . yup, you heard that right! it’s super easy, making it perfect even for those who think they can’t cook (no shame, we’ve all been there!).
Plus, the cost? way cheaper than store-bought stuff, and you get a batch of about ½ cup. that’s a whole lot of deliciousness to enjoy in your own desserts!
Why You'll Love This Recipe
Now let's talk benefits. first up, we’re all about health ! vanilla beans are loaded with antioxidants and can even offer a boost to your mood (hello, happy baking!).
When you whip up this homemade vanilla bean paste, you're not just making a great ingredient; you're also dodging those weird additives found in some retail products.
Pure and simple that's where it's at!
Wondering when to serve your vanilla bean paste? any occasion is a good one! birthdays, holidays, or just a tuesday that needs a pick-me-up it's a versatile little star for your desserts.
And let’s be real, it’s a whole heck of a lot better than just plain old vanilla extract. those flecks of real vanilla in your baked goods? game changer!
The Great Vanilla Showdown
Speaking of advantages, have you ever looked at the price tag on vanilla bean paste compared to the extract? it can be a bit wild! making this at home gives you that gourmet vanilla dish without the gourmet price!
Even if you're into the french vanilla bean techniques, this quick vanilla paste recipe is gonna blow your mind.
Plus, when you're cooking with vanilla beans, you can really play around with flavors! try infusing it into sauces or even in cocktails.
Seriously, the options are endless. and those leftover vanilla pods? don't throw them away! you can use them for making homemade sugar or even vanilla infused milk.
It’s a total win-win!
But Wait, There’s More!
With all these incredible benefits, are you ready to gather your ingredients? because trust me, this beautiful homemade vanilla bean paste is not gonna make itself.
You’ll be needing five whole vanilla beans , along with some sugar, water, and maybe a splash of corn syrup for consistency, if you're feeling fancy.
Get those taste buds ready because we’re about to whip up something that’ll elevate your desserts and even spark some jealous comments from your friends! stick around; up next, i’ll lay down exactly what you need to do to create your own delicious batch.
It’s seriously going to change your baking game. let’s dive into the ingredient list!
Essential Ingredients Guide: A Deep look into
Let’s get down to the nitty gritty of cooking essentials . whether you’re a newbie or a seasoned chef, we all need a solid foundation to work from.
So, gather ‘round as we explore the staples that can elevate your kitchen game.
Premium Core Components
First up, premium core components ! You can’t whip up magic without the right materials. Let’s break it down with a little finesse.
Measurements: Knowing measurements is key. For instance, 5 whole vanilla beans can give you that richness that synthetic flavors just can’t touch. That’s about 100 grams if you’re on the metric train.
Quality Indicators: Look for Grade A vanilla beans . They should be plump and oily. A dry bean? Nah, toss that back!
Storage Guidelines: Keep your beans in a cool, dim place just like how you’d store fine wine. Their shelf life? Roughly 6-12 months if treated right.
Freshness Tips: When selecting, give ‘em a squeeze. They should be flexible , not brittle. More wiggle, less brittle is a good motto!
Signature Seasoning Blend
Now, let’s talk signature seasoning blends ! They’re like the secret sauce of your dishes.
Essential Spice Combinations: A pinch of cinnamon, sprinkle of nutmeg, and some allspice can make your holiday desserts sing!
Herb Selections: Fresh basil pairs wonderfully with tomatoes. And don’t get me started on thyme with roasted chicken. Heavenly!
Flavor Enhancers: Want something magical? Toss in some garlic or shallots. Flavor game strong!
Regional Variations: In the South, we love our Creole spices. Head to the West Coast, and it’s all about fresh herbs and citrus. The U.S. is a flavorful melting pot!
Smart Substitutions
Sometimes you don’t have what you need, but no worries. Here’s where smart substitutions come in.
Common Alternatives: Ran out of vanilla extract ? Pop in some almond extract; you’re gonna get a nutty surprise!
Dietary Modifications: Going vegan? Use aquafaba instead of eggs in baking. It’s like magic , I swear!
Emergency Replacements: No fresh herbs? Dried herbs can save the day, use them two to three times as much.
Seasonal Options: Use what’s fresh! As fall rolls in, grab those warm spices and pumpkin puree to spice things up.
Kitchen Equipment Essentials
Gear up, folks! We’re moving to kitchen equipment essentials —the tools of the trade.
Must Have Tools: A good chef's knife, a reliable cutting board, and a set of measuring spoons will make cooking so much easier. Trust me.
Alternative Equipment: Don’t have a fancy stand mixer? Your good ol’ whisk and elbow grease will do just fine.
Preparation Tips: Always prep your ingredients before you start cooking. Less kitchen chaos means more happiness .
Storage Solutions: Keep your pantry organized. Use clear containers for your spices, so you can sniff out what you need without digging.
Let’s Get Cooking!
Alright, now that you’re equipped with the essential ingredients and tools, how about we dive into something sweet? If you want to make your desserts pop with flavor, I've got just the thing!
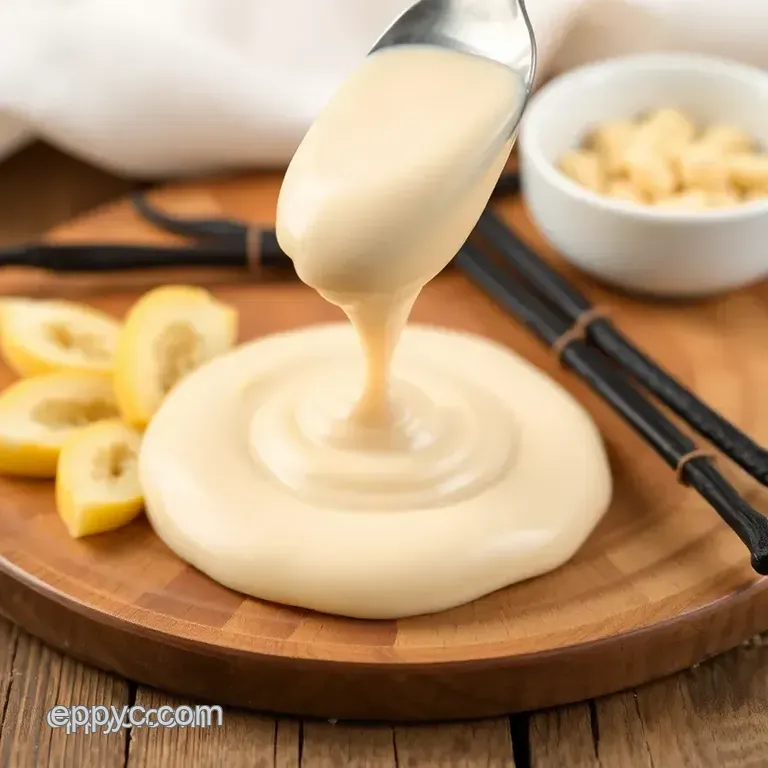
In a super quick process, you can make vanilla bean paste in 10 minutes ! imagine creating a homemade vanilla bean paste that will elevate your pies, cakes, and all those creamy desserts! you won’t look back to store-bought again.
Stay tuned as we roll into the recipe section trust me, you want to stick around for this. with just a few simple ingredients and steps, you’ll master the art of vanilla .
Let’s transform your desserts and wow your taste buds!
Mastering Professional Cooking: Your Guide to Vanilla Bean Paste
Let’s talk about one of the magical ingredients in the culinary world vanilla bean paste! if you want to elevate your desserts from ordinary to extraordinary, making your own homemade vanilla bean paste is the way to go.
Seriously, you can make vanilla bean paste in 10 minutes with just a few ingredients. yeah, you heard me right 10 minutes! that means you’ll have a delicious, aromatic paste ready to jazz up your cakes, custards, and even your morning oatmeal.
Essential Preparation Steps: Getting Ready for Vanilla Magic
Before you jump into mixing, you've got to prep like a pro. this is where mise en place comes in.
That fancy term basically means "everything in its place." gather your whole vanilla beans, sugar, water, and corn syrup.
Having everything laid out cuts down on chaos later.
Time management is crucial too. set a timer for 10 minutes that’s how long this recipe will take. feeling rushed? take a deep breath! cooking is about enjoying the process, not just the results.
Keep your workstation organized. it isn’t just about looks; it saves you from scrambling around when you need something. pro tip: place all your ingredients close to where you’ll be cooking.
And don’t forget safety! those vanilla beans can be slippery when you slice them, so use a sharp knife and take your time.
Step-by-step Process: Your Vanilla Journey
Now, let’s get down to business! Here’s how to whip up that delicious homemade vanilla bean paste :
- Prepare your vanilla beans. Slice each bean lengthwise to reveal the seeds.
- Scrape out the beautiful seeds into a bowl. Set those aside; they add serious flavor!
- Combine the ingredients. In a small saucepan, toss in the scraped beans, seeds, sugar, water, and corn syrup (if you're using it).
- Heat the mixture. Place it over medium heat. Stir until the sugar dissolves completely.
- Cook briefly. Let it simmer for about 2- 3 minutes while stirring occasionally. Don’t walk away like I’ve done watch for that perfect consistency!
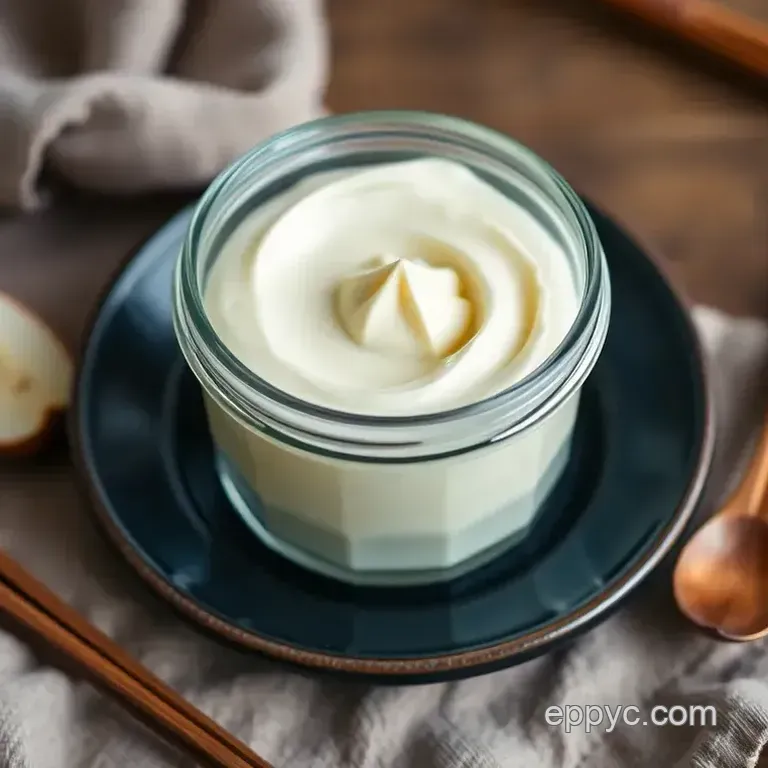
- Cool it down. Remove from heat and let it cool before pouring it into your glass jar. It will thicken as it cools.
There you go! You just made some awesome vanilla bean paste. Wasn’t that easy?
Expert Techniques: Making Your Paste Perfect
If you want to get all fancy, consider how to store your vanilla bean paste . keep it in a cool, dark place to maintain its flavor.
You could also think about thickening vanilla paste by reducing the water slightly if you prefer a richer texture.
Watch for signs of doneness. if it's too liquidy for your taste, simmer it just a tad longer. and guess what? if it ever feels off, just blend it again! don’t worry about making mistakes; it’s part of learning.
Success Strategies: Never Fail with Vanilla
One of the most common mistakes? Forgetting to scrape the seeds properly —that bitter taste is no fun. Make sure you get every last drop of goodness out of those pods.
Quality assurance ? always use the best vanilla beans you can find. grade a beans are your go-to for that rich flavor profile.
If you’re on a budget, check for sales; some retail outlets have great options.
And let's not forget about make-ahead options . store your vanilla bean paste in the fridge, and it should last for about a month.
You might even consider using it in various ways like in creamy desserts or to flavor sweet sauces. the sky’s the limit!
Now, if you’re curious about some fun recipes to try or need cooking tips for vanilla , hang tight! I'm all geared up to share even more details.
Additional Information
So, what are you waiting for? go ahead, whip up that quick vanilla paste recipe , and see how it instantly elevates your cooking game! from drizzling over pancakes to infusing rich flavors in desserts, homemade vanilla bean paste is super versatile and worth the hype.
Curious about different ways to use it? i’ll dive into that next!
Additional Recipe Information: Elevate Your Vanilla Game
Oh my gosh! making your own homemade vanilla bean paste is one of those kitchen hacks that’ll totally change your dessert game.
Seriously, with just a few steps, you can make vanilla bean paste in 10 minutes . how amazing is that? let’s jump into the nitty gritty of creating this gourmet ingredient that’ll have you feeling like a professional chef in no time!
Pro Tips & Secrets
First off, high-quality vanilla beans are your best friends. You want those lush, plump ones that practically ooze sweetness. My go-to? Grade A beans they pack a punch!
For time saving techniques , if you’re crunched, chop those beans into smaller pieces before scraping; it’ll speed things up, i promise.
Oh, and if you like a thicker paste, simply cut back slightly on the water when mixing.
Flavor enhancement tips? don’t be afraid to spice it up! a dash of cinnamon or a splash of bourbon can transform your paste into a flavor bomb.
Imagine using it in your baked goodies or even pancakes. total brunch goals!
When it comes to presentation , think about how we eat with our eyes first. drizzle your vanilla bean paste on desserts like a pro! play with colors by adding fresh fruit or vibrant berries alongside.
It makes such a difference.
Perfect Presentation
Plating is an art. to plate like a pro , use a small spoon to create a swoop of paste on the plate as a base.
Then, pile on your dessert masterpiece. think layers of creamy vanilla desserts or a simple custard topped with whipped cream.
Garnishes? Fresh mint leaves or a sprinkle of colorful edible flowers send your dish into the stratosphere of wow factor. Plus, they add a pop of color that makes everything sing.
Let’s talk color combinations too! A rich brown from the vanilla against a bright white cream looks mouthwatering. It’s all about those contrasts!
Storage & make-ahead
Okay, let’s get real about storage. your vanilla bean paste will stay fresh in an air-tight container in the fridge for about a month.
Just shake that jar before each use; the contents may settle.
If you want to make it ahead of time, it freezes beautifully! just pop it into an ice cube tray, freeze, and transfer the cubes to a zip-lock bag.
Talk about quick vanilla paste recipes at your fingertips!
Creative Variations
Feeling adventurous? Let’s chat creative variations ! You can tweak the flavor profile by tossing in some zest from an orange or lemon. It’ll totally brighten up your dishes.
For dietary modifications , if sugar is a concern, try natural sweeteners like maple syrup or a sugar substitute. Your paste will still have that rich vanilla flavor we crave.
How about a regional twist ? Take inspiration from the South and add a touch of bourbon for a bourbon vanilla bean paste —totally elevates gourmet vanilla dishes !
Complete Nutrition Guide
Let’s not forget the nutrition part! vanilla bean paste has some surprising health benefits. sure, the calories add up, but it contains antioxidants and minerals.
When you’re flavoring desserts with this homemade gem, you’re doing more than just sweetening; you’re adding a kick of flavor that is, believe it or not, good for you!
Use it wisely— portion guidance is super important here. Just a teaspoon can do wonders without breaking the calorie bank.
Expert FAQ Solutions
Now, let’s address some of your burning questions. one that comes up often? “can i use vanilla extract as a substitute?” totally! but keep in mind, you’ll have to reduce the amount of sugar to balance it out.
It won’t be quite as rich without those gorgeous vanilla bean flecks, though!
And if you’re wondering how to scrape vanilla beans —just use the back of a knife after slicing them lengthwise; it’s as easy as pie.
Wrapping Up
So there you have it! with just 10 minutes , you can whip up a batch of homemade vanilla bean paste that will elevate your desserts and impress your friends.
Whether you’re baking or drizzling it over pancakes, this magic ingredient is incredibly versatile.
Make it your own by trying out those variations or just drenching everything in flavor trust me, you’re gonna love it.
Now, grab those vanilla beans, dive into your kitchen, and let’s get making! enjoy your vanilla adventures, folks!
Make Vanilla Bean Paste In 10 Minutes

