Gluten Free Bread Recipe: Rustic Artisan Loaf That Doesnt Crumble
- Achieving the Perfect Crumb: Finally, a Gluten Free Bread That Holds Up
- The Science Behind the Sandwich: Why Psyllium Husk is Key
- Essential Ingredients for Your Best Gluten Free Bread Loaf
- Baking Mastery: The Step-by-Step Method for the Rustic Loaf
- Pro Baker Tips and Troubleshooting Common Gluten-Free Issues
- Maintaining Freshness: Storage and Freezing Your Artisan Loaf
- Perfect Pairings: Serving Suggestions for Your Seeded Loaf
- Recipe FAQs
- 📝 Recipe Card
Achieving the Perfect Crumb: Finally, a gluten-free Bread That Holds Up
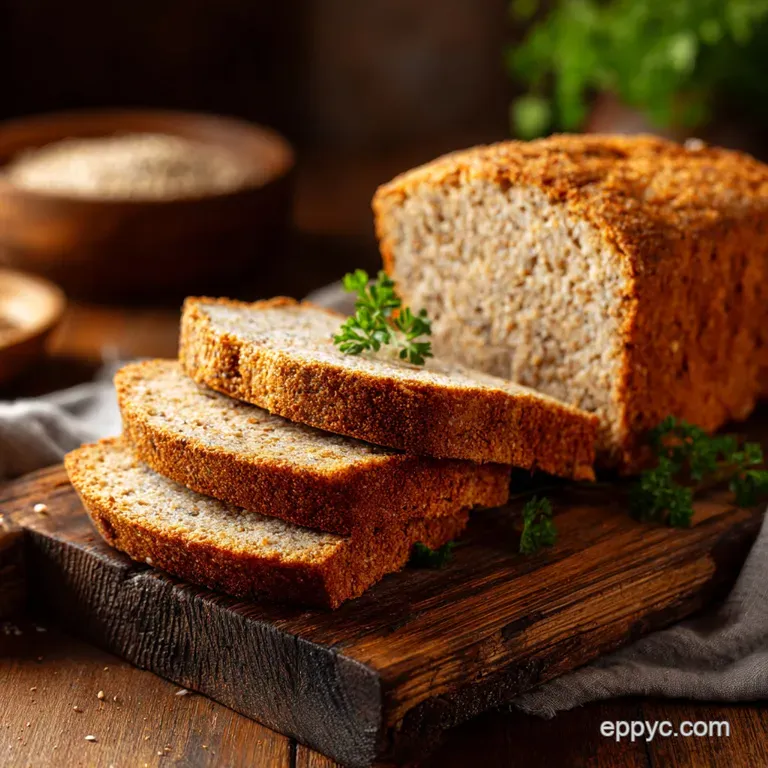
That smell. It's the absolute best part of baking, isn't it? When this beautiful, gluten-free artisan bread loaf is cooling on the rack, your kitchen is going to smell like a proper, old-school bakery. You get that deep, nutty, yeast rich aroma that makes you instantly crave salted butter.
Look, I’ve tried every store-bought and homemade gluten-free bread recipe on the internet, and 99% of them crumble before they hit the toaster. This is the recipe that changed everything for me.
It’s cheap, surprisingly fast to mix up, and holds up perfectly to seriously heavy sandwich fillings. It truly is the best gluten-free bread recipe I’ve ever developed.
Getting that perfect, flexible crumb requires understanding a tiny bit of kitchen chemistry, though. We need to ditch the usual "gumminess" traps and focus entirely on building a durable structure. Ready to make a real, honest-to-goodness loaf that doesn't fall apart? Let’s crack on and get baking.
The Science Behind the Sandwich: Why Psyllium Husk is Key
Why Traditional gluten-free Recipes Fail
Traditional GF bread recipes rely too heavily on refined starches, like pure potato or cornstarch, which results in a gummy texture when warm. They also completely lack the crucial elastic pull that gluten provides, meaning they collapse easily and turn into bricks when cool.
That’s why those early attempts tasted like dry, pre-sliced sponges they had no structural integrity.
Our Game Changing Approach to Structure
We aren't trying to trick flours into acting exactly like wheat. We are building a new structure entirely using specialized binders. This loaf uses psyllium husk powder to create a dense, incredibly flexible matrix.
This psyllium husk bread recipe relies on hydration, not kneading, to develop a robust inner network.
The Sandwich Test: Is this Loaf Truly Sliced Bread Ready?
Yes, absolutely! Because the psyllium structure is so robust, this loaf can handle being sliced thin and toasted without falling apart. You won’t get that dreaded crumble when spreading jam or trying to build a proper BLT. That structural integrity is the true test of good gluten-free bread .
The Magic of Hydrocolloids: Replacing Gluten's Elasticity
Psyllium and xanthan gum are hydrocolloids; they love water. When mixed with liquid, they swell dramatically, creating a sticky, viscous gel. This gel mimics the netting structure of gluten, trapping the gases released by the yeast.
Use psyllium husk powder, not whole husks , for the best texture.
Balancing Hydration for an Open Texture
This dough looks wetter than any traditional bread dough you've ever handled. That's intentional. gluten-free flours require significantly more hydration than wheat flour, and the psyllium needs the extra liquid to hydrate fully. If your dough is too dry, it will bake up dense and heavy, so trust the process.
The Role of Apple Cider Vinegar in Yeast Activation
The vinegar serves a couple of important roles here. First, a touch of acid helps tenderize the protein structures in the egg and flours. Second, and more importantly, the slight acidity encourages the yeast to work faster and harder, resulting in a better overall rise.
Essential Ingredients for Your Best gluten-free Bread Loaf
The Core Dry Blend: Psyllium, Starches, and Whole Grains
The combination of brown rice and sorghum flours gives us a lovely depth of flavor and texture that prevents the loaf from tasting metallic or bland. I once tried to substitute flaxseed entirely for the psyllium and the result was dense, heavy, and tasted vaguely of sadness. Never again!
Psyllium is the non-negotiable MVP here.
Crucial Ingredient Alert: You MUST weigh your dry ingredients. Scooping gluten-free flours compresses them, and you’ll end up using 30% too much. Get a cheap digital scale it’s the best baking investment you’ll ever make.
Activating Your Yeast: Temperature and Proofing Checks
Your water temperature is incredibly important. If it’s too hot, you kill the yeast, and you get a pancake. If it’s too cold, your loaf will never rise sufficiently. Use a thermometer to hit that 105 115°F (40 46°C) sweet spot.
The honey is just fast food for the yeast; it gets them ready for work!
Flour Blend Swaps: Tested Alternatives for Texture and Flavor
Different flours behave differently, but here are the tested swaps that maintain the structure needed for this gluten-free bread flour combination.
| Original Ingredient | Tested Substitute | Notes |
|---|---|---|
| Sorghum Flour | Millet Flour or Certified gluten-free Oat Flour | Provides similar protein and structure. |
| Tapioca Starch | Potato Starch or Cornstarch (slightly denser crumb) | Necessary for lightness and browning. |
| Honey/Maple Syrup | Granulated Sugar (10g) | Only needed to feed the yeast; flavor is minimal. |
Nut-Free and Seed Free Adaptations
To make this completely nut-free, ensure your oat fiber (if using) and flours are certified nut-free (cross contamination is real). If you can't use the sorghum flour, double down on the brown rice flour for the bulk of the loaf. Skip the external seeds, obviously.
Baking Mastery: The step-by-step Method for the Rustic Loaf

Prepping the Psyllium: Creating the Essential Gel Structure
After mixing all the dry ingredients into the liquids, you need that 15 minute rest period. This is mandatory. You'll watch the sticky batter thicken dramatically, transforming from a thick soup into a weird, sticky dough. This is the psyllium husk bread recipe working its magic!
Mixing and The 'No-Knead' Rest Phase
Unlike traditional bread, we are mixing vigorously for 5– 7 minutes, not kneading. This intense mixing fully hydrates the psyllium and xanthan gum, activating their binding properties. Don't skip the rest; it makes the shaping phase slightly (only slightly) less messy.
Shaping the Wet Dough (The Wet Hands Technique)
The dough is notoriously sticky it feels much more like cake batter than bread dough. Do not try to flour your surface. Flour just makes the crust taste dry and powdery. Instead, lightly oil your work surface and your hands heavily.
Use gentle pushing and folding to shape the log; avoid excess manipulation.
The Double Proof Strategy for Maximum Rise
We use a longer, cooler first proof ( 90 minutes) to develop flavor, followed by a quick second proof in the oven's residual heat. Watch the volume, not the clock. The loaf should only increase by about 50%.
Over proofing is the number one reason GF bread collapses in the oven.
Pro Baker Tips and Troubleshooting Common gluten-free Issues
Diagnosing a Dense or Gummy Crumb
This nearly always comes down to two specific failures: 1) You sliced the loaf while it was still warm, or 2) you used volumetric cups instead of a kitchen scale. Seriously, precision is everything with gluten-free bread .
Achieving that Deep Golden Crust
The initial blast of 450°F (230°C) heat is what sets the crust beautifully. Don't be scared by the high temperature. That heat, combined with the small amount of sugar in the yeast mix, promotes a lovely, rich Maillard reaction.
The Importance of Oven Temperature and Steam
The initial steam prevents the crust from hardening too quickly, allowing the dough one last little surge of growth we call this oven spring. If you can’t manage a pan of water, just spritz the oven walls quickly with a water bottle before you shut the door.
Why You Must Wait to Slice (The Cooling Rule)
This is the hardest rule, I know! But the bread continues cooking even after it comes out of the oven. If you slice it early, all that trapped steam condenses immediately, turning the delicate crumb structure into a gummy, sticky mess.
Wait until the loaf is stone cold (at least 2 hours).
Maintaining Freshness: Storage and Freezing Your Artisan Loaf
Short Term Storage: Counter vs. Fridge
Once fully cooled, store the loaf, well wrapped, at room temperature for 3 4 days. Unlike traditional bread, GF bread stales quickly in the fridge because the starches crystalize faster at cool temperatures. Only refrigerate if it contains perishable add-ins, but otherwise, stick to the counter.
The Best Way to Slice Before Freezing
But does it freeze well? You bet. This gluten-free artisan bread freezes beautifully. My advice is to slice the fully cooled loaf entirely before freezing it . Wrap the whole sliced loaf tightly in plastic wrap, then aluminum foil, and place it in a freezer bag.
You can then pull out a single slice and toast it directly from the freezer. Trying to saw through a frozen, unsliced loaf is a terrible life choice, trust me. It lasts up to three months this way.
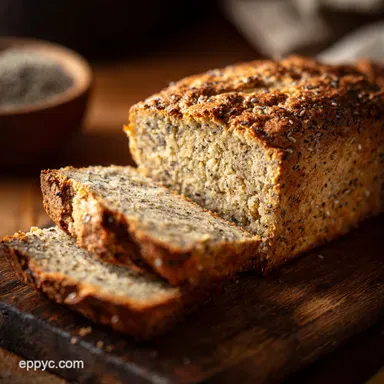
Perfect Pairings: Serving Suggestions for Your Seeded Loaf
This rustic loaf is robust and chewy enough to stand up to heavy toppings and rich flavors. It doesn't dissolve into mush.
- The Ultimate Toast: Thickly sliced, toasted, and slathered with good quality salted butter and a dollop of jam.
- Hearty Dipper: Serve alongside a warming, thick soup or chili.
- Dressing Foundation: This bread dries out beautifully and creates the perfect cubes for rich side dishes like Dressing: The Ultimate Crispy Sage and Butter Bread Dressing . The sturdy crumb holds its shape wonderfully when baked.
- Bruschetta Base: Toast slices under the broiler until golden, rub with garlic, and top with fresh tomato and basil.

Recipe FAQs
Why did my gluten-free loaf turn out too dense and heavy?
This is frequently a hydration issue. Ensure your water is the correct temperature and that the psyllium husk fully gels for the recommended amount of time before you mix in the dry ingredients. Also, check that you did not accidentally overpack the flours when measuring, which often leads to a dense result.
My bread is still crumbly and falls apart when sliced. What went wrong?
Crumbly texture indicates insufficient moisture or inadequate binder activation. Ensure you used the specified amount of apple cider vinegar (ACV), which helps improve the crumb structure and flavor.
Crucially, always let the loaf cool completely at least 90 minutes before attempting to slice it, as heat traps essential moisture.
Can I substitute psyllium husk powder with xanthan gum?
While both are excellent binders, they do not function identically in this recipe. Psyllium husk is absolutely crucial for achieving the elasticity and flexibility needed for a proper sandwich loaf, which mimics the structure of gluten.
Substituting it with xanthan gum will likely result in a flatter loaf that lacks the necessary chewiness and resilience.
What is the best way to store the gluten-free bread to keep it fresh?
gluten-free bread tends to dry out much faster than traditional wheat bread. Once the loaf is completely cooled, store it tightly wrapped in plastic wrap or placed in an airtight container at room temperature for up to three days.
For optimal long term storage, slice the cooled loaf and freeze the individual slices immediately, defrosting as needed.
How can I prevent the top of my loaf from cracking during baking?
Cracking occurs when the exterior crust sets too quickly before the interior has finished expanding. Try increasing the humidity in your oven during the first 20 minutes of baking by placing a shallow pan of water on the rack below the bread pan.
Alternatively, you can score the top of the loaf slightly deeper before baking to control where the steam escapes.
Can I swap the multi grain flour blend for a single gluten-free flour, like brown rice flour?
It is strongly advised against substituting the multi grain blend with a single flour, as this recipe relies on the synergistic blend of starches and proteins for its texture. If you must substitute, use a quality, pre-mixed gluten-free all-purpose flour blend that is specifically designed for yeast baking.
You may need to adjust the hydration slightly depending on the brand used.
Can I make this loaf without seeds or add different flavors (e.g., rosemary)?
Absolutely, the seeds are entirely optional and can be omitted without affecting the fundamental loaf structure. If adding savory flavors, like dried herbs such as rosemary or thyme, mix them directly into the dry ingredients before hydrating the dough.
For sweeter variations, incorporate elements like cinnamon or raisins before the final mix.
Artisan gluten-free Bread Loaf
Ingredients:
Instructions:
Nutrition Facts:
| Calories | 130 kcal |
|---|---|
| Protein | 2.0 g |
| Fat | 0.0 g |
| Carbs | 32.0 g |
