Chocolate Covered Strawberries
- Time: Active 20 mins, Passive 30 mins, Total 50 mins
- Flavor/Texture Hook: Shattering dark chocolate with a juicy center
- Perfect for: Romantic evenings, holiday gifting, or a quick party win
- Create Shattering Snap Chocolate Covered Strawberries
- Why This Dipping Technique Works
- Essential Recipe Timing and Specs
- Sourcing Premium Dipping Elements
- Simple Tools for Better Berries
- The Step-By-Step Coating Method
- Solving Common Dipping Problems
- Flavor Twists and Easy Swaps
- Storage and Freshness Tips
- Perfect Pairings for Your Platter
- Recipe FAQs
- 📝 Recipe Card
Create Shattering Snap Chocolate Covered Strawberries
Imagine the sound of that first bite. It is not a dull thud, but a distinct, crisp crack that gives way to a burst of cold strawberry juice. That is the gold standard we are chasing today.
I have spent way too many nights dealing with "weeping" berries or chocolate that simply slides off like a silk robe on a marble floor. It’s frustrating, right? But honestly, we have all been there.
The trick isn't in expensive equipment or some secret chef's warehouse. It’s about understanding how sugar and fat play together. This Chocolate Covered Strawberries (with Tips!) | Downshiftology approach focuses on the small things, like the humidity in your kitchen and the exact way you wash your fruit.
We've all seen those sad, sweaty berries at grocery stores, and I promise you, we are doing much better than that today.
We are going to use dark chocolate for that sophisticated bitterness, but I’ll show you how to dress it up with white chocolate swirls. This is about taking three simple ingredients and using technology free, heartfelt techniques to create something that looks like it came from a high end boutique.
Let’s get your kitchen smelling like a cacao dream.
Why This Dipping Technique Works
Emulsification Stability: Shortening acts as a stabilizer, preventing the chocolate from becoming too brittle or dull when it hits the cold fruit.
Crystallization Control: Melting the chocolate slowly prevents the cocoa butter from separating, ensuring a glossy finish rather than a chalky, grey bloom.
| Method | Time | Texture | Best For |
|---|---|---|---|
| Microwave | 5 mins | Smooth, glossy | Quick weeknight treats |
| Double Boiler | 10 mins | Very consistent | Large holiday batches |
| Instant Pot | 8 mins | Warm & fluid | Party fondue style |
Getting the temperature right is everything. If the chocolate is too hot, it will cook the outside of the berry, making it mushy and causing it to "leak" juice under the shell. If it’s too cold, it won't dip smoothly. We want that sweet spot where it flows like heavy cream but holds its shape on a spoon.
Essential Recipe Timing and Specs
Before we even touch a strawberry, let's talk about the window of success. You need to be intentional with your timing. If you dip berries that are still cold from the fridge, condensation will form under the chocolate. That moisture is the enemy of a good snap.
It acts like a lubricant, making your beautiful chocolate shell slide right off.
| Goal | Temperature/Time | Visual Cue | Result |
|---|---|---|---|
| Chocolate Melt | 110°F | Flows like honey | Smooth coating |
| Berry Prep | 2 hours | No visible water | Shell stays put |
| Final Set | 30 mins | Matte, non sticky | Crisp, clean snap |
I usually wash my berries first thing in the morning if I'm dipping them in the afternoon. I lay them out on a clean kitchen towel and let them air dry completely. Trust me, even a single drop of water hidden under the green leaves will ruin your whole batch.
- If you want a thick shell, dip the berries twice, letting them set for 5 minutes between coats.
- If you want a matte finish, let them set at room temperature instead of the fridge.
- If you want a glossy shine, use a tiny bit more shortening and a quick chill.
Sourcing Premium Dipping Elements
The quality of your chocolate dictates the entire experience. Since we are only using a few items, don't skimp here. I prefer a dark chocolate with at least 60% cacao. It provides a sophisticated contrast to the natural sweetness of the fruit. If you’re a fan of deeper flavors, you might even enjoy the profile used in a Death by Chocolate recipe which highlights that rich cocoa intensity.
For the Berries
You want 1 lb of fresh strawberries. Look for berries that are bright red all the way to the top. Green shoulders mean they aren't fully ripe and will be tart. Also, keep the stems on! They act as a natural handle for dipping.
For the Coating
We need 8 oz dark chocolate (60% cacao), chopped. Avoid the "chocolate chips" from the baking aisle if possible, as they often contain stabilizers that prevent them from melting smoothly. A bar of good chocolate is much better.
For the Garnish
This is where you can have some fun. Have 2 oz of white chocolate ready for drizzling. You can also use 1 tbsp of crushed nuts or sea salt. That salty sweet combo is a total winner.
| Component | Science Role | Pro Secret |
|---|---|---|
| Dark Chocolate | Structure & Fat | Chop into even pieces for uniform melting |
| Shortening | Viscosity & Shine | Never use butter; the water content will seize the chocolate |
| Strawberries | Acid & Moisture | Keep at room temp to prevent condensation "weep" |
Using vegetable shortening is a classic Covered Strawberries (with Tips!) | Downshiftology trick. It thins the chocolate just enough to make a beautiful, thin coating that doesn't feel waxy. It also gives the chocolate that professional "sheen" that makes people think you bought them from a pro.
Simple Tools for Better Berries
You don't need a fancy tempering machine to make Strawberries (with Tips!) | Downshiftology style treats. I actually prefer a microwave safe glass bowl because it retains heat well, keeping the chocolate fluid longer while you work through the pound of fruit.
A simple parchment lined baking sheet is also non negotiable for easy cleanup.
Chef's Tip: Freeze your metal baking sheet for 10 minutes before you start. When you place the dipped berries on the cold surface, the chocolate sets almost instantly at the base, preventing those "puddles" of chocolate from forming around the bottom.
Another trick I love is using a toothpick. If the stems on your berries are too short or fragile, gently poke a toothpick into the top. This gives you way more control and keeps your fingers clean. It’s all about working smarter, not harder.
The step-by-step Coating Method
Right then, let's crack on with the process. We've got our 1 lb of berries dry and ready. We’ve chopped our 8 oz of dark chocolate. Now we just need to bring them together.
- Prep the tray. Line a large baking sheet with parchment paper or a silicone mat. Note: This prevents sticking and makes the "feet" of the chocolate easy to snap off later.
- Melt the base. Place the dark chocolate and 1 tsp shortening in a glass bowl. Microwave in 30 second bursts, stirring between each, until smooth and velvety.
- Prepare the drizzle. Melt the 2 oz white chocolate in a separate small bowl using the same 20 second burst method. Note: White chocolate burns much faster than dark chocolate, so be careful.
- Hold the stem. Grab a strawberry by the green leaves or the stem. Pull the leaves back slightly so you can get the chocolate close to the top.
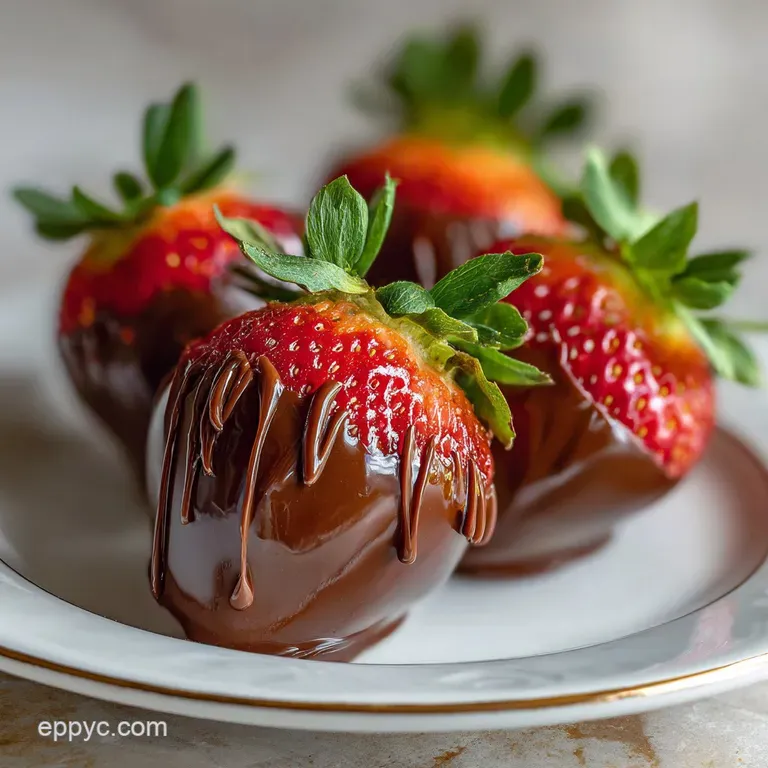
- The deep dip. Submerge the berry into the dark chocolate, swirling it slightly to cover all sides until evenly coated up to the shoulders.
- The drip and drag. Lift the berry out and let the excess chocolate drip back into the bowl. Drag the bottom of the berry across the rim of the bowl. Note: This prevents that big pool of chocolate from forming on your tray.
- Lay it down. Place the berry gently on the parchment paper. Repeat with the remaining Strawberries (with Tips!) | Downshiftology.
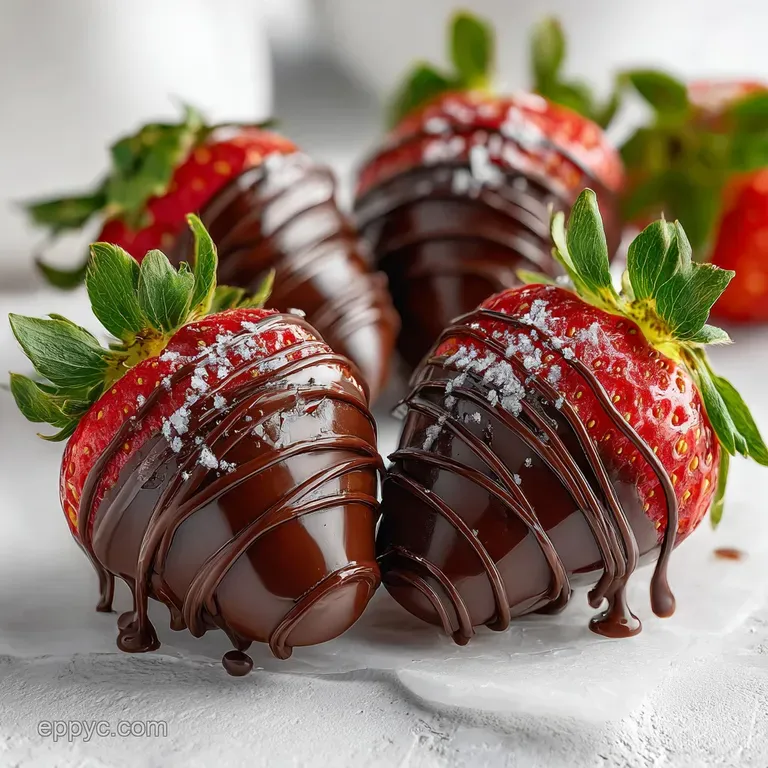
- Drizzle with flair. Dip a fork into the melted white chocolate and flick it back and forth over the dark berries until a striped pattern emerges.
- Add the crunch. If using the 1 tbsp crushed nuts or sea salt, sprinkle them on while the chocolate is still wet.
- Final set. Let the berries sit at room temperature for 15 minutes, then move them to the fridge for 30 minutes until the shells are firm and matte.
The white chocolate drizzle adds such a professional look. If you like the idea of alternative coatings, you might want to look at a How to Dip recipe for a different twist on the classic fruit dip. It’s a great way to expand your repertoire once you've mastered the basics here.
Solving Common Dipping Problems
Even with the best intentions, chocolate can be finicky. I once tried to rush the drying process and ended up with a bowl of "seized" chocolate that looked like grainy mud. It happens to the best of us! The key is not to panic. Most of these issues are easily fixed if you know what caused them.
Why Your Chocolate Seized
If a single drop of water gets into your melting chocolate, it will turn into a gritty, clumpy mess. This is called seizing. It happens because the water causes the sugar and cocoa particles to clump together. To fix it, you can actually add a teaspoon of boiling water and stir vigorously.
It sounds counterintuitive, but it helps re emulsify the mixture, though it won't be quite as glossy.
Preventing Sliding Shells
If the chocolate is sliding off the berry, it’s usually because the fruit was either too cold or too wet. If this happens mid batch, stop and pat your remaining berries with a fresh paper towel. Also, check the temperature of your chocolate.
If it’s too thin and hot, it won't grip the skin of the fruit effectively.
| Problem | Root Cause | Solution | | :--- | :--- | :--- : | | Dull or grey chocolate | Heat shock or high humidity | Melt slowly and avoid the fridge for the first 10 mins | | Chocolate "sweating" | Temperature transition | Let berries come to room temp before serving | | Grainy texture | Overheated
chocolate | Add a tiny bit of shortening and stir away from heat |
Common Mistakes Checklist
- ✓ Never wash berries right before dipping; they need hours to air dry.
- ✓ Don't use milk chocolate chips for the base; they are too soft to snap.
- ✓ Avoid crowding the tray; berries shouldn't touch or they will stick together.
- ✓ Stop the microwave early; residual heat will finish melting the last few chunks.
- ✓ Keep your work area cool; a hot kitchen makes the setting process a nightmare.
Flavor Twists and Easy Swaps
Once you have the foundation of these (with Tips!) | Downshiftology favorites, you can start experimenting. I love adding a pinch of espresso powder to the dark chocolate to deepen the flavor.
It makes the whole thing feel much more "grown up." You can also play with the base ingredients if you have dietary needs or just want a change of pace.
For a larger crowd, you’ll want to scale up. For 2 lbs of berries, I usually double the chocolate but only increase the shortening by 50%. This keeps the chocolate from getting too thin.
If you’re making a huge batch, work in smaller bowls so the chocolate doesn't cool down too much before you reach the end of the berries.
| Original Ingredient | Substitute | Why It Works |
|---|---|---|
| Dark Chocolate | Semisweet Chocolate | Slightly sweeter but still sets firmly. |
| Vegetable Shortening | Coconut Oil (solid) | Provides a similar sheen. Note: Adds a slight coconut flavor and melts faster at room temp. |
| White Chocolate | Melted Peanut Butter | Adds a salty, creamy contrast. Note: Won't set as hard as white chocolate. |
I've also seen people use crushed candy canes during the holidays or even toasted coconut. The possibilities are endless when you have a solid chocolate base.
Storage and Freshness Tips
Chocolate covered fruit is a "day of" treat. I wish I could tell you they last for a week, but the reality is that strawberries are mostly water. Once they are picked, they start to break down.
The sugar in the chocolate also draws moisture out of the berry, which is why you see that "syrup" leaking out after 24 hours.
Store your berries in a single layer in a container lined with paper towels. The paper towel absorbs any extra moisture. Don't seal the lid tightly; leave it cracked a bit so air can circulate.
They will stay fresh in the fridge for about 1 to 2 days, but they are honestly best within 8 hours of dipping.
Zero Waste Tip: If you have leftover chocolate in the bowl, don't throw it out! Stir in some pretzels, raisins, or even the "ugly" berries that were too small to dip. Spread it on parchment paper to make a quick "kitchen sink" chocolate bark.
You can also use leftover berries in a smoothie or as a topping for oatmeal the next morning.
There is a common myth that you must use a double boiler for perfect results. That's just not true anymore. Modern microwaves are perfectly capable if you use low power and stir often. Another myth is that freezing the berries makes them last longer don't do it!
Freezing destroys the cell structure of the strawberry, and when it thaws, you’ll just have a puddle of mush inside a chocolate shell.
Perfect Pairings for Your Platter
These berries are a standout on their own, but they really shine when part of a larger spread. If you're hosting a dinner party, I love serving them alongside a light mousse or a sharp cheese board.
The acidity of the berries and the richness of the chocolate play beautifully with a piece of aged white cheddar or a creamy brie.
For a romantic vibe, pair them with a dry sparkling wine. The bubbles cut right through the fat of the dark chocolate, cleansing your palate for the next bite. If you're going for a full dessert spread, they look stunning next to white frosted cupcakes or even a simple vanilla bean panna cotta.
If you are a true chocolate lover, consider adding these to a plate with other homemade treats. They would be the perfect fresh counterpart to something like a rich pudding or even some homemade fudge.
This recipe is really about bringing that heartfelt, handmade touch to your table, empowering you to create something truly elegant with very little fuss. Enjoy every bite!

Recipe FAQs
Can I use frozen strawberries for chocolate covered strawberries?
No, stick with fresh. Frozen berries release a lot of moisture when thawed, which will cause the chocolate to seize and prevent it from adhering properly.
How do I melt chocolate for dipping without it seizing?
Melt chocolate slowly and gently, avoiding water. Use a microwave on 50% power in 20-second intervals, stirring between each, or a double boiler over simmering, not boiling, water.
Why is my chocolate shell sliding off the strawberries?
The strawberries were likely too cold or still wet. Ensure berries are at room temperature and completely dry before dipping; cold fruit causes condensation, and residual moisture prevents the chocolate from gripping.
How can I get a glossy finish on my chocolate covered strawberries?
Add a small amount of vegetable shortening or coconut oil. This thins the chocolate, helps it flow smoothly, and contributes to a professional sheen once set.
Is it true I must use a double boiler for white chocolate?
No, this is a common misconception. White chocolate can be easily melted in the microwave at 50% power, stirring frequently, as it's more prone to scorching than dark chocolate.
How far in advance can I make chocolate covered strawberries?
Best made within 6-8 hours of serving for optimal texture. While they can be made up to 24 hours ahead and refrigerated, the moisture from the strawberries can eventually cause the chocolate to "sweat" or soften.
What's the best way to store chocolate covered strawberries?
Store them in a single layer in a cool, dry place, or in the refrigerator. If refrigerating, place them in an airtight container with a paper towel to absorb moisture, and let them come to room temperature slightly before serving.
Chocolate Covered Strawberries

Ingredients:
Instructions:
Nutrition Facts:
| Calories | 74 kcal |
|---|---|
| Protein | 0.8 g |
| Fat | 4.5 g |
| Carbs | 7.7 g |
| Fiber | 1.2 g |
| Sugar | 5.8 g |
| Sodium | 3 mg |
