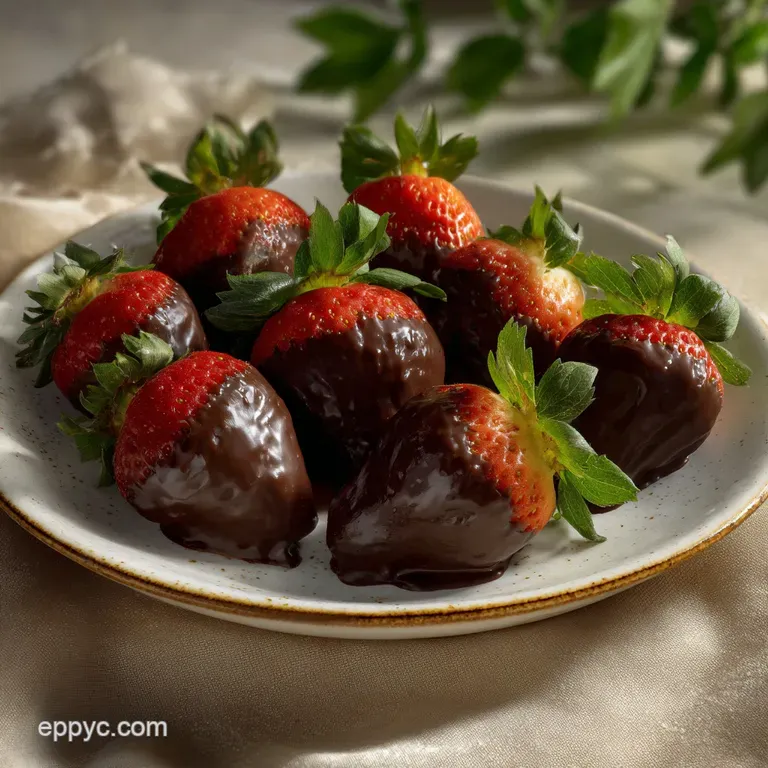
Best Chocolate Covered Strawberries Recipe
- Time: Active 15 minutes, Passive 5 minutes, Total 20 minutes
- Flavor/Texture Hook: Velvety dark chocolate with a crisp, shatter like shell
- Perfect for: Romantic evenings, holiday gifting, or a joyful weekend treat
- Mastering the BEST Chocolate Covered Strawberries recipe
- The Science of Why it Works
- Essential Recipe Success Metrics
- Choosing the Finest Ingredients
- Necessary Tools for Pastry Art
- Executing the Flawless Dip
- Resolving Common Dipping Issues
- Artistic Garnish and Color Ideas
- Guidelines for Preserving Freshness
- Exquisite Pairings and Serving Ideas
- Recipe FAQs
- 📝 Recipe Card
Mastering the BEST Chocolate Covered Strawberries recipe
Imagine the sound of a thin chocolate shell beginning to shatter between your teeth, revealing a cold, juicy berry that bursts with sweetness. That specific, joyful moment is what we're chasing today. I remember the first time I tried this; I was so impatient that I dipped wet berries into overheated chocolate.
The result was a grainy, sliding mess that looked nothing like the glossy jewels you see in high end pastry shops. It was a lesson in patience and the fine art of temperature control, but once I figured it out, there was no going back.
The secret isn't just in the chocolate you buy, but in how you treat the fruit before it ever touches the bowl. We are creating a edible piece of art where color balance and garnish strategy take center stage.
You don't need a professional kitchen to achieve a mirror like finish; you just need to understand how chocolate behaves when it meets a tiny bit of coconut oil and a perfectly dry strawberry. Trust me, the difference between "homemade" and "handcrafted" is all in these tiny details.
We are going to focus on creating a visual masterpiece. We’ll use dark chocolate as our deep, moody canvas, then bring it to life with vibrant white chocolate drizzles and textured garnishes. If you’ve ever felt intimidated by tempered chocolate, don't worry.
We’re using a "cheater’s temper" that gives you all the shine without the thermometer stress. It’s about bringing joy back into the kitchen and making something that looks almost too good to eat. Almost.
The Science of Why it Works
Fat Stabilization: Coconut oil introduces refined fats that lower the chocolate's melting point, creating a velvety mouthfeel and a high gloss finish. Hydrophobic Barrier: Chocolate is oil based and repels water; ensuring the strawberry skin is completely dry prevents the shell from "seizing" or sliding off the fruit.
| Method | Time | Texture | Best For |
|---|---|---|---|
| Stovetop | 8 minutes | Ultra smooth | Large batches where consistent heat is vital |
| Oven (Low) | 12 minutes | Thick & rich | Melting chocolate slowly without risk of water steam |
Choosing your melting method is the first step in your creative process. While the microwave is fast, the stovetop double boiler provides a level of control that truly helps in achieving that professional luster. If you enjoy the process of crafting intricate desserts, you might find the same joy in my Cheesecake Stuffed Strawberries recipe which uses a similar fruit focused technique.
Essential Recipe Success Metrics
| Component | Science Role | Pro Secret |
|---|---|---|
| Dark Chocolate | Structure & Snap | Use 60% cocoa for the most reliable setting properties |
| Coconut Oil | Viscosity Control | Refined oil adds shine without altering the berry flavor |
| Fresh Berries | Moisture Source | Keep stems long to act as a natural dipping handle |
Success in this BEST Chocolate Covered Strawberries recipe depends on the quality of your base. When we talk about the "snap," we are looking for the sound of well set cocoa butter. If the chocolate is too soft, it won't hold the garnishes; if it's too brittle, it will flake off in chunks.
The balance of these three elements is what creates the perfect bite. It's much like the logic behind a great Evaporated Milk Chocolate recipe, where the ratio of fats to solids determines the final luxury of the texture. Once you have your ingredients prepped, the artistry can truly begin.
Choosing the Finest Ingredients
- 1 lb fresh strawberries: Look for firm, bright red fruit. Why this? Overripe berries leak juice, which causes the chocolate shell to soften prematurely.
- 8 oz high-quality dark chocolate: Chopped finely for even melting. Why this? Higher cocoa butter content ensures a thinner, more elegant coating.
- 1 tsp refined coconut oil: Solid at room temperature. Why this? It provides a professional sheen and helps the chocolate flow smoothly.
- 2 oz white or milk chocolate: For the decorative drizzle. Why this? Provides a high contrast visual that highlights the strawberry's natural shape.
For the dark chocolate, you can substitute 8 oz of semi sweet chocolate chips, though the result will be slightly sweeter and thicker. If you don't have coconut oil, use 1 tsp of vegetable shortening; it helps with the shine but lacks the subtle melting quality of coconut.
For the decorative drizzle, colored candy melts work beautifully if you want to match a specific party theme, though they won't have the same rich flavor as real white chocolate.
Necessary Tools for Pastry Art

To treat this like a true pastry project, you'll need a few specific items. A small, deep glass bowl is better than a wide one because it allows for a deeper "plunge" when dipping the berries. You will also need parchment paper or a silicone baking mat to ensure the berries don't stick as they set.
I always keep a few disposable piping bags or even just a small zip top bag on hand for the drizzle. This is where the artistry happens! A toothpick is also a secret weapon for fixing any tiny bubbles or dragging the drizzle into beautiful marble patterns.
If you're feeling particularly artistic, a small kitchen brush can be used to flick "gold dust" or edible glitter onto the finished fruit for a show stopping effect.
Executing the Flawless Dip
Phase 1: Bone Dry Prep
Wash your 1 lb of strawberries in cold water, then pat them dry with a lint free towel. Note: They must sit at room temperature for at least 30 minutes until every trace of moisture has evaporated from the skin.
Phase 2: Gentle Microwave Melting
Place 8 oz of chopped dark chocolate and 1 tsp of coconut oil in a glass bowl. Heat in 20 second bursts, stirring vigorously between each, until the chocolate is 90% melted. The residual heat will finish the job.
Phase 3: The Deep Dip
Hold a strawberry by the green stem and submerge it into the dark chocolate. Cook for 3 seconds while slowly rotating the berry to ensure a thick, even coat up to the shoulders.
Phase 4: The Twist and Lift
Lift the berry straight up and give it a gentle shake, then a quick twist. Wait 5 seconds for the excess to drip off before placing it on the parchment paper.
Phase 5: The Primary Drizzle
Melt the 2 oz of white chocolate and snip a tiny corner off your piping bag. Sweep the bag back and forth over the berries in a fluid, continuous motion.
Phase 6: The Color Accent
While the drizzle is still tacky, add your first color accent, like crushed emerald green pistachios. Note: Adding texture while wet ensures the garnish stays bonded to the shell.
Phase 7: The Final Polish
Add a second accent, perhaps a few grains of gold sanding sugar, to catch the light. Wait 10 minutes before moving to the next phase to let the patterns stabilize.
Phase 8: The Setting Stage
Place the tray in the refrigerator for exactly 15 minutes. Cook until the chocolate is matte and firm to the touch, then remove immediately to prevent condensation.
Resolving Common Dipping Issues
Avoiding Grainy Chocolate Mess
This usually happens when a single drop of water enters the bowl. This is called "seizing," and it turns your silky liquid into a gritty paste. To fix it, you can sometimes whisk in a tiny bit more coconut oil, but it’s best to prevent it by keeping your workspace completely dry.
Fixing the Sweat Issue
If you see tiny beads of water on your finished berries, they’ve been in the fridge too long or the room is too humid. The temperature shock causes moisture in the air to cling to the cold chocolate. I always suggest letting the berries set in a cool, dry room instead of the fridge if you have the time.
Achieving a Professional Gloss
If your chocolate looks dull, it likely got too hot. Chocolate is temperamental! If you don't use a thermometer, just make sure you stop heating the chocolate while there are still a few solid chunks left. The stirring process is actually what helps align the fat crystals for that mirror finish.
| Problem | Root Cause | Solution |
|---|---|---|
| Chocolate Sliding | Wet fruit or warm berries | Pat dry and ensure fruit is room temp, not cold |
| Thick & Lumpy | Overheating the chocolate | Add 1/2 tsp coconut oil and stir rapidly |
| White Streaks | Fat bloom from temp shock | Avoid the freezer; use a gradual cool down |
Common Mistakes Checklist
- ✓ Never dip cold berries directly from the fridge (condensation will form).
- ✓ Avoid using a wooden spoon to stir; it can hold onto hidden moisture.
- ✓ Don't skip the coconut oil - it's the key to that thin, elegant shell.
- ✓ Ensure the parchment paper is flat to prevent "chocolate feet" at the base.
- ✓ Let the berries air dry for at least 30 minutes after washing.
Artistic Garnish and Color Ideas
For a truly artistic approach, think about your color palette. I love using a "Triple Threat" garnish strategy: one for color, one for texture, and one for shimmer. For example, use white chocolate for the color, crushed freeze dried raspberries for the texture, and a touch of edible gold leaf for the shimmer.
It creates a layer of depth that makes the BEST Chocolate Covered Strawberries recipe feel like a gift.
If you are scaling this recipe up for a large party (2x or 3x the batch), remember that you’ll need to work in smaller sub batches. Chocolate stays at the perfect dipping temperature for only about 10-15 minutes.
If you have 3 lbs of berries to dip, melt the chocolate in three separate stages so it doesn't thicken and become difficult to manage halfway through.
When scaling down for a solo treat, you can easily use just 4 oz of chocolate and half a pound of berries. Just be sure to use a very small, narrow bowl (like a ramekin) so the chocolate is deep enough to submerge the berries. For another chocolate centered delight that scales beautifully, check out this Chocolate Dipped Vanilla Ice recipe.
Guidelines for Preserving Freshness
Storage Guidelines
These are best enjoyed the day they are made. However, you can store them in the fridge for up to 24 hours. Place them in a single layer in a container lined with paper towels to absorb any escaping moisture.
Do not cover the container tightly; a bit of airflow prevents the "sweating" that ruins the glossy finish.
Zero Waste Tips
If you have leftover melted chocolate, don't toss it! Pour it onto a piece of parchment, sprinkle with any leftover crushed nuts or fruit, and let it set into a "pantry bark." You can also dip the remaining strawberry leaves or even small pretzels into the leftovers. Nothing goes to waste in a joyful kitchen!
Exquisite Pairings and Serving Ideas
To make these berries truly sing, serve them alongside a crisp glass of sparkling wine or a cold glass of milk. The acidity of the wine cuts through the richness of the dark chocolate beautifully. If you're hosting a brunch, these look stunning arranged around a central bowl of whipped mascarpone.
The Myth of the Freezer
Many people think the freezer is the fastest way to set chocolate. While it is fast, it's also the fastest way to ruin your hard work. The extreme cold causes the cocoa butter to separate, leading to those ugly white streaks known as "fat bloom." A gentle 15 minute chill in the fridge is all you need for that professional snap.
The "Drip Free" Dipping Myth
You might hear that you need a special fork to dip berries. Honestly, your hands are your best tools. Holding the stem gives you much better control over the angle and the "swirl" than any metal tool ever could. Plus, it’s more fun!
Right then, let's get those berries drying! This recipe is as much about the process as the result. Whether you're making them for a loved one or just to brighten your own afternoon, the artistry involved is a pure expression of joy.
Once you see that first tray of glossy, decorated berries, you'll see why I call this the BEST Chocolate Covered Strawberries recipe I've ever shared. Happy dipping!

Recipe FAQs
What is the secret to chocolate covered strawberries?
Dry strawberries and proper chocolate temperature are key. Moisture causes the chocolate to seize, and incorrect temperature leads to dull or grainy coatings. Achieving a shatter like snap and a glossy finish relies on these two fundamentals, much like mastering the emulsification in a dressing.
What kind of chocolate is best for chocolate covered strawberries?
high-quality dark chocolate with at least 60% cocoa content. This provides the best flavor, snap, and melting properties. Higher cocoa butter content leads to a thinner, more elegant coating and better gloss.
How to make the best chocolate coated strawberries?
Start with perfectly dry, room temperature strawberries. Gently melt high-quality dark chocolate with a touch of refined coconut oil, then dip each berry, allowing excess to drip off before placing on parchment paper.
Drizzle with white chocolate while the dark coating is still tacky, and chill briefly to set.
Should strawberries be warm or cold before dipping in chocolate?
Room temperature is ideal; avoid both warm and cold. Cold strawberries will cause condensation when they meet the warmer chocolate, leading to a dull finish or chocolate "sweating." Warm berries will melt the chocolate too quickly, creating a messy dip.
Can I use frozen strawberries?
No, stick with fresh. Frozen berries release too much moisture when thawed, making it impossible to get a clean, crisp chocolate shell. This moisture issue is similar to why you can't use watery fruit in certain baked goods; it disrupts the texture.
How long do chocolate covered strawberries last?
They are best enjoyed the same day they are made. For optimal freshness, store them in a single layer in a container lined with paper towels in the refrigerator for up to 24 hours, ensuring they are not tightly covered to prevent condensation.
What causes the white streaks on chocolate covered strawberries?
This is usually fat bloom, caused by temperature fluctuations. It happens when the cocoa butter separates from the chocolate due to extreme cold (like in the freezer) or rapid temperature changes. A gentle chill in the refrigerator is best for setting.
Chocolate Covered Strawberries 2

Ingredients:
Instructions:
Nutrition Facts:
| Calories | 77 kcal |
|---|---|
| Protein | 1.0 g |
| Fat | 5.1 g |
| Carbs | 7.2 g |
| Fiber | 1.4 g |
| Sugar | 4.6 g |
| Sodium | 2 mg |
