Recipe for Chicken in a Dutch Oven with Garlic
- Time: Active 15 minutes, Passive 45 minutes, Total 1 hour
- Flavor/Texture Hook: Shatter crisp skin with velvety, garlic infused pan juices
- Perfect for: High impact weeknight dinners or hands off Sunday roasting
- Achieving Excellence with this Recipe for Chicken in a Dutch Oven with Garlic
- Understanding the Essential Elements
- Preparing the Necessary Kitchen Tools
- Step-by-Step Guide to the Perfect Roast
- Troubleshooting Common Roasting Challenges
- Adjusting the Recipe for Different Crowds
- Creative Flavor Adaptations and Swaps
- Managing Your Kitchen Success
- Debunking Common Roasting Myths
- Perfect Pairings for Your Garlic Chicken
- Addressing Your Roasting Questions
- Recipe FAQs
- 📝 Recipe Card
There is nothing quite like the sizzle of chicken thighs hitting a hot, buttered pot. That sound a violent, happy crackle is the first sign that you're about to eat something truly special.
For years, I struggled with poultry that was either rubbery or bone dry, but then I started using heavy cookware to bridge the gap between frying and roasting.
This recipe for chicken in a Dutch oven with garlic and herbs delivers a flavorful, one pot meal. It solves the "soggy skin" problem by using a two stage heat method that first seals the fats and then renders them into a liquid gold sauce.
We’ve all been there, staring at a bland bird in a glass tray, wishing for more depth; this pot method is the technology that fixes that forever.
Honestly, don't even bother with boneless breasts for this one. You need the bone and the skin to stand up to the radiant heat of the pot. We're going to empower your inner chef today by turning basic budget friendly staples into a dinner that looks like a million bucks. Let's crack on.
Achieving Excellence with this Recipe for Chicken in a Dutch Oven with Garlic
The magic of this dish lies in how we manipulate heat and moisture within a sealed environment. When you use heavy duty cookware like a Le Creuset or a Lodge, you aren't just baking; you're creating a micro climate where the protein can undergo several transformations simultaneously.
- Collagen Conversion: Sustained heat at 160°F to 180°F converts tough connective tissues into silky gelatin, creating that "melt in-your mouth" texture.
- Aromatic Infusion: Garlic compounds are fat soluble, meaning the butter and oil act as a digital speed delivery system for flavor directly into the meat fibers.
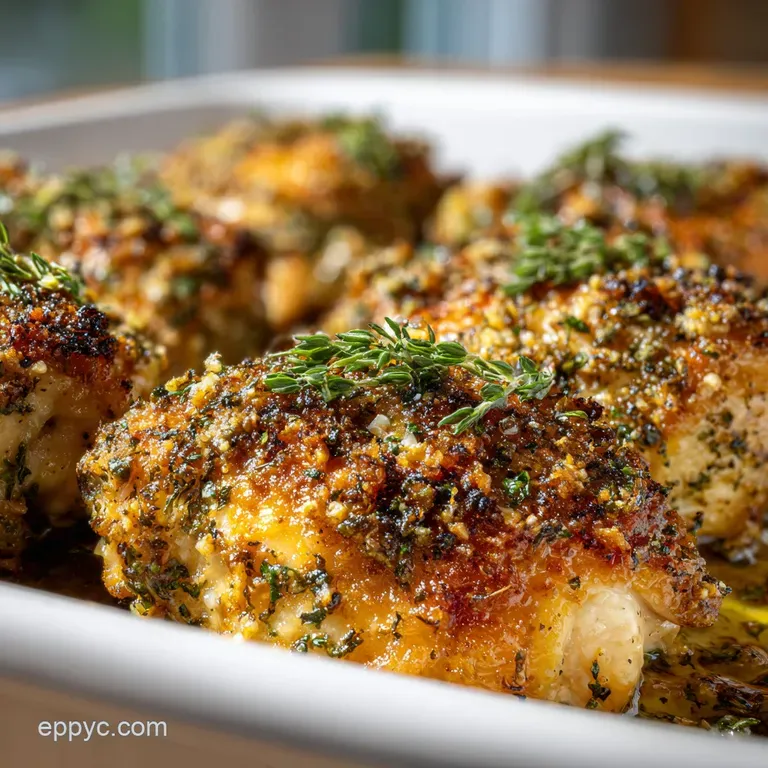
- Maillard Reaction: The high contact heat of the initial sear creates complex sugars on the skin, resulting in deep savory notes and a golden brown finish.
- Thermal Momentum: The thick walls of the pot maintain a steady temperature even when the oven door is opened, preventing the "stalled" cooking that ruins tenderness.
Harnessing Radiant Heat Retention
Heavy cast iron stores massive amounts of energy. Unlike thin stainless steel, it doesn't drop in temperature the second cold meat touches it. This means we get an immediate, aggressive sear that locks in the natural juices.
It's the most efficient way to cook because the heat comes from all sides the bottom, the heavy lid, and the thick walls.
Managing the Maillard Reaction
To get that deep bronze color, the surface of the chicken must reach 285°F. If the meat is wet, it will steam instead of sear. I've learned the hard way that a quick pat down with a paper towel is the difference between a sad, grey thigh and a crispy masterpiece.
Trust me on this: dry skin is the secret to success.
Collagen Conversion for Tenderness
Using bone in thighs is a smart move for your budget and your palate. The bone acts as an insulator, slowing down the internal temperature rise so the fat has time to render completely. This is very similar to the technique used in our Hearty Beef Bourguignon recipe, where slow, steady heat transforms the texture of the meat.
| Ingredient | Science Role | Pro Secret |
|---|---|---|
| Bone in Thighs | Insulation & Gelatin | Leave the skin on for a natural fat cap basting |
| Head of Garlic | Steam & Aromatics | Halve it crosswise to expose the "honey" of the cloves |
| Dry White Wine | Deglazing & Acidity | Use the steam to loosen caramelized bits (fond) |
One thing I've noticed is that people often underestimate the power of a good deglaze. When that wine hits the hot iron, it lifts all those burnt looking bits off the bottom. Those bits are actually concentrated flavor nuggets that make your sauce velvety.
Understanding the Essential Elements
When I first started cooking, I’d buy whatever was on sale without thinking about how the ingredients interact. For this dish, we are looking for a balance of fat, acid, and heavy aromatics. It's a budget friendly list, but we're going to treat these ingredients with the respect of a gourmet feast.
| Original Ingredient | Substitute | Why It Works |
|---|---|---|
| Unsalted Butter | Ghee | Higher smoke point but still provides that rich, nutty dairy flavor |
| Dry White Wine | Bone Broth + 1 tsp Vinegar | Replicates the acidity and depth without the alcohol content |
| Fresh Rosemary | Dried Thyme (1/2 amount) | Provides an earthy, woodsy punch, though lacks the floral fresh notes |
If you're out of fresh herbs, don't panic. Just remember that dried herbs are more concentrated. Use about a third of what the recipe calls for in fresh. But if you can, grab the fresh stuff the aroma while it's roasting is basically free therapy.
The Poultry
We are using 1 kg bone in, skin on chicken thighs (approx. 4 to 6 pieces). Why thighs? They are more forgiving than breasts. If you overcook a breast by five minutes, it’s a shoe; if you overcook a thigh, it’s just more tender. It’s the ultimate digital safety net for home cooks.
The Garlic Herb Compound Rub
This is where the flavor lives. You’ll need 56g unsalted butter, softened, 6 cloves garlic, minced, 1 tbsp fresh rosemary, finely chopped, 1 tbsp fresh thyme leaves, and 1/2 tsp smoked paprika.
We are also adding 1 tsp fine sea salt and 1/2 tsp cracked black pepper for basic seasoning.
The Aromatic Base
To build the foundation, we use 15ml extra virgin olive oil, 1 large yellow onion, thickly sliced, and 1 head garlic, halved crosswise.
These act as a "roasting rack" for the chicken, keeping it off the direct floor of the pot so the bottom doesn't burn while the skin crisps up. Finally, 120ml dry white wine or low sodium chicken bone broth provides the moisture for the braise.
Preparing the Necessary Kitchen Tools
You don't need a kitchen full of gadgets, but a few specific items will make your life significantly easier. Since we are focusing on a budget smart approach, I recommend investing in one good piece of cast iron that will last your entire life.
- Dutch Oven (5-6 quart): I personally use a Lodge or a Le Creuset. The heavy lid is non negotiable for trapping the steam.
- Tongs: Long handled ones are best so you don't get splattered with hot fat during the searing phase.
- Small Mixing Bowl: For mashing that herb butter together.
- Meat Thermometer: The digital ones are best. You're looking for an internal temp of 165°F to 175°F for thighs.
Chef's Note: If you don't have a Dutch oven, you can use a heavy stainless steel pot with a tight lid, but you may need to check the liquid levels halfway through as they tend to lose moisture faster.
step-by-step Guide to the Perfect Roast
Let’s get into the nitty gritty. This is where the digital precision meets heartfelt cooking. Follow these steps closely, and I promise your kitchen will smell like a five star bistro in about twenty minutes.
1. Preparing the Herb Composite
In a small bowl, mash together the 56g softened butter, 6 cloves minced garlic, rosemary, thyme, paprika, salt, and pepper.
Note: This creates a concentrated flavor paste that won't slide off the meat. Use your fingers to rub this under the skin of each of the 1 kg chicken thighs. This ensures the flavor penetrates the meat, not just the skin.
2. Achieving the Perfect Sear
Heat 15ml olive oil in your Dutch oven over medium high heat. Place the chicken skin side down. Note: Don't crowd the pot; work in batches if you have to. Sear for 5-7 minutes until the skin is golden brown and releases easily from the pan. If it's sticking, it's not ready yet.
Let it develop that "shatter" texture. Remove the chicken and set aside on a plate.
3. Building the Flavor Foundation
In the same pot (don't you dare wash out those brown bits!), add the thickly sliced yellow onion and the halved head of garlic (cut side down). Cook for 2 minutes until the onions begin to soften and the garlic faces are charred.
This is the heartbeat of the dish.
4. Roasting to Juicy Perfection
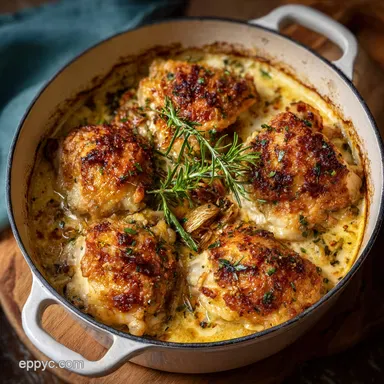
Pour in the 120ml white wine or broth, using a wooden spoon to scrape up all the caramelized bits from the bottom. Place the chicken back in, skin side UP, sitting on top of the onions and garlic. Note: Keeping the skin above the liquid line is vital for crunch.
5. The Oven Transition
Cover the pot with the lid and slide it into a preheated 400°F (200°C) oven. Bake for 30 minutes. At this point, the meat is cooking through and absorbing all those garlic fumes.
6. The Final Crisp
Remove the lid for the final 10-15 minutes of cooking. Note: This allows the skin to re crisp after the steaming phase. Roast until the internal temperature hits 165°F and the skin looks crackly and vibrant.
7. Resting and Serving
Transfer the chicken to a platter and let it rest for 5 minutes. Note: This allows the juices to redistribute so they don't run out when you bite in. Squeeze the roasted garlic cloves out of their skins they will be soft like butter and smear them over the chicken or a piece of crusty bread.
Troubleshooting Common Roasting Challenges
Even the best of us hit a snag now and then. I remember the first time I tried this; I didn't dry the chicken well enough, and it ended up looking like it had been boiled. Not exactly the "empowered cook" vibe I was going for!
Why Your Chicken Skin is Soggy
The most common cause is too much liquid or not enough air circulation. If you submerge the chicken in the broth, the skin will never crisp. It needs to sit atop the aromatics like it's on a throne. Also, skipping the lid off stage at the end is a cardinal sin.
That final blast of dry heat is what gives you that "shatter" effect.
Avoiding Burnt Garlic Bitterness
Garlic turns bitter if it burns. When searing the chicken, make sure there aren't loose bits of minced garlic in the pan too early. That's why we put the minced garlic under the skin and use the whole head for the base it's much harder to burn a whole head of garlic than a tiny mince.
| Problem | Root Cause | Solution |
|---|---|---|
| Skin is limp and pale | Not enough initial sear or too much steam | Increase searing time; ensure lid is removed for final 10 mins |
| Meat is dry/stringy | Overcooked or using boneless breasts | Use a thermometer; switch to bone in thighs for more fat |
| Sauce is too thin | Not enough reduction during cooking | Simmer the pan juices on the stove for 5 mins while chicken rests |
If your sauce feels a bit weak, you can always whisk in a teaspoon of cold butter at the very end. It's a classic French trick that adds a velvety sheen and deepens the flavor profile instantly. It’s similar to the finishing touch in a Classic Chicken Francaise Recipe.
Adjusting the Recipe for Different Crowds

Scaling this recipe is fairly straightforward because the pot does most of the work. If you are cooking for a larger group, you might need to move beyond a single Dutch oven or adjust your liquid ratios.
- Scaling Down (Cooking for 2): Use half the chicken but keep the onion and garlic amounts the same. The aromatics are the "sacrificial layer" that protects the meat, and having plenty of sauce is never a bad thing.
- Scaling Up (Feeding 8): Use a larger 7 quart pot. Do not double the wine/broth; only increase it by about 50% (180ml). Too much liquid will turn your roast into a soup.
- Numeric Checkpoints:
- Searing: 425°F surface temp of the oil.
- Internal Temp: 175°F (for thighs) is actually better than 165°F as it breaks down more collagen.
- Resting: Exactly 5-8 minutes.
For those who need a quicker version versus the classic method, here is a quick look at the trade offs:
| Feature | Fast (Skillet Only) | Classic (Dutch Oven) |
|---|---|---|
| Time | 25 minutes | 1 hour |
| Texture | Crispy but can be dry | Ultra tender, fall off-bone |
| Sauce | Thin pan sauce | Concentrated, rich jus |
Creative Flavor Adaptations and Swaps
Once you have the base technique down, you can start digital tuning this recipe to fit your mood. This is the part where we get to be innovative. I often swap out the rosemary for cilantro and lime if I'm feeling like something brighter.
The Zesty Mediterranean Twist
Swap the rosemary for dried oregano and add a handful of kalamata olives and halved cherry tomatoes to the pot before roasting. The tomatoes will burst and create a jammy, acidic sauce that pairs beautifully with the garlic.
The Smoky Spicy Kick
Double the smoked paprika and add a sliced jalapeño (seeds removed) to the onion base. This gives the chicken a beautiful reddish hue and a lingering warmth that isn't too overpowering. It's a great way to use budget friendly spices to change the whole vibe.
The Paleo Friendly Modification
If you are avoiding dairy, swap the butter for ghee or extra virgin coconut oil. Coconut oil will add a very slight sweetness, which actually works surprisingly well with the garlic and thyme. Just make sure to use the "refined" version if you don't want a tropical aroma.
Decision Shortcut: If you want a crispier skin, sear for 2 minutes longer than you think you should. If you want a richer sauce, use bone broth instead of wine.
If you want a faster cleanup, use a parchment paper liner (though you'll lose some sear quality).
Managing Your Kitchen Success
One of the best things about this recipe is how well it behaves the next day. In fact, some people argue the sauce is even better after 24 hours in the fridge because the garlic has more time to mellow and meld with the chicken fats.
Storage and Zero Waste
Store leftovers in an airtight container in the fridge for up to 4 days. When reheating, do it in a pan on the stove with a splash of water to keep it from drying out. You can freeze the cooked chicken for up to 3 months, but be aware that the skin will lose its crunch.
Zero Waste Tip: Don't toss that garlic onion wine sludge at the bottom of the pot! Blend it up with a little more broth to create a "gravy" for mashed potatoes the next night. Also, save the chicken bones in a bag in your freezer. Once you have a few pounds, you can make the best How to Make recipe base (stock) you've ever tasted.
Debunking Common Roasting Myths
We’ve all heard "old wives' tales" about cooking chicken, but let's look at the actual physics of what's happening in your Dutch oven.
- Myth 1: Searing "seals in" the juices. This is scientifically false. Searing actually causes moisture loss on the surface. We do it for flavor (Maillard reaction) and texture, not for juiciness. The juiciness comes from not overcooking the internal meat.
- Myth 2: You must wash your chicken before cooking. Please don't. This just sprays bacteria all over your sink. The heat of the oven will kill anything on that chicken much more effectively than tap water ever could.
- Myth 3: You can't open the lid during cooking. While it's best to keep it closed to maintain the micro climate, a quick peek to check the liquid level won't ruin the dish. Just be fast!
Perfect Pairings for Your Garlic Chicken
Since this dish is so rich and savory, you want sides that can either soak up that liquid gold or provide a sharp contrast. I usually go for a starch and something green.
This chicken is incredible when served alongside a pile of buttery mashed potatoes or some crusty sourdough bread to mop up the pan juices. If you're looking for something lighter, a crisp arugula salad with a lemon vinaigrette cuts through the fat of the chicken thighs perfectly.
For a more involved meal, this pairs beautifully with a side of roasted root vegetables. You can even toss some carrots and parsnips into the pot with the onions if you have a big enough Dutch oven. It’s a very similar "one pot" philosophy to what we see in the Classic Chicken Cordon Bleu recipe, where the goal is a complete, harmonious flavor profile in every bite.
Addressing Your Roasting Questions
Selecting the Right Pot Size
A 5 quart or 6 quart Dutch oven is the sweet spot. If the pot is too large, the juices will spread out too thin and evaporate, leading to a burnt bottom. If it's too small, the chicken will be cramped and will steam rather than roast. You want just enough room for the pieces to sit comfortably without overlapping.
Managing Internal Temperatures
While 165°F is the safe minimum for poultry, chicken thighs actually taste better when cooked to 175°F. The extra 10 degrees allows more of that connective tissue to break down without drying out the meat.
Because the Dutch oven holds heat so well, remember that the temp will rise about 5 degrees after you take it out (this is called carryover cooking).
Handling the Whole Garlic Head
When you halve the head of garlic, don't worry about peeling it. The skins help hold the cloves together during the roasting process. Once it's done, the garlic inside will be the consistency of roasted chestnuts sweet, mellow, and completely different from the sharp bite of raw garlic.
It’s one of the best parts of this whole recipe!

Recipe FAQs
Can I use boneless, skinless chicken thighs for this recipe?
No, it's highly recommended to use bone-in, skin-on chicken thighs. The bone insulates the meat, slowing down cooking and allowing fats to render, which contributes to tenderness. The skin crisps up beautifully in the Dutch oven, adding flavor and texture.
Why is searing the chicken skin side down so important?
Searing skin side down is crucial for achieving shatter crisp skin. The high heat renders the fat, creating a golden brown, delicious crust. If the skin is wet or not seared properly, it can become rubbery instead of crispy.
What is the purpose of the onion and whole garlic head at the bottom of the pot?
They act as a natural rack, elevating the chicken away from the direct heat of the pot bottom. This prevents burning while the aromatics infuse the chicken with flavor during roasting. The softened garlic cloves become spreadable and delicious!
My chicken skin didn't get crispy. What went wrong?
Likely causes include not drying the chicken skin thoroughly or not removing the lid for the final roasting stage. Ensuring the skin is patted dry before searing and allowing it to crisp uncovered at the end are key to achieving that desired texture.
Can I substitute the white wine with something else?
Yes, you can substitute dry white wine with low-sodium chicken bone broth. To replicate the acidity, add about 1 teaspoon of vinegar to the broth. This substitution works well for those avoiding alcohol and still provides a rich base for the sauce.
How long should the chicken cook for in the oven?
Bake covered for 30 minutes, then uncovered for an additional 10-15 minutes, or until the internal temperature reaches 165°F to 175°F. Thighs benefit from the higher end of this range as it allows more connective tissue to break down, resulting in maximum tenderness.
What are the best side dishes to serve with this Dutch oven chicken?
This dish pairs wonderfully with starchy sides like mashed potatoes or crusty bread to soak up the pan juices. For a lighter option, a crisp salad with a bright vinaigrette cuts through the richness. Consider serving it with a side akin to our How to Make the Best Garlic Fried Rice Recipe in 20 Minutes! for a complete garlic infused meal.
Dutch Oven Chicken Garlic
Ingredients:
Instructions:
Nutrition Facts:
| Calories | 688 kcal |
|---|---|
| Protein | 42 g |
| Fat | 51 g |
| Carbs | 8 g |
| Fiber | 1.4 g |
| Sugar | 2.8 g |
| Sodium | 765 mg |
