Chicken Broth: Nutrient-Dense Golden Elixir
- Time: Active 15 minutes, Passive 6 hours, Total 6 hours 15 mins
- Flavor/Texture Hook: Savory, velvety liquid gold with a clean finish
- Perfect for: Sunday meal prep, healing soups, and building rich sauces
- How to Make Silky Chicken Broth
- The Physics of Collagen Extraction
- Yield and Time Measurements
- Essential Bone and Vegetable Analysis
- Required Tools for Success
- Detailed Simmering and Straining Steps
- Fixing Cloudy or Bland Broth
- Adjusting for Large Batches
- Debunking Bone Broth Tales
- Storage and Waste Reduction Methods
- Best Uses for Liquid Gold
- Recipe FAQs
- 📝 Recipe Card
How to Make Silky Chicken Broth
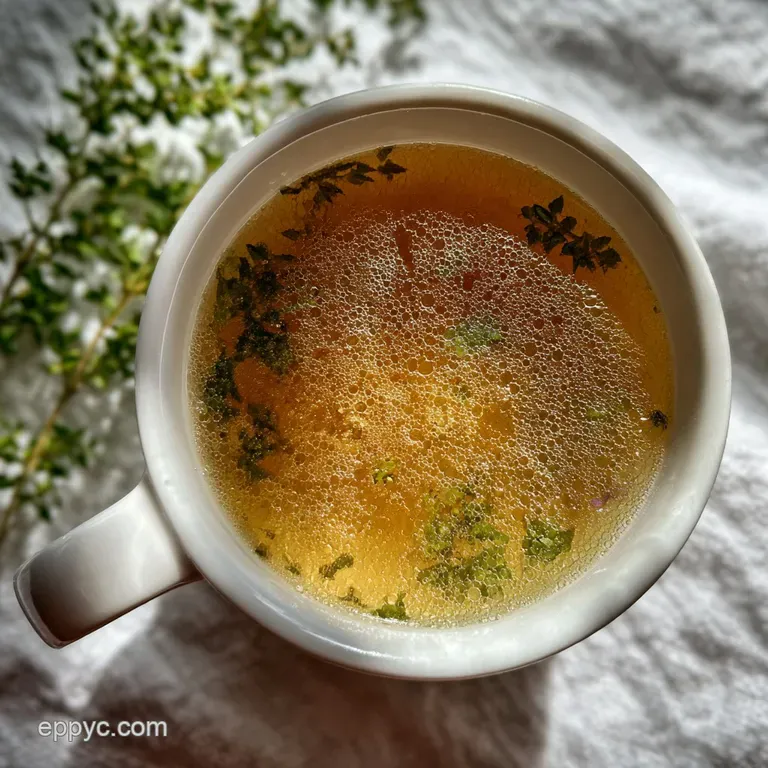
I remember the first time I actually succeeded in making a batch that didn't look like murky dishwater. I was standing in my tiny kitchen, the windows were foggy from the steam, and that unmistakable, savory aroma of slow cooked poultry and thyme was hugging every corner of the room.
I took a spoon, dipped it into the pot, and saw that clear, amber liquid shimmering back at me. It felt like I had finally unlocked a secret level of home cooking that I'd only ever read about in old culinary textbooks.
Trust me, there is something deeply heartfelt and empowering about knowing exactly what went into your pot. We aren't just boiling water here; we are using digital age precision and old world patience to extract every ounce of goodness from those 4 lbs of chicken pieces.
It is the ultimate kitchen technology, really turning scraps into gold. We've all been there, staring at a carton of broth with ingredients we can't pronounce, but once you realize how effortless it is to create this at home, you'll never look back.
We are going to focus on a few reliable steps that preserve quality without requiring you to hover over the stove for hours. Whether you're using this for a sick day or as the foundation for a fancy dinner, the results are consistently brilliant.
Let's get the stove humming and transform these simple ingredients into something truly special.
The Physics of Collagen Extraction
Gelatin Transition: When we keep the temperature just below a boil, the collagen in the chicken backs and necks slowly breaks down into gelatin without being shattered by violent bubbles. This creates that coveted velvety mouthfeel that coats the back of your spoon.
Cold Start Osmosis: Starting with 6 quarts of cold filtered water allows the soluble proteins to release gradually into the liquid rather than seizing up, which keeps the final result crystal clear.
Thermal Layering: Halving the garlic and onions without peeling the carrots adds natural pigments and sugars that caramelize slightly against the heat, providing that signature sunset gold hue.
| Method | Time | Texture | Best For |
|---|---|---|---|
| Stovetop | 6 hours | Velvety/Rich | Maximum flavor depth |
| Instant Pot | 1 hour 30 mins | Clean/Light | Quick weeknight meals |
| Slow Cooker | 10 hours | Deep/Intense | Set and forget prep |
The choice of method really depends on your schedule, but the stovetop allows for the most control over clarity. If you're in a rush, the pressure cooker is a fantastic digital tool to speed up the process, though you might lose a bit of that sparkling clarity you get from a gentle, open pot simmer.
Yield and Time Measurements
Making a big batch is the smartest move you can make for your future self. This recipe yields about 16 servings, which sounds like a lot until you realize how fast it disappears when you're using it for everything from risotto to deglazing pans.
We are looking at a total time of 6 hours 15 mins, but honestly, only about 15 minutes of that involves you actually doing anything.
I always suggest weighing your vegetables if you can. While "2 large carrots" is a good guide, hitting that 200g mark ensures the sweetness of the carrot doesn't overpower the savory chicken notes. It’s those tiny details that move a dish from "okay" to "I need this recipe."
Essential Bone and Vegetable Analysis
| Component | Science Role | Pro Secret |
|---|---|---|
| Chicken Backs/Wings | Collagen Source | Wings provide the most gelatin for a silky texture. |
| Yellow Onions | Flavor Foundation | Leave the skins on for a deeper, more amber color. |
| Black Peppercorns | Spice/Aromatics | Keep them whole to prevent the broth from turning grey. |
| Cold Filtered Water | Extraction Medium | Always use cold water to prevent cloudiness from the start. |
The chicken pieces are the stars here. I like using a mix of 4 lbs of chicken pieces like backs, necks, and wings because they are packed with connective tissue. If you find yourself with a leftover carcass from a Sunday roast, throw that in too! It’s the ultimate zero waste move.
For the vegetables, don't worry about perfect dice. Those 2 inch chunks of 2 large carrots and 3 stalks of celery are perfect for a long simmer. They need to be big enough that they don't turn to mush and disappear into the liquid before the six hours are up.
Required Tools for Success
You don't need a kitchen full of gadgets to make chicken broth, but a few specific items make the process much smoother. A large 12 quart stockpot is ideal for holding the 6 quarts of water and all the solids without splashing over the sides.
If you have a fine mesh strainer (chinois), that's your best friend for getting a refined finish.
Chef Tip: If you want an incredibly clear broth, line your strainer with a damp coffee filter or a piece of cheesecloth. This catches those tiny particles that a regular mesh strainer might miss.
I also recommend having a "fat skimmer" or a wide spoon handy. In the first hour, you'll see some foam rising to the top. It’s just denatured protein, but scooping it out makes a world of difference in the final appearance.
Detailed Simmering and Straining Steps
- Place 4 lbs chicken pieces in the bottom of a large, heavy stockpot. Note: Packing them tightly ensures they stay submerged.
- Add 2 large carrots, 3 stalks celery, 2 medium yellow onions, and 1 head garlic. Note: Keep the onion skins on for better color.
- Toss in 1 bunch fresh parsley, 4 sprigs fresh thyme, 2 dried bay leaves, and 1 tbsp black peppercorns.
- Pour in 6 quarts cold filtered water until the ingredients are fully covered.
- Bring the pot to a very slow simmer over medium high heat. Watch for the first bubbles to break the surface.
- Reduce heat to the lowest setting until only a few lazy bubbles appear every few seconds.
- Skim any grey foam from the surface during the first 45 minutes using a wide spoon.
- Simmer uncovered for 6 hours until the liquid has reduced slightly and turned deep gold.
- Strain the broth through a fine mesh sieve into a clean container until all solids are removed.
- Cool the liquid quickly by placing the container in an ice bath before refrigerating.
Fixing Cloudy or Bland Broth
One of the most common issues people have when they make chicken broth for the first time is cloudiness. This usually happens because the heat was too high. If the water boils vigorously, the fat and proteins emulsify into the water, creating a milky appearance.
It still tastes fine, but it lacks that professional look.
To Fix Murky Liquid
If your broth looks muddy, you can try a "protein raft" technique using egg whites, but usually, it's easier to just let it settle and strain it again. To avoid this next time, remember: a simmer should look like a "smile" on the surface of the water, not a rolling tide.
To Rescue Weak Flavor
If your broth tastes like plain water after a few hours, you might have used too much water or not enough salt at the end. Remember, we don't salt the broth during the simmer because it reduces, which could make it too salty. Always season at the very end.
| Problem | Root Cause | Solution |
|---|---|---|
| Cloudy Broth | Hard boiling/Agitation | Keep heat low; never stir the pot while simmering. |
| Bitter Aftertaste | Overcooked herbs | Add fresh parsley only in the last hour of cooking. |
| Lacks Body | Not enough bones | Use more wings and necks next time for gelatin. |
Common Mistakes Checklist
- ✓ Never let the pot reach a rolling boil (keep it at a lazy simmer).
- ✓ Don't peel your onions; the skins provide the golden color.
- ✓ Use cold water to start to ensure a clear extraction.
- ✓ Avoid stirring the pot, which breaks up the vegetables and makes the liquid murky.
- ✓ Wait until the very end to add salt so you can control the concentration.
Adjusting for Large Batches
If you're looking to double this recipe for a massive freezer haul, keep a few things in mind. When you scale up to 8 lbs of chicken and 12 quarts of water, you don't necessarily need to double all the spices.
I usually increase the black peppercorns and bay leaves by 1.5x rather than a full 2x to keep the flavors balanced.
For scaling down, if you only have a small amount of chicken scraps, you can easily halve the recipe. Use a smaller pot to ensure the water still covers the bones. If you're only making a small amount, the cook time can be reduced to about 4 hours, as the volume is easier to penetrate.
| Fresh Broth | store-bought | Difference |
|---|---|---|
| Rich in Gelatin | Usually thin/watery | Fresh broth gels when cold; carton broth stays liquid. |
| Zero Additives | High Sodium/MSG | You control the salt and preserve the pure chicken flavor. |
| Cost Effective | $4-5 per carton | Uses scraps and cheap cuts for pennies on the dollar. |
Debunking Bone Broth Tales
Many people think "bone broth" and "chicken broth" are two entirely different things. In reality, the difference is mostly just time and the inclusion of more bones versus meat. My version here is a hybrid long enough to get that gelatin but focused on the bright, clean flavor of a traditional broth.
Another myth is that you must roast the bones first. While roasting adds a deep, smoky flavor, a "white" broth (using raw bones) provides a cleaner, more versatile base that works better for classic soups. It's not about which is better; it's about what flavor profile you need for your final dish.
Storage and Waste Reduction Methods
Once your broth is strained and cooled, it will keep in the fridge for about 5 days. You'll notice a layer of fat will solidify on the top. Do not throw this away! This is "schmaltz," and it is incredible for sautéing vegetables or making matzo balls.
It also acts as a natural seal, keeping the broth fresh underneath.
To freeze, I love using silicone muffin tins or large ice cube trays. Once they are frozen, pop the "broth pucks" into a freezer bag. They stay fresh for up to 6 months. This makes it so easy to grab just a half cup for a sauce or a full quart for a quick soup. For a great way to use this, consider my Chicken Pot Pie recipe, which relies heavily on a high-quality liquid base.
Best Uses for Liquid Gold
There are a million ways to use this, but I have a few favorites. If you're feeling fancy, use it as the poaching liquid for my Classic Chicken Francaise Recipe. The lemon and butter mingle with the homemade broth to create a sauce that is out of this world.
If you want something with a bit of a kick, use this broth to start The Pan Seared Chicken recipe. The depth of the homemade liquid balances the heat of the amarillo sauce perfectly.
If you want a more intense flavor, do this: Reduce the finished broth by half over high heat to create a "glace" for sauces. Add a piece of dried kombu in the last hour for an extra hit of umami. Use the broth to cook your rice or quinoa instead of water for an instant flavor boost.
Making your own broth is one of those small kitchen shifts that completely changes the way you cook. It’s practical, it’s resourceful, and it makes your house smell like a warm hug. Once you see that velvety texture for yourself, you'll be hooked!

Recipe FAQs
What is a good way to make chicken broth?
Simmer bones and aromatics gently for 6 hours. Start with cold water and maintain a temperature just below boiling, skimming foam initially. This slow thermal extraction maximizes collagen conversion.
How to make a quick homemade chicken broth?
Use a pressure cooker on high for 90 minutes. While the stovetop method yields better clarity, the Instant Pot drastically reduces the passive cook time necessary for flavor extraction.
How do you make broth for chicken?
Simmer chicken backs, necks, and wings with roughly chopped vegetables and herbs. The key is using collagen rich parts, like wings, and maintaining low heat to extract the gelatin, which is foundational for rich sauces like those in Grandmas Chicken Pot Pie How to Make it Perfect.
Is chicken broth just chicken stock and water?
No, that is inaccurate. Chicken stock typically uses roasted bones and is cooked for a shorter time, resulting in a lighter body; broth uses simmering bones and meat scraps and is focused on collagen extraction.
What causes my homemade chicken broth to be cloudy instead of clear?
The primary cause is vigorous boiling rather than a gentle simmer. When the water boils hard, proteins and fats emulsify into the liquid, causing cloudiness; avoid this by ensuring only very lazy bubbles break the surface.
Can I use frozen chicken parts for making broth?
Yes, you can start with frozen bones, but thaw them first. Adding frozen items drastically lowers the water temperature and can interrupt the slow initial extraction of flavor, leading to a less developed final product.
How should I salt the broth during the cooking process?
Do not add salt until the broth is fully cooked and strained. The liquid reduces significantly during the 6-hour simmer, meaning any salt added early will concentrate too much, potentially making the final product overly salty.
Golden Chicken Broth Elixir

Ingredients:
Instructions:
Nutrition Facts:
| Calories | 38 kcal |
|---|---|
| Protein | 3.4 g |
| Fat | 2.1 g |
| Carbs | 1.2 g |
| Fiber | 0.1 g |
| Sugar | 0.5 g |
| Sodium | 72 mg |
