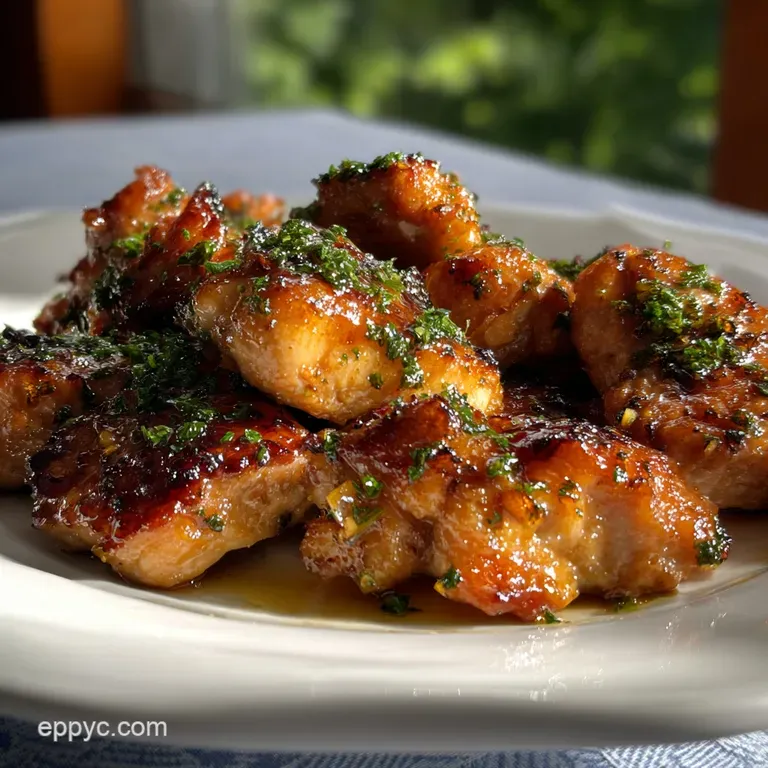
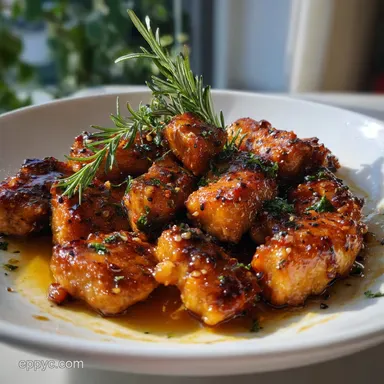
Honey Garlic Chicken Thighs: Sticky & Crisp
- Time: Active 10 minutes, Passive 15 minutes, Total 25 minutes
- Flavor/Texture Hook: Shatter crisp skin meets a tacky, umami rich garlic glaze
- Perfect for: High energy weeknights or impressive last minute entertaining
- Achieving Shatter Crunch Honey Garlic Chicken Thighs
- The Science of Why it Works
- Critical Checkpoints for Perfect Consistency
- Flavor Architecture of Balanced Glazes
- Essential Tools for Streamlined Cooking
- Precision Roadmap Raw to Radiant
- Navigating Obstacles for Flawless Finishes
- Creative Adaptations for Every Kitchen
- Preservation Tactics to Defeat Waste
- Curating Plates for Visual Impact
- Myths Regarding Sticky Chicken
- HIGH in Sodium
- Recipe FAQs
- 📝 Recipe Card
Achieving Shatter Crunch Honey Garlic Chicken Thighs
You know that sound when a fork scrapes across a perfectly seared piece of chicken? That dry, raspy sizzle is exactly what we’re chasing today. I spent years trying to get Honey Garlic Chicken Thighs right, usually ending up with either a soggy mess or a burnt pan of sugar.
It was frustrating because the flavor profile is so iconic, but the execution often feels like a gamble. Right then, let's toss the guesswork out the window because I’ve finally figured out the digital age precision needed to make this foolproof.
The secret isn't just in the sauce, it’s in the architecture of the chicken itself. We've all been there, staring at a pan of gray meat wondering where we went wrong. Trust me on this, once you understand how the honey interacts with the heat and how the cornstarch creates a protective barrier, you’ll never look at a chicken thigh the same way again.
It's about empowering your inner chef with a few clever shortcuts that don't sacrifice an ounce of quality.
We’re going to use 1.5 lbs of boneless skinless chicken thighs for this. Why thighs? They have the fat content to withstand high heat without turning into cardboard, unlike chicken breasts which are far too temperamental for a sticky glaze.
We've got 15 minutes of cook time ahead of us, so grab your favorite heavy skillet and let's get to work. You'll be surprised at how technology, like a simple digital thermometer, can take this from "fine" to "phenomenal" in seconds.
The Science of Why it Works
Starch Gelatinization: The cornstarch dredge absorbs surface moisture and creates a rigid, microscopic lattice that turns into a shatter crisp crust upon contact with hot oil.
Maillard Reaction: High heat triggers a chemical dance between amino acids and reducing sugars, resulting in those deep brown, savory flavor compounds we crave.
Viscosity Control: The raw honey acts as a natural thickener, reaching its peak "tacky" state as water evaporates, which allows it to cling to the chicken's textured surface.
| Method | Time | Texture | Best For |
|---|---|---|---|
| Cast Iron Skillet | 15 minutes | Maximum crunch, deep char | The authentic, sticky experience |
| Air Fryer | 18 minutes | Even browning, less oil | Hands off prep and easy cleanup |
| Slow Cooker | 4 hours | Fork tender, velvety sauce | Low effort meal prep days |
If you’re in the mood for more Mediterranean vibes later this week, my Savory Chicken Shawarma recipe uses a similar over high heat technique to keep things juicy while developing a beautiful crust.
Critical Checkpoints for Perfect Consistency
When we talk about precision, we aren't just being fussy. Cooking is a series of chemical reactions, and small shifts in temperature or timing can change the outcome entirely. For this dish, I always look for a few specific visual and thermal cues.
The first is the "sizzle test" if the oil doesn't whisper loudly when the chicken hits the pan, you're just boiling meat in fat.
| Component | Science Role | Pro Secret |
|---|---|---|
| Raw Honey (1/3 cup) | Sugar source & glaze base | Use room temp honey for faster emulsification with soy sauce. |
| Cornstarch (3 tbsp) | Moisture barrier | Double tap the chicken to shake off excess; a thick layer becomes gummy. |
| Apple Cider Vinegar (1 tbsp) | Acidic brightener | It cuts through the cloying sweetness, preventing flavor fatigue. |
Adding that splash of apple cider vinegar is what separates the amateurs from the pros. It provides a sharp counterpoint to the 24 grams of sugar per serving, making the entire dish feel lighter and more balanced on the palate.
Flavor Architecture of Balanced Glazes
Getting the ingredients right is half the battle, but choosing the right versions of those ingredients is where the magic happens. We're using 6 cloves of garlic here because, honestly, anything less is just a suggestion.
- 1.5 lbs boneless skinless chicken thighs: Trim these well so you don't have large pockets of unrendered fat.
- Substitute: Chicken breast (cut into 1 inch chunks). Why this? Thighs stay juicy under high heat compared to leaner cuts.
- 3 tbsp cornstarch: This is the "crunch" factor.
- Substitute: Arrowroot powder. Why this? Cornstarch creates a harder, more resilient crust than flour.
- 1/3 cup raw honey: The soul of the glaze.
- Substitute: Maple syrup. Why this? Honey provides the specific tackiness needed to coat the protein.
- 3 tbsp low sodium soy sauce: For that essential umami hit.
- Substitute: Tamari (for gluten-free). Why this? Low sodium prevents the reduction from becoming an salt bomb.
- 1 tbsp apple cider vinegar: Balance and brightness.
- Substitute: Rice vinegar. Why this? ACV has a fruitiness that complements honey perfectly.
- 6 cloves garlic, minced: Don't use the jarred stuff!
- Substitute: 1.5 tsp garlic powder (only in emergencies). Why this? Fresh garlic releases essential oils that infuse the oil.
- 1 tsp fresh ginger, grated: Adds a subtle heat and fragrance.
- Substitute: 1/2 tsp ground ginger. Why this? Fresh ginger offers a zesty bite that dried ginger lacks.
Essential Tools for Streamlined Cooking
You don't need a kitchen full of gadgets, but a few choice items make this recipe a breeze. I swear by a heavy bottomed skillet preferably cast iron or stainless steel. These materials hold heat better than thin aluminum, which means when you drop 1.5 lbs of cold chicken into the pan, the temperature doesn't plummet.
A microplane is also a digital cook's best friend. It makes quick work of those 6 cloves of garlic and that teaspoon of ginger, turning them into a paste that melts into the sauce rather than leaving you with chunky, burnt bits. Finally,, grab a pair of silicone tipped tongs.
You'll be flipping the chicken frequently once the glaze goes in, and you want to be able to move quickly without scratching your pan or tearing the delicate crust we worked so hard to build.
Precision Roadmap Raw to Radiant

- Dry the chicken. Use paper towels to pat the 1.5 lbs of chicken thighs until bone dry. Note: Surface moisture is the enemy of a good sear.
- Dredge the protein. Toss the thighs in a bowl with 3 tbsp cornstarch, 1 tsp kosher salt, and 1/2 tsp black pepper until every crevice is coated.
- Heat the oil. Add 2 tbsp avocado oil to your skillet over medium high heat. Note: Avocado oil has a high smoke point, so it won't burn.
- Sear the first side. Place chicken in the pan and cook for 5 minutes until a golden brown crust forms.
- Flip and repeat. Turn the thighs over and cook for another 5 minutes until the second side is firm and bronzed.
- Whisk the glaze. While chicken sears, combine 1/3 cup honey, 3 tbsp soy sauce, 1 tbsp vinegar, garlic, ginger, and red pepper flakes in a small bowl.
- Clear a space. Push the chicken to the edges of the pan and pour the honey mixture into the center.
- Simmer and reduce. Let the sauce bubble for 2 minutes until the bubbles become large and slow popping.
- Coat the chicken. Toss the thighs in the sauce for 2 more minutes until the glaze is thick and tacky.
- Final check. Ensure the internal temperature has reached 165°F (74°C) using a digital thermometer.
Chef's Note: If you notice the garlic browning too quickly, turn the heat down slightly before adding the liquid. Burnt garlic is bitter and will ruin the delicate balance of the honey.
Navigating Obstacles for Flawless Finishes
Sometimes things go sideways in the kitchen, but most "failures" are just opportunities to pivot. If your sauce looks more like soup than a glaze, don't panic. It usually just means the pan wasn't hot enough or you didn't let it reduce long enough.
Thinning Out Overly Thick Sauce
If you get distracted and the honey reduces too far, the sauce can become a hard candy like substance. This happens when the water content evaporates completely, leaving only the sugars behind.
Simply add a tablespoon of water or chicken broth and whisk vigorously over low heat to bring it back to a velvety consistency.
Preventing Bitter Burned Garlic
Garlic is delicate. Because this recipe uses high heat for the sear, adding the garlic too early is a common mistake I once made. By whisking it into the honey and soy sauce first, the liquid acts as a heat buffer, allowing the garlic to soften and release its flavor without scorching.
| Problem | Root Cause | Solution |
|---|---|---|
| Chicken is soggy | Crowded pan | Cook in two batches to allow steam to escape. |
| Sauce won't stick | Too much oil | Drain excess oil from the pan before adding the glaze. |
| Glaze is too salty | Regular soy sauce | Switch to low sodium soy sauce or add a splash of water. |
Common Mistakes Checklist
- ✓ Never skip drying the chicken; moisture creates steam, which prevents browning.
- ✓ Don't use a non stick pan if you want a truly shatter crisp crust; stainless steel is better.
- ✓ Avoid moving the chicken for the first 4 minutes to allow the Maillard reaction to work.
- ✓ Shake off every bit of excess cornstarch - we want a veil, not a blanket.
- ✓ Always use fresh ginger; the powdered version lacks the aromatic oils that make this pop.
Creative Adaptations for Every Kitchen
I love how flexible this recipe is. While the stovetop method is my go to for that specific "shatter" texture, you can definitely adapt this for your favorite kitchen technology. If you're short on time, the air fryer is a game changer.
Just toss the dredged thighs in the basket, spray with a bit of oil, and cook at 400°F for 12 minutes before tossing them in the sauce in a separate bowl.
Convenient One Pan Strategy
To turn this into a full meal, I like to toss some broccoli florets or snap peas into the pan during the last 4 minutes of cooking. They'll steam slightly in the moisture from the chicken and then get coated in that glorious honey garlic glaze.
It saves you from washing another pot and keeps all those flavors in one place.
If you’re looking for a crowd pleaser that uses pantry staples for a cozy Sunday night, try serving this chicken alongside my Chicken Casserole recipe. The contrast between the sticky honey glaze and the buttery Ritz cracker topping is a texture lover's dream.
Precise Scaling Guidelines
- To Half (2 servings): Use 0.75 lbs chicken. Keep the sauce ratios the same for extra dipping, or reduce everything by half. Use a smaller 8 inch skillet.
- To Double (8 servings): Use 3 lbs chicken. Note: Do not double the salt or red pepper flakes immediately; start with 1.5x and adjust. You MUST cook the chicken in at least two batches to prevent overcrowding.
- To Triple (12 servings): Increase sauce liquids by 2.5x rather than 3x to prevent it from becoming too watery. Work in three batches for the sear.
Preservation Tactics to Defeat Waste
Honey Garlic Chicken Thighs are surprisingly great for meal prep because the glaze acts as a moisture seal, keeping the meat from drying out when reheated. Store leftovers in an airtight glass container in the fridge for up to 4 days. When you're ready to eat, skip the microwave if you can.
A few minutes in a toaster oven or air fryer at 350°F will revive that crust much better than the "zapper."
For the zero waste enthusiasts: don't toss the trimmings! If you trimmed fat or small bits of meat from your thighs, throw them into a freezer bag. Once you have enough, they make a fantastic base for a quick chicken stock. Even the ginger peels can be simmered with some honey and lemon for a soothing tea.
Curating Plates for Visual Impact
We eat with our eyes first, especially when a dish has this much gloss. To make this look as good as it tastes, I always finish with a heavy sprinkle of toasted sesame seeds and some thinly sliced green onions. The bright green pop against the deep amber glaze is stunning.
The Classic Pairing Choice
Serve these thighs over a bed of fluffy jasmine rice. The rice acts as a sponge for any stray glaze, ensuring not a single drop of that honey garlic goodness goes to waste. If you want something a bit more vibrant, a simple cucumber salad with rice vinegar and sesame oil provides a cooling crunch that cleanses the palate between bites of the rich, sticky chicken.
Nutritious Low Carb Options
If you're watching your carbs, cauliflower rice is a brilliant vehicle for this sauce. Alternatively, you can serve the chicken inside large butter lettuce cups with shredded carrots and cilantro for a fresh, wrap style meal.
The saltiness of the soy and the heat of the red pepper flakes shine through even more when paired with fresh, crisp greens.
Myths Regarding Sticky Chicken
One persistent myth is that you must marinate the chicken for hours to get flavor. In reality, with a glaze this punchy, a long marinade is unnecessary and can actually make the skin too wet to crisp up properly. The flavor is built through the searing process and the reduction of the sauce in the final minutes.
Another misconception is that honey will burn instantly. While honey does have a low burn point compared to oil, the presence of soy sauce and vinegar raises the overall temperature threshold of the mixture.
As long as you don't walk away from the pan once the glaze is in, you have plenty of time to get that perfect reduction without any scorched flavors. Trust the process and keep that chicken moving!

HIGH in Sodium
950 mg mg of sodium per serving (41% % of daily value)
The American Heart Association recommends limiting sodium intake to about 2,300mg per day for most adults.
Sodium Reduction Tips for This Recipe
-
Low-Sodium Soy Sauce-20%
Use an even lower sodium soy sauce (e.g., tamari, coconut aminos). Reducing the sodium content of soy sauce by half can significantly lower the overall sodium.
-
Reduce Added Salt-25%
Decrease the amount of kosher salt added to the chicken from 1 tsp to 1/2 tsp. Taste and adjust after cooking.
-
No Salt Added-15%
Use No-Salt Added Chicken Thighs or trim the chicken thighs more. Some pre-packaged chicken is injected with a saline solution to extend shelf life.
-
Vinegar Boost-10%
Experiment with a splash more apple cider vinegar for added tang and flavor, which can help compensate for less salt. Add 1/2 to 1 tbsp more ACV to enhance the flavor profile.
-
Spice It Up
Enhance flavors with sodium free herbs and spices like garlic powder, onion powder, smoked paprika, or cayenne pepper. These alternatives can increase flavor complexity without adding sodium.
Recipe FAQs
Can I use chicken breasts instead of thighs?
No, stick with thighs. Chicken breasts are too lean and can dry out quickly under the high heat required for this recipe, whereas thighs have the fat content to stay juicy.
How do I prevent the honey glaze from burning?
Lower the heat and whisk constantly. The combination of soy sauce and vinegar helps raise honey's burn point, but it still requires attention during the final glaze reduction.
What's the secret to extra crispy skin?
Dry the chicken thoroughly and use cornstarch. Patting the thighs completely dry removes moisture that steams rather than sears, and cornstarch creates a barrier for maximum crispiness.
How do I make the glaze thicker if it's too thin?
Simmer uncovered for longer. Allow the sauce to bubble and reduce further over medium low heat until it reaches your desired tacky consistency.
Can I make this in an air fryer?
Yes, it's a great alternative. Air fry the dredged chicken at 400°F (200°C) for about 12-15 minutes, then toss with the prepared glaze in a separate bowl.
Is it okay to use jarred minced garlic?
Fresh is highly recommended, but jarred can work in a pinch. Fresh garlic provides a more vibrant flavor; if using jarred, you might need slightly less, and be aware it can sometimes add a slightly metallic note.
How long can I store leftovers?
Up to 4 days in an airtight container. For best results when reheating, use a toaster oven or air fryer to help revive the crispiness, as microwaves can make the chicken soft.
Honey Garlic Chicken Thighs
Ingredients:
Instructions:
Nutrition Facts:
| Calories | 409 kcal |
|---|---|
| Protein | 32 g |
| Fat | 17 g |
| Carbs | 31 g |
| Fiber | 1 g |
| Sugar | 24 g |
| Sodium | 950 mg |
