Stottie Cake Recipe: a Bread Machine Delight
- The Complete Guide to Authentic Stottie Cake
- What Makes This Recipe Special
- Health and Nutrition Highlights
- Recipe at a Glance
- Premium Ingredients Guide
- Kitchen Equipment Essentials
- Professional Cooking Guide
- Game-Changing Tips
- Perfect Presentation
- Storage and Make-Ahead
- Creative Variations
- Complete Nutrition Guide
- Expert FAQ Solutions
- 📝 Recipe Card
Have you ever wondered why some breads just hit differently than others? maybe it's the texture, or perhaps it's that comforting aroma wafting through your home as it bakes.
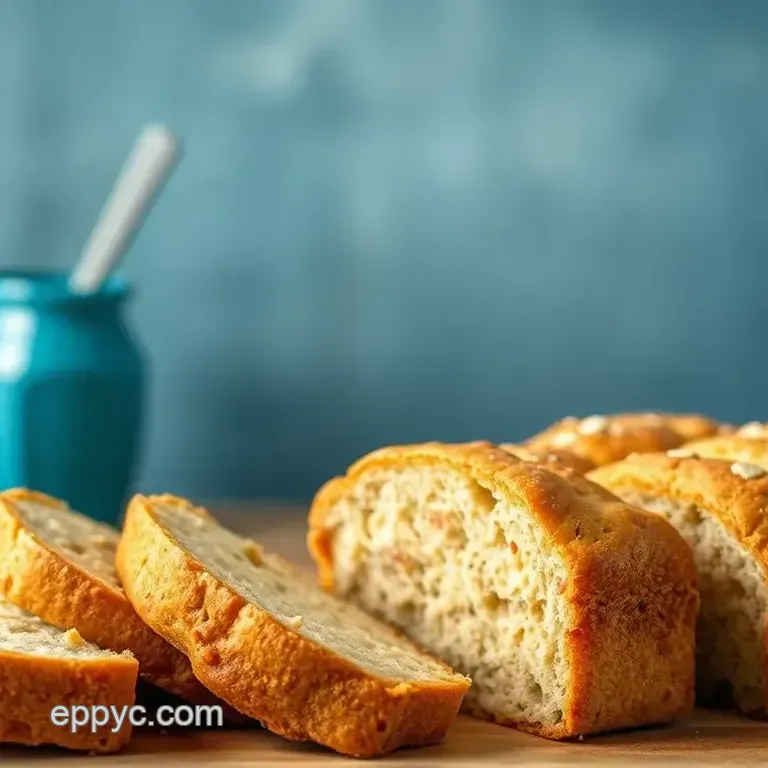
There’s a special magic to bread, and today, i’m about to share my absolute favorite the stottie cake ! this traditional northeastern england bread, known for its unique texture and soft crumb, comes out light and fluffy, thanks to a bit of bread machine magic.
I promise you won’t need to be a master baker to tackle this recipe. honestly, if you can measure ingredients, you’re halfway there!
Stottie cake has a rich history that dates back to the coal mining days in the northeast of england. picture this: hearty miners coming in from the chilly, gritty outdoors, craving something warm and filling.
This fluffy bread, notable for its soft, dense interior and slightly crusty exterior, became a staple for many families.
Its unique selling point? it's just so darn versatile! serve it warm with butter, slap on some jam, or use it as the base for a jaw-dropping sandwich seriously, you can’t go wrong.
Plus, if you ever needed an excuse to bake your own bread at home, now you have it! making stottie cake is not only a fun, hands-on project but also a great way to bond with family or marvel at your homemade artisan loaves.
The Complete Guide to Authentic Stottie Cake
Stotties are rooted in a rich culinary heritage that shaped the northern landscape. folklore often surrounds traditional english recipes like this, reflecting the soul of its people.
Once, this bread was prepared in the hearth of family homes; nowadays, it’s making a comeback, riding the wave of modern day popularity as a comfort food recipe .
The beauty of stottie cake rests in its fascinating origin story the very bread that miners used to sustain them during their long shifts has transcended its humble beginnings, finding a place in our hearts and on our dinner tables.
What Makes This Recipe Special
What truly captivates me about this recipe is the unique flavor combinations . the addition of whole wheat flour adds a nutty undertone that will make your taste buds sing.
The techniques are foolproof; with the help of a bread machine, you can mix and knead dough without breaking a sweat.
And trust me, once you’ve tried my stottie cake recipe bread machine , you won’t go back to store-bought!
Need some time saving tips ? Embrace the bread machine to cut down on prep time and focus on what matters savoring that first bite while it’s still warm!
Health and Nutrition Highlights
Let’s talk about the health benefits for a second. homemade bread can be a nutritious addition to your diet, especially with whole grains like in our stottie cake.
Whole wheat flour adds fiber, enhances digestion, and keeps you feeling fuller, longer. plus, it’s much better than those store-bought loaves loaded with preservatives yuck !
Also, with just a few ingredients, we're looking at a balanced nutrition fact profile that offers both taste and health without the fuss.
Recipe at a Glance
- Total Preparation Time: Around 2 hours (15 minutes active prep, 40 minutes cooking)
- Skill Level Required: Easy peasy, no prior experience needed!
- Serving Size: Yields about 8 heavenly servings.
- Cost Efficiency: Making your own bread is often more economical and certainly more satisfying than buying!
So now that you know why stottie cake holds a special place in my heart and stomach, it’s time to dive into the most exciting part the ingredients! whether you're going classic or trying out some recipe variations for bread , you’ll be well on your way to creating your very own homemade stottie cake.
Get your apron on; let’s get baking!
Premium Ingredients Guide
Oh my gosh, let’s dive into the magical world of premium core ingredients ! it’s like casting a spell for your dishes to go from basic to sublime, especially when we’re sweet talking about making that heavenly stottie cake recipe using a bread machine .
I remember the first time i touched a loaf of freshly baked stottie cake. it was soft, with a crust that felt just right everything we want in artisanal bread at home.
Premium Core Ingredients
When you’re picking out the star ingredients for your bread, aim for quality. Here’s a little rundown to help:
Detailed Measurements : For our stottie cake, you’ll be using 3 cups of all-purpose flour and 1 cup of whole wheat flour. Precision will ensure that light and fluffy texture we crave!
Quality Indicators : Fresh ingredients are key. Check that your flour smells sweet and nutty. It should be fresh enough to know your bread won’t taste like cardboard!
Selection tips : go for whole wheat flour with a finer grain. it will blend beautifully with the all-purpose flour and give your stottie an irresistibly nutty flavor.
If you can find locally milled options, those could elevate your bread game even higher!
Storage guidance : keep your flours in airtight containers in a cool, dry place. this will trick them into staying fresher for much longer, much like a secret stash of goodies waiting for the perfect moment.
Signature Seasoning Blend
Now onto flavor! Let’s craft something memorable with our seasoning. A stottie cake loves the basics but feels even more welcome with a bit of charm.
Spice Combinations : Adding a pinch of garlic powder can elevate your bread’s taste to unexpected heights.
Herb Selections : Fresh rosemary or thyme? Yes, please! This combo not only smells fantastic but adds unique bread flavors, perfect for sandwiches.
Flavor Enhancers : Consider using baking with olive oil to create a moist crumb.
Aromatic Additions : How about a sprinkle of pepper? It gives a refined kick that complements the stottie's nutty backdrop beautifully!
Smart Substitutions
Sometimes life throws a curveball and you’ve got to pivot. Whether you're following a recipe or just improvising, here are some handy tips:
Alternative Options : If you've run out of whole wheat flour, don’t fret! You can use 100% all-purpose flour, but be warned: the texture will change slightly.
Dietary Swaps : Need gluten-free? You could substitute with chickpea or oat flour. Just remember, the fun of baking with whole grains can get a little tricky!
Emergency Replacements : Don’t panic if you’ve got no olive oil. Melted butter works wonders, giving your loaf a richer flavor!
Seasonal Variations : During autumn, why not throw in some pumpkin spice? It’ll keep your bread cozy and festive!
Kitchen Equipment Essentials
Let’s get our hands dirty with some kitchen gadgets that make this stottie cake a breeze.
Must Have Tools : A solid bread machine is a game changer. It takes care of the mixing and kneading, allowing you to sit back and sip tea!
Recommended Appliances : A good oven is essential. You want one that will let you bake crusty bread recipes and keep up with your baking dreams.
Helpful Gadgets : Don’t underestimate a good set of measuring cups and spoons trust me, they help maintain that balance for a perfect dough.
Home alternatives : if a bread machine isn’t in your arsenal yet, use your trusty hands for mixing and kneading dough.
Sure, it’s a bit of a workout, but think of it as bonding time with your bread!
Pro Ingredient Tips
Before we wrap up and get ready to bake, let me share a couple of pro tips that could save you some headaches.
Selection Secrets : Always opt for active dry yeast that’s within its expiration date. It acts like a little magician, helping your dough rise.
Quality Markers : When choosing olive oil, extra virgin is your golden ticket. It brings depth and richness to your bread.
Storage solutions : keep any leftover bread in a paper bag to maintain that crisp crust. if you want to save it longer, freeze it; just be sure to slice before freezing for easy serving later.
Money Saving Tips : By mixing your own blends, not only can you experiment but you’ll also save money on store-bought alternatives that may lack the same quality.
With these tips and insights, i hope you’re feeling ready to grab your ingredients and find that cozy nook in your kitchen.
And trust me when i say, once you’ve mastered this stottie cake recipe bread machine magic, you’ll be dreaming of more homemade artisan loaves.
Now, let's roll up our sleeves and dive into those step-by-step instructions that’ll bring this delightful bread to life!
Professional Cooking Guide
So, gather ‘round, my friends, because today i’m sharing my tried and-true method for making a delightful stottie cake using a bread machine .
This isn’t just any old bread; this is a unique and comforting loaf that hails from northeastern england . seriously, it’s like a hug in bread form! trust me, once you take a bite, you'll feel right at home, even if you're miles away from the rolling hills of yorkshire.
Essential Preparation Steps
First off, let’s chat about mise en place , which means having everything prepared and ready to go before you dive into the cooking. For our stottie cake, gather:
- 3 cups all-purpose flour
- 1 cup whole wheat flour
- 1 ½ teaspoons salt
- 2 teaspoons sugar
- 2 tablespoons olive oil
- 1 ¼ cups warm water (think 110°F, like a warm bath)
- 1 ½ teaspoons active dry yeast
Once you’ve got your ingredients because mixing and kneading dough is half the fun, have your bread machine ready. life is much easier when your kitchen is organized, so take a minute to get everything in order.
Next up, time management! allocate about 15 minutes for active prep and 40 minutes for baking , but don't forget you’ll need about 1 hour for that magical first rise.
So set a timer, grab your cup of tea, and relax while all the magic happens.
Professional Cooking Method
Okay, let’s get into the nitty gritty of this stottie cake recipe . place the warm water, olive oil, sugar, and salt in the bread machine pan.
Then, sprinkle the flours on top, making a little well in the center to add the yeast. choose the basic bread setting and hit start!
Here's an underappreciated tip: around 5 minutes in, check that dough! it should form a lovely, elastic ball. if it’s battling the stickiness monster, add a touch more flour.
Timing is crucial, so let it complete the first rise this is where the magic happens. you’ll know it’s ready when it has roughly doubled in size.
Don’t be alarmed; it can take about 60 minutes or so !
Once that’s done, gently remove the dough and shape it into a thick round. give it a cozy blanket of flour and let it rise again for about 30 minutes while preheating your oven to 400°f (200°c) .
This second rise is essential for a fluffy interior.
Expert Techniques
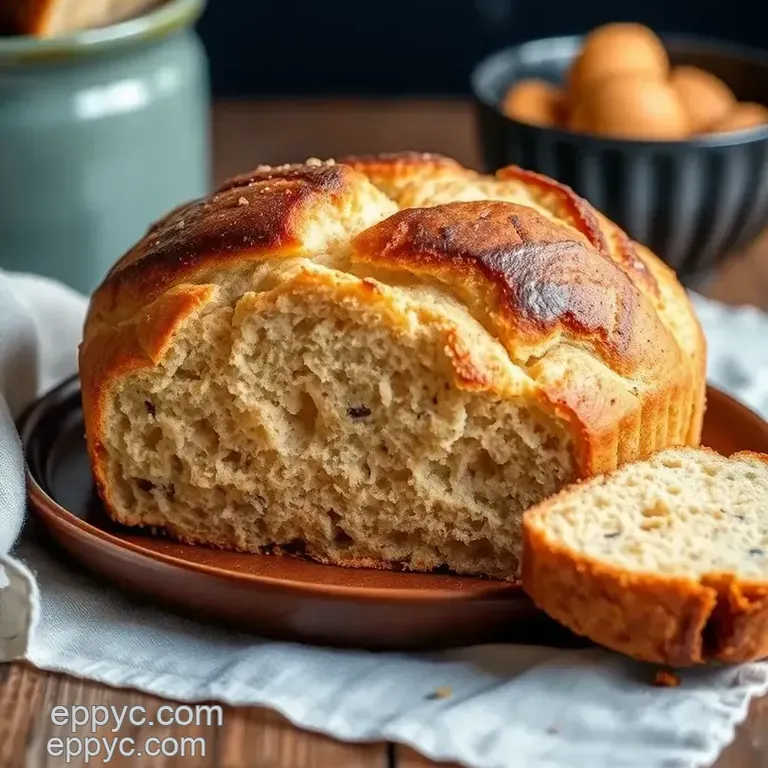
Now for the pièce de résistance: baking our stottie cake! place it in the oven and let it work its roasty magic for 30 to 40 minutes .
That bread should puff up beautifully and go golden brown. you’ll know it’s done when it sounds hollow when tapped on the bottom.
Quick tip this is the time to give your kitchen a sniff check! A warm, nutty aroma should be wafting through the air.
Success Strategies
Alright, so let’s talk about some potential hiccups, because we all know cooking isn’t always smooth sailing. if your dough doesn’t rise, check your yeast for freshness nobody wants flatbread! if you go for that crusty bread texture, try baking it on a preheated stone.
Quality checks are essential too; the loaf should be light and fluffy with a nicely crisp crust. Serve it warm, slathered with butter, and you’ll have a winner every time.
Wrapping Up
Now, doesn't that sound like a comfort food recipe you'd want to dive into weekly? and let’s not forget how versatile this stottie cake can be; dip it in your soup or use it for sandwich making.
Plus, if you’ve got leftovers, they make killer bread crumbs for your next casserole!
Ready for a little more? next up, we’ll dive into some additional information that can elevate your baking game, including fun recipe variations for bread and some smart baking tips that’ll have you serving up unique bread flavors in no time.
Let’s keep the baking magic alive!
Game Changing Tips
Oh my gosh, let me tell you if you’re diving into the world of homemade bread machine fun, you’ve got to have a few tricks up your sleeve.
When i first began experimenting with traditional bread recipes, i felt a bit lost, like a fish out of water, but over time i gathered some kitchen wisdom that changed everything.
Professional Insights
Using a bread machine isn’t just about convenience; it’s a game changer. i often select the "basic bread setting," perfect for an easy going loaf.
Trust me, the best bread machine settings really matter! and while i can totally whip up a crusty bread recipe by hand, the machine means i can relax, pour a glass of wine, and let technology do the hard work.
Expert Techniques
Mixing and kneading dough is where the magic starts. the rhythm of the machine takes care of all that, but don’t forget to check in on your dough.
After about five minutes, i open the lid and take a peek. if it’s too sticky, i might toss in a little extra flour it’s all about finding that sweet spot of texture.
Kitchen Wisdom
And remember, just because you’re making light and fluffy bread doesn’t mean you can’t put your own spin on things! i love adding olives and herbs to my dough, which makes things taste so much more vibrant.
Perfect Presentation
Okay, so you’ve mastered the stottie cake recipe and it’s looking gorgeous. don’t ruin that with a bad presentation now! honestly, very few things feel as good as pulling a fresh loaf from the oven and knowing it looks as good as it tastes.
Plating Techniques
When serving up that warm loaf, try slicing it gently with a serrated knife i always wait for it to cool a bit.
Don't you just cringe at the thought of squishing all that lovely texture?
Garnish Ideas
For that extra flair, I drizzle some finely chopped herbs on top or sprinkle a few sea salt crystals. It makes it look so charming!
Serving Suggestions
Pair your stottie cake with some creamy butter or homemade jams. Trust me, it’s comfort food like you've never had before, especially on a lazy Sunday morning.
Storage and make-ahead
Let’s get real: once you make this stottie cake, it’s going to disappear faster than you can blink! but if you find yourself with some leftover (which i highly doubt), here’s how to keep it fresh.
Storage Guidelines
To store it, wrap your loaf in parchment paper and place it in a paper bag. this keeps it cozy and away from bugs! a plastic bag can make it mushy, which is a total bummer.
Preservation Methods
If you want to extend the life of your healthy bread options , slice it up and freeze the pieces. They’ll be ready for you whenever a craving hits!
Reheating Instructions
To reheat, toss it on a baking tray and warm in the oven for a bit. It’s like getting a freshly baked loaf once again.
Creative Variations
Now, if you’re feeling adventurous, you can always play around with flavors in your traditional English recipes !
Flavor Adaptations
Ever thought about adding some caramelized onions or roasted garlic while mixing? They’ll blow your mind! With just a few tweaks, your stottie cake can transform into something completely unique.
Dietary Modifications
And don’t worry if you’re cutting back on gluten. You can introduce gluten alternatives in baking, like almond flour or a gluten-free bread mix. Just remember, the texture might shift a bit.
Complete Nutrition Guide
Eating delicious bread is one thing, but knowing what’s in it makes it even sweeter.
Detailed Breakdown
Each slice of your stottie cake packs about 160 calories. It’s really not too bad when you think about it!
Health Benefits
With a mix of all-purpose and whole wheat flour, you’re getting fiber and nutrients right in every bite.
Portion Guidance
I usually say, enjoy two slices with a hearty soup or split a loaf with a friend. Comfort food doesn’t have to break your healthy rhythm!
Expert FAQ Solutions
Got questions? I've been there, trust me!
Common Concerns
Maybe you’re worried about not kneading enough. Just keep an eye on the dough’s texture; it should be smooth and slightly elastic.
Troubleshooting Guide
If your loaf seems too dense, don’t fret. Next time, just watch the yeast and check the rise times; getting this right is crucial!
Success Tips
One last thing always follow the recipe as best as you can, especially if you’re trying to clear the cobwebs off a new-to-you bread machine .
Phew! there’s so much more to baking than just throwing flour in a bowl. it’s a journey, a project that can lead to moments of bliss with every slice of warm bread.
Trust me; you’ll be whipping up your stottie cake recipe bread machine style in no time! happy baking!
Stottie Cake Recipe A Bread Machine Delight

