Dressing Recipe: the Ultimate Sage and Butter Bread Dressing

- The Ultimate Sage and Butter Dressing: A Foundational Recipe for Festive Feasts
- Mastering Moisture and Crunch: The Science of Perfect Dressing Texture
- The Anatomy of Flavor: Ingredients and Critical Substitutions for the Ultimate Sage Dressing
- How to Prepare and Bake the Ultimate Bread Dressing (Step-by-Step Method)
- Troubleshooting Your Dressing: Chef's Secrets and Common Errors
- Maximizing Shelf Life: Storage and Freezing Instructions
- Pairing Perfection: Serving Suggestions for Your Herb Dressing
- Recipe FAQs
- 📝 Recipe Card
The Ultimate Sage and Butter Dressing: A Foundational Recipe for Festive Feasts
The moment that buttery, earthy aroma hits the oven, everything changes. It’s pure, nostalgic comfort food, guaranteed to make your kitchen smell like the best holiday memory you’ve ever had.
We're talking about that perfect balance: the crisp, golden top layer giving way to an incredibly tender, herbaceous core.
Seriously, stop buying the boxed mixes with those weird crumbly squares. This homemade Sage and Butter Dressing is based on using up stale bread and simple aromatics, making it shockingly inexpensive and easy to prepare.
This recipe is the quiet MVP of any big meal, providing the necessary contrast and foundation for rich meats and heavy gravies.
I've finally nailed the foundational ratio of dry bread to wet binder after years of experiments (and one disastrous, gluey attempt). I promise this method eliminates the dread of a dry crumbly dressing or, worse, a wet, dense, flavorless block. Let's crack on and make the best dressing of your life.
Mastering Moisture and Crunch: The Science of Perfect Dressing Texture
What is Bread Dressing (And Why It’s Better Than Traditional Stuffing)?
Let’s clear up the difference right now, because it matters. Dressing is baked separately in a casserole dish, while stuffing is cooked inside the turkey cavity. Baking the dressing separately means you get gorgeous, crispy edges and a perfectly safe temperature every time.
Never sacrifice crispiness for convenience.
Cooking it in the bird, while traditional, makes controlling texture nearly impossible, and you often end up with a disappointingly soggy result. This recipe focuses on achieving that incredible textural contrast: crunchy exterior, super moist interior.
The Essential Flavor Profile: Why Sage and Butter Reign Supreme
This is not the time for subtlety. We are maximizing flavor intensity here. The combination of pungent, earthy sage with creamy, high-quality butter is foundational for a reason; it’s the ultimate savory hug. Don't be shy with the fresh herbs, please, because they truly define the entire dish.
If you love this deep, herbaceous flavor, you might be ready for my next level Turkey dressing: Proper Pub-Style Sage and Sausage Recipe .
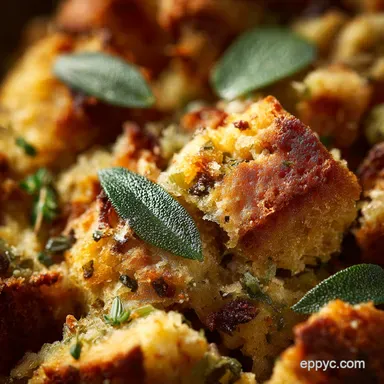
Achieving That Smashing Top: A Step Beyond Dry and Crumbly
Nobody wants dried out bread crumbs. The secret to a phenomenal crispy top is twofold: pre-drying the bread and strategic fat application. We use a generous amount of fat, yes, but we also save a hefty portion of butter until the very end.
When you remove the foil, those tiny dots of cold butter melt, basting the top surface. This encourages maximum browning and delicious, buttery crispiness.
The Role of Fat Saturation: Why Quality Butter is Non-Negotiable
Fat carries flavor. That's just food science. Since we are using butter as the primary fat and flavor agent (and not drippings, since it's baked outside the bird), you must use unsalted butter. It is incredibly important to control the salt level yourself.
Using a good quality butter, ideally one with a higher fat content, creates a richer mouthfeel and prevents the dressing from tasting hollow.
The Maillard Reaction: Achieving the Golden Brown Crust
The Maillard reaction is just a fancy term for why browned food tastes better. It's what gives toasted bread and roasted meat their incredible complex flavor. We bake the dressing covered initially to cook the interior safely, then we strip off the foil for the final 10– 15 minutes.
This exposure to high, dry heat allows the sugars and proteins on the surface, already saturated with butter, to caramelize beautifully.
Balancing Liquids: The Secret to a Moist, But Not Soggy, Interior
This is where most home cooks fail. They either add too little stock and get a sand dune, or too much and end up with a dense, bread pudding. We use warm stock and beaten eggs to bind the cubes.
Using warm stock helps the dried bread absorb the liquid more thoroughly and evenly, resulting in that wonderfully fluffy texture.
Chef's Note: Remember, dried bread is a sponge. You must pour the liquid in slowly and wait five minutes to see how much is actually absorbed before adding more.
The Anatomy of Flavor: Ingredients and Critical Substitutions for the Ultimate Sage Dressing
Getting the ingredients right is half the battle. Here is what you need and what you can swap if you're in a pinch.
Choosing the Right Bread Base: Stale vs. Toasted Cubes
Please, use sturdy bread. Forget the fluffy pre-sliced white stuff; it turns to mush instantly. Sourdough, French baguettes, or even thick cut brioche works best because they hold their shape under moisture. I usually cube the bread a day or two before, spread it on a sheet tray, and just leave it out to dry.
If you forget, toast the cubes in a low oven until they feel completely hard and dry.
Fresh Herbs vs. Dried Herbs: Maximizing Sage Impact
For a foundational recipe like this, fresh herbs are non-negotiable. Dried sage can often taste dusty, especially when used in large quantities. Fresh sage, thyme, and parsley give you that bright, clean herbaceous flavour that makes this dressing sing.
Essential Aromatics and Liquids (Beyond the Basics)
Onion and celery sautéed in butter form the aromatic base. Don't rush this step! Cooking them slowly until they are fully softened releases their deep, sweet flavor into the butter, which then permeates the entire dish. We bind it all together with warm stock and eggs.
The eggs are crucial because they set up the structure and keep everything cohesive once baked.
Strategic Ingredient Swaps for Dietary Needs
| Ingredient | Mandatory Substitute | Notes & Usage |
|---|---|---|
| Bread Cubes | Cornbread or gluten-free Loaf | If using cornbread, reduce stock by 1/2 cup as it absorbs less. |
| Unsalted Butter | Quality Vegan Butter Sticks | Avoid margarines, which are too oily. Stick to solid sticks for dotting. |
| Chicken Stock | high-quality Vegetable Stock | Ensure low sodium content; you want control over the seasoning. |
| Eggs | Flax Eggs (1 Tbsp flaxseed + 3 Tbsp water per egg) | Best for binding, though texture will be slightly less fluffy. |
How to Prepare and Bake the Ultimate Bread Dressing (step-by-step Method)

Prepping the Bread Cubes: Drying for Maximum Absorption
As outlined in the recipe card above, start with dried bread. Evenly toss those dry cubes with 2 tablespoons of melted butter and place them directly into your huge mixing bowl. Combine the bread with all the chopped fresh herbs.
Sautéing the Aromatics (Building the Flavor Base)
Melt 1/4 cup of the butter in your heavy bottomed skillet over medium heat. Add the onion and celery, cooking them gently low and slow is the mantra here. Cook them for a full 8 to 10 minutes until they are translucent and sweet.
Only add the minced garlic for the final minute; this prevents it from burning and turning bitter.
Combining and Resting: Hydrating the Bread Perfectly
Scrape all those glorious, buttery aromatics right over the bread and herb mixture. Give it a gentle toss. Now, prepare your liquid binder: whisk the eggs and the first 3 cups of warm stock together with the salt and pepper.
Pour about 3 cups of the liquid binder over the bread mixture. Stop! Now, put down the spoon and let the mixture sit for 5– 7 minutes. This resting time is non-negotiable and lets the dry bread absorb the liquid fully. If, after 5 minutes, you still see dry crumbs at the bottom, add the remaining stock until the mixture is cohesive but still light. This resting technique is similar to what makes my Crockpot Dressing: Stress Free, Moist Sage Classic for Thanksgiving so reliably moist.
Baking Times and Temperatures for Ideal Results
Transfer the loose mixture to your baking dish. Resist the urge to press it down; we want airy spaces for that fluffy texture. Dot the surface evenly with the remaining 3/4 cup of cold butter cubes. Cover tightly with foil and bake at 375°F (190°C) for 25 minutes.
Then, remove the foil and bake uncovered for the remaining 10– 15 minutes until the top is deeply golden brown.
Troubleshooting Your Dressing: Chef's Secrets and Common Errors
Mistake #1: Over Hydration and Soggy Results
The number one mistake is treating the bread like a cookie dough batter. Over mixing and adding too much liquid results in a dressing with the consistency of wallpaper paste. Fix: If you realize it’s too wet before baking, quickly mix in a handful of new, dry bread crumbs.
They will soak up the excess liquid and lighten the texture.
The Power of Resting Time: Why Patience is Key
I know I said it above, but it bears repeating: resting time is everything. Skipping the rest means you might add too much stock initially, thinking the bread is still dry, only to find the moisture pools at the bottom later. Allowing it to rest ensures the moisture distributes evenly.
Achieving Maximum Crispness on the Top Layer
If your dressing is still too pale after the required baking time, crank the oven temperature up to 400°F (200°C) for the last three to five minutes. Keep a close eye on it!
If only the center needs browning, you can use the broiler, but this is a high risk maneuver watch it continuously, or it will burn.
Adjusting Seasoning Before Baking
The bread, eggs, and butter all need adequate seasoning. Before you add the bread, take a little sip of your warm stock/egg mixture (I know, sounds weird, but trust me). It should taste slightly too salty or too intense. That flavor intensity will be perfectly diluted when the bread absorbs it. This simple trick is essential for any savory baking project, even something simpler like making my addictive How to Make Ranch Dressing My Seriously Addictive Recipe .
Maximizing Shelf Life: Storage and Freezing Instructions
Reheating Leftover Dressing Without Drying It Out
Leftover dressing keeps beautifully in an airtight container in the refrigerator for up to 4 days. To reheat, the microwave is fine for quick fixes, but the oven is better. Place the dressing back in a casserole dish, drizzle lightly with a tablespoon of extra stock or melted butter, cover tightly with foil, and bake at 350°F (175°C) until piping hot (about 20 minutes).
Safe Freezing Methods for Pre- and Post Baked Batches
This recipe freezes wonderfully!
- Freezing Pre-Baked: Assemble the dressing completely, place it in a disposable foil pan, and cover tightly with two layers of foil. Freeze for up to 3 months. Thaw overnight in the refrigerator before baking as directed.
- Freezing Post Baked: Cool the leftovers completely, then slice into individual serving sizes. Wrap each slice tightly in plastic wrap and then foil. This prevents freezer burn. Reheat from frozen (unwrapped and covered) in a 350°F oven with a splash of stock.
Pairing Perfection: Serving Suggestions for Your Herb Dressing
This dressing is inherently rich, salty, and savory, so it pairs best with dishes that offer a clean, protein base or some necessary acidity.
- The Classic Setup: Serve this with roasted poultry and lashings of rich, thick gravy.
- A Tart Counterpoint: You absolutely need a tart side dish to cut the richness. Cranberry sauce is traditional, but even a bright, zesty salad (like an Easy Caprese Pasta Salad Recipe with Zesty Balsamic Dressing ) works beautifully.
- Simple Roast: Don't wait for a holiday! This dressing is phenomenal alongside a simple weeknight pork chop or a roasted leg of lamb.

Recipe FAQs
Why is my dressing dry and crumbly, even after adding the required amount of stock?
Dryness often occurs if your bread wasn't properly dried before mixing, preventing proper absorption, or if the initial stock ratio was too low for the density of the bread used. Try adding a little extra melted butter or a binding agent like a whisked egg with a splash of cream to restore moisture and help the dressing hold together.
Can I make this Sage and Butter Dressing ahead of time?
Yes, this recipe is excellent for make-ahead preparation. You can assemble the entire dressing mixture (up to the point of baking) and store it tightly covered in the refrigerator for up to 48 hours. Alternatively, bake the dressing completely, cool it, and freeze it for up to three months.
My dressing is too soggy and gooey inside. What went wrong?
Soggy dressing usually results from using excessive liquid or covering the dish for too long during baking, which steams the bread instead of crisping it. If it's already mixed, try adding a few more cubed dry bread pieces to soak up the excess moisture before baking.
If it's already baking, uncover it entirely and raise the oven temperature slightly to allow for quick evaporation.
What is the best type of bread to use for the ultimate texture?
The best dressing starts with high-quality, dense bread like artisan sourdough, a country loaf, or challah, as they hold their shape well when moistened. Avoid standard soft, sliced white bread, which tends to dissolve into a paste when soaked in stock and butter.
Can I make this Sage and Butter Dressing vegan or dairy-free?
You can easily adapt this recipe by substituting the unsalted butter with a high-quality vegan butter substitute or olive oil for sautéing the aromatics. Ensure you also swap out chicken stock for savory vegetable broth to maintain a fully plant based final product.
How do I reheat leftover baked dressing without drying it out?
To reheat dressing, place the leftovers in a baking dish, sprinkle lightly with a tablespoon of stock or melted butter, and cover tightly with foil. Reheat at 350°F (175°C) until warm throughout, then remove the foil for the last 10 minutes to restore the crispy top crust.
What is the difference between "dressing" and "stuffing," and why do you recommend cooking it separately?
"Dressing" is cooked outside the turkey or protein, while "stuffing" is cooked inside the bird's cavity. We recommend cooking it separately because external dressing achieves a safer and uniform temperature faster, guaranteeing the desired crispy top and moist center.
Stuffing must reach 165°F (74°C) to be safe, which can sometimes overcook the meat surrounding it.
Ultimate Sage Butter Bread Dressing
Ingredients:
Instructions:
Nutrition Facts:
| Calories | 380 calories |
|---|---|
| Fat | 24 g |
| Fiber | 2 g |
