Valentines Chocolate Covered Strawberries
- Time: Active 15 minutes, Passive 5 minutes, Total 20 minutes
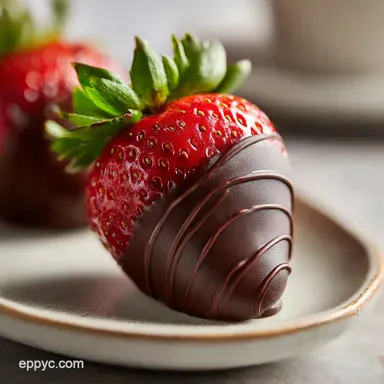
- Flavor/Texture Hook: A velvety, snap able dark chocolate coating over vibrant berries
- Perfect for: Romantic evenings, artistic gift giving, or a show stopping party centerpiece
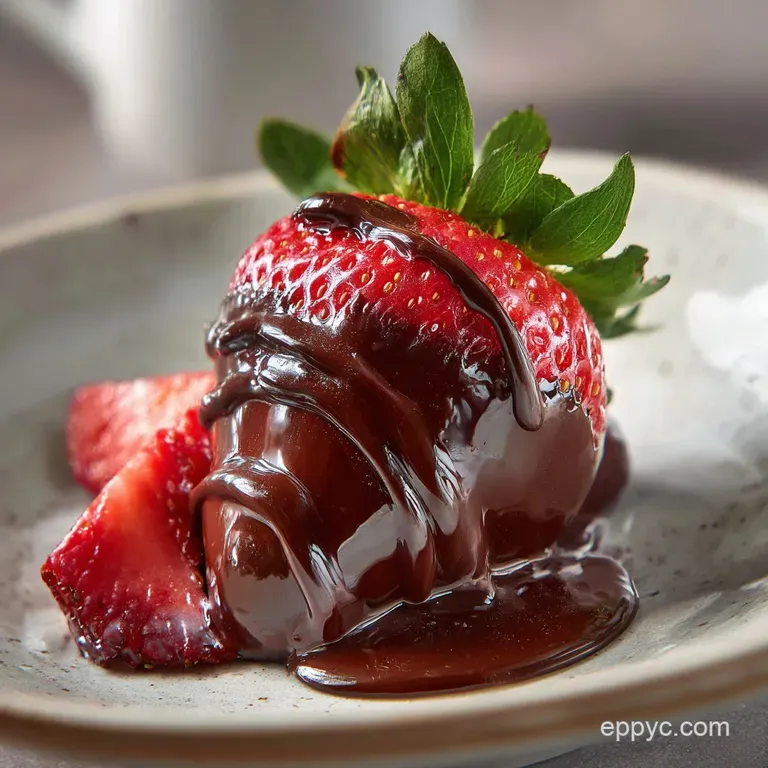
- Perfect Valentines Chocolate Covered Strawberry Valentine Dessert and Chocolate Covered Treat
- The Physics of the Chocolate Snap
- Timing for Your Show Stopping Creation
- The Essentials for Your Pastry Artistry
- Tools for a Flawless Presentation
- Crafting Your Chocolate Covered Treat
- Solving Common Chocolate Dipping Issues
- Artistic Twists for Every Palate
- Scaling Your Artistic Berry Display
- Debunking Common Chocolate Dipping Myths
- Preserving Your Joyful Dessert Creation
- Recipe FAQs
- 📝 Recipe Card
Perfect Valentines Chocolate Covered Strawberry Valentine Dessert and Chocolate Covered Treat
The first time I tried to make a professional looking dessert for a date, it was a literal disaster. I thought I could just melt a chocolate bar, throw in some wet strawberries, and call it a day.
Instead of that beautiful, glossy finish you see in boutiques, I ended up with a puddle of grainy grey sludge and berries that looked like they were weeping. It was heartbreaking! I spent the rest of the night scrubbing a burnt pot while we ate plain fruit.
But that failure was the best thing that ever happened to my pastry skills. I became obsessed with the artistry of the dip. I realized that this dish isn't just about food; it is about the joy of creating something visual.
Indulge in this recipe for a romantic Valentines Chocolate Covered Strawberry Valentine Dessert and Chocolate Covered Treat. When you get that "shatter" sound as you bite through the dark chocolate, you will know exactly why the details matter.
We've all seen those supermarket versions that are thick, waxy, and frankly, a bit sad. This recipe is different. We are going for a high fashion aesthetic with a taste that actually matches the looks. We're using real dark chocolate and a touch of coconut oil for that runway glow.
By the time we're done, you'll be creating berries that look like they belong in a glass case in Paris.
The Physics of the Chocolate Snap
Surface Tension Control: Drying the berries for at least 30 minutes ensures the chocolate grips the skin rather than sliding off on a film of moisture.
Lipid Emulsification: Adding coconut oil to the dark chocolate lowers the melting point slightly, creating a more velvety mouthfeel while maintaining a glossy sheen.
Crystal Stabilization: Keeping the white chocolate at a lower temperature than the dark chocolate prevents the drizzle from melting into the base layer, preserving the artistic contrast.
| Premium Ingredient | Budget Alternative | Flavor Impact | Savings |
|---|---|---|---|
| 60% Cacao Bar | Chocolate Chips | Less complex, sweeter finish. Note: Chips contain stabilizers that resist melting. | Save $4-6 |
| Fresh Long Stem Berries | Standard Berries | Harder to grip while dipping. | Save $3-5 |
| Virgin Coconut Oil | Vegetable Shortening | Lacks the subtle nutty aroma. | Save $1-2 |
Choosing the right base is essential for your artistic success. While a high-quality bar offers the best "snap," if you are just practicing your drizzle technique, chips are a forgiving place to start.
Just keep in mind that the flavor profile will shift from a deep, sophisticated cocoa to a much sweeter, more "candy like" experience.
Timing for Your Show Stopping Creation
To achieve that boutique look, you need to hit three specific precision checkpoints. First, ensure your chocolate reaches exactly 45°C (113°F) during melting to break down all existing crystals.
Second, let your dipped berries set at a cool room temperature (around 20°C or 68°F) rather than a freezing fridge, which prevents "sweat." Finally, wait exactly 3 minutes after the initial dark dip before applying your white chocolate artistry so the layers don't bleed.
| Checkpoint | Goal | Why It Matters | Visual Cue |
|---|---|---|---|
| Berry Prep | 30 mins | Prevents "weeping" | Skin feels matte and dry |
| Chocolate Melt | 45°C (113°F) | Ensures smooth flow | Runs off a spoon like silk |
| Set Time | 5 mins | Crisp shell formation | Surface loses its wet look |
The Essentials for Your Pastry Artistry
The secret to a truly show stopping Valentines Chocolate Covered Strawberry Valentine Dessert and Chocolate Covered Treat lies in the quality of your components. I always reach for a dark chocolate with at least 60% cacao because it provides that sophisticated bitterness that balances the natural sugars of the fruit. This is much like the balance we look for in a Double Chocolate Dessert recipe, where the depth of the cocoa defines the whole experience.
| Ingredient | Science Role | Pro Secret |
|---|---|---|
| Dark Chocolate | Structural Base | Chop into tiny, uniform shards for even melting without burning. |
| Coconut Oil | Viscosity Modifier | Use refined oil to get the shine without an overpowering coconut scent. |
| White Chocolate | Decorative Contrast | Wafers melt more reliably than bars for fine line drizzling. |
Component List
- 450g (1 lb) fresh long stem strawberries: Look for bright red skins and fresh green leaves. Why this? The stems act as a natural handle for dipping.
- 280g (10 oz) high-quality dark chocolate (60% cacao): Avoid "candy melts" if you want real flavor. Why this? Provides the classic "snap" and rich cocoa depth.
- 15ml (1 tbsp) refined coconut oil: This is our secret to the glossy finish. Why this? Thins the chocolate for a professional, delicate coating.
- 55g (2 oz) white chocolate melting wafers: These are specifically for the artistry. Why this? They set quickly and hold their shape for thin lines.
- 0.75g (0.125 tsp) flaky sea salt: Just a tiny pinch. Why this? Cuts through the richness and brightens the berry flavor.
Tools for a Flawless Presentation
You don't need a professional kitchen, but a few specific tools make the joy of decorating much easier. A double boiler is ideal, but a microwave safe glass bowl works perfectly if you are careful.
I highly recommend using a silicone baking mat or high-quality parchment paper; there is nothing more tragic than a beautiful berry sticking and tearing its bottom off!
For the drizzle, a small piping bag with a tiny tip is great, but a simple fork can create a lovely, rustic "splatter" effect if you are feeling more avant garde. If you want to expand your chocolate skills, the techniques used here are very similar to what you'll need for a Heart Shaped Chocolate recipe, especially when it comes to managing temperature and flow.
Crafting Your Chocolate Covered Treat

- Wash the fruit. Rinse the 450g (1 lb) of strawberries under cold water. Note: Keep the stems on; they are part of the aesthetic.
- Dry completely. Pat each berry with a lint free towel and let them air dry until the skin feels completely matte.
- Chop the chocolate. Break the 280g (10 oz) of dark chocolate into very small pieces. Note: Smaller pieces melt faster and more evenly.
- Melt with oil. Combine the dark chocolate and 15ml (1 tbsp) of coconut oil in a glass bowl. Microwave in 20 second bursts while stirring.
- Achieve silkiness. Continue stirring until no lumps remain and it looks like liquid satin.
- Dip the base. Hold a berry by the stem and submerge it into the dark chocolate. Twist slightly as you pull it out to clear excess.
- Rest on parchment. Place the dipped berry on a lined tray. Repeat for all 20 servings.
- Melt the white chocolate. Heat the 55g (2 oz) of white wafers until fully fluid and glossy.
- Drizzle with flair. Use a fork or piping bag to sweep white chocolate across the berries until you achieve a delicate, striped pattern.
- Add the finish. Sprinkle the 0.75g (0.125 tsp) of sea salt over the wet chocolate. Let set 15 minutes before moving.
Solving Common Chocolate Dipping Issues
One of the most common heartbreaks is when the chocolate starts to "seize." This usually happens because a tiny drop of water got into the bowl. Chocolate and water are enemies! If your chocolate goes from silky to a gritty paste in seconds, you've likely introduced moisture or overheated it.
Another annoyance is "sweating." This happens when you move berries from a very cold fridge to a warm room. The moisture in the air condenses on the cold chocolate, ruining that matte artistic look we worked so hard for.
To avoid this, try to keep them in a cool, dry place instead of the refrigerator if you are serving them the same day.
Why Your Shell is Streaky
If you see white streaks or a dusty film on your chocolate after it dries, that is called "bloom." It doesn't mean the treat is bad, but it does ruin the visual artistry. This usually happens if the chocolate was heated too quickly or cooled too slowly.
Using the coconut oil helps stabilize the fats and reduces the chance of this happening.
| Problem | Root Cause | Solution |
|---|---|---|
| Chocolate is grainy | Overheating or moisture | Melt in shorter bursts; keep all tools bone dry. |
| Coating slides off | Berries were damp | Air dry for 30 minutes before dipping. |
| White drizzle bleeds | Dark layer was too wet | Wait 3-5 minutes for the base to set slightly. |
Common Mistakes Checklist
- ✓ Never cover the bowl while melting (steam creates water droplets).
- ✓ Avoid using plastic bowls; glass or metal holds temperature better.
- ✓ Don't skip the coconut oil - it provides the necessary elasticity for the shell.
- ✓ Ensure the berries are at room temperature, not straight from the fridge.
- ✓ Work in a cool room to prevent the chocolate from staying soft too long.
Artistic Twists for Every Palate
If you want to move beyond the classic look, try a "White Valentine" theme. Swap the dark chocolate for a high-quality white chocolate base and drizzle with pink dyed white chocolate. It creates a very soft, romantic aesthetic. For another variation, you can look at my Chocolate Covered Strawberries recipe for tips on using different nut toppings or crushed freeze dried raspberries for added texture.
| Servings | Ingredient Adjustments | Cooling Space | Time Needed |
|---|---|---|---|
| 10 people | 225g berries, 140g choc | 1 half sheet tray | 15 mins |
| 20 people | 450g berries, 280g choc | 1 full sheet tray | 20 mins |
| 40 people | 900g berries, 420g choc | 2 full sheet trays | 35 mins |
Scaling Your Artistic Berry Display
When you are doubling the recipe for a large party, don't just double everything blindly. For the chocolate, you actually only need about 1.5x the volume for a 2x batch of berries because you lose less to the sides of the bowl as the volume increases.
If you are scaling down for a "Will you be my Valentine chocolate covered strawberries" moment for two, use a very small, deep bowl so you have enough depth to submerge the fruit completely.
One trick for small batches is to use a muffin tin to hold the berries upright if they don't have long stems. For large batches, I recommend working in stages. Melt half the chocolate, dip ten berries, then melt the rest.
This keeps the chocolate at the optimal dipping temperature and prevents it from thickening up too much before you finish.
Debunking Common Chocolate Dipping Myths
Many people believe that adding butter makes the chocolate shinier. In reality, butter contains water which can cause the chocolate to seize or become soft and tacky. Stick to coconut oil or cocoa butter for that professional glow.
Another myth is that you must refrigerate the berries immediately to make them set. While it is faster, the sudden temperature shock often causes the chocolate to crack or "sweat" later. A slow set at room temperature (around 18-20°C) results in a much more stable and beautiful finish.
Preserving Your Joyful Dessert Creation
These treats are best enjoyed the day they are made. The strawberries are living things, and once they are washed and dipped, they begin to release moisture inside the shell. Storage: If you must store them, place them in a single layer in a container lined with paper towels.
Keep them in a cool spot (not the fridge) for up to 6 hours. If it's very warm, the fridge is okay, but leave the lid slightly cracked to prevent moisture buildup. Zero Waste: Don't throw away that leftover chocolate in the bowl!
Pour it onto a piece of parchment, sprinkle with any leftover salt or chopped nuts, and let it harden into a "chef's snack" bark. You can also chop the leafy strawberry tops and add them to a pitcher of water for a subtle, refreshing fruit infused drink.
Whatever you do, don't let a single drop of that dark chocolate go to waste. Creating a Valentines Chocolate Covered Strawberry Valentine Dessert and Chocolate Covered Treat is about the process as much as the result.
Enjoy the sizzle of the melting chocolate and the artistic flair of the drizzle it's pure kitchen joy!

Recipe FAQs
Can I freeze chocolate covered strawberries for later use?
No, freezing degrades the texture significantly. Freezing causes the water inside the strawberry to expand and rupture the fruit's cells, resulting in a mushy texture once thawed.
How to achieve that perfect glossy, non-streaky chocolate shell?
Add refined coconut oil and maintain low heat during melting. The oil thins the chocolate, creating a delicate coating that flows smoothly and sets with a high gloss sheen, similar to the finish in our Indulgent Carab Covered recipe.
Is it true that strawberries must be completely dry before dipping?
Yes, complete dryness is non-negotiable for proper adhesion. Any surface moisture will cause the chocolate to instantly seize or slide off, creating thick, uneven patches.
How to make the white chocolate drizzle thin enough for intricate art?
Use high-quality melting wafers and thin them slightly with a drop of vegetable shortening. Wafers melt more consistently than bars; if the drizzle is too thick, work quickly to apply it before the base layer sets completely.
Why did my chocolate turn into a grainy, thick paste instead of staying smooth?
This is usually caused by water contamination or overheating the chocolate. Even a tiny amount of steam or a damp utensil introduces water, causing the cocoa solids to clump rapidly.
Should I dip the strawberries while they are cold from the refrigerator?
No, room temperature fruit sets best without "sweating." Dipping cold berries into warm chocolate causes condensation when they return to room temperature, leading to a dull, wet surface finish.
What is the best way to handle a large batch to keep the chocolate from thickening too fast?
Work in batches, remelt or refresh the chocolate as needed. Melt only half your chocolate supply initially, dip about 20 berries, and then melt the second half to maintain an optimal, fluid working temperature for all pieces.
Valentines Chocolate Covered Strawberries
Ingredients:
Instructions:
Nutrition Facts:
| Calories | 107 kcal |
|---|---|
| Protein | 1.0 g |
| Fat | 6.6 g |
| Carbs | 11.2 g |
| Fiber | 1.6 g |
| Sugar | 9.2 g |
| Sodium | 12 mg |
