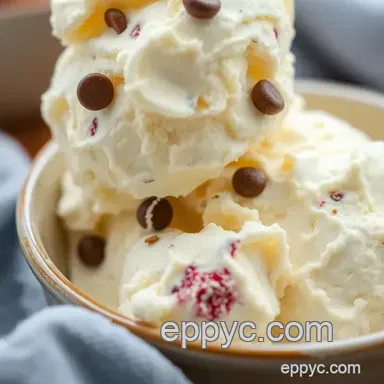
Churned Vanilla Ice Cream with Egg Yolk Custard

- Time: 20 min active + 10 min cooking + 8 hrs 25 min chilling/freezing
- Flavor & Texture: Creamy and rounded
- Perfect for: Summer dessert parties
Pure vanilla extract is the star here. It brings a deep, woody floral note that imitation versions can't touch, turning a simple base into something truly artistic. Using the real stuff ensures the flavor stays clean and doesn't taste like chemicals.
This Churned Vanilla Ice Cream depends on the balance of fat and air. When you churn it, you're not just freezing it, you're incorporating tiny bubbles that make the texture silky.
You'll get a pale ivory scoop that feels luxurious. It's a show stopping addition to any dessert table, whether it's served plain or paired with a warm tart.
Churned Vanilla Ice Cream Techniques
- Egg Yolks
- They bind the fat and water together, creating a stable custard that doesn't separate.
- Constant Motion
- Churning breaks up ice crystals as they form, which keeps the texture soft and scoopable.
- Deep Chill
- A base kept below 40°F (4°C) freezes faster, preventing large ice shards from ruining the mouthfeel.
The Core Details
Before you start, make sure your ice cream maker bowl is frozen. If you're using a hand-crank machine, have your rock salt and crushed ice ready in a large bin.
This process takes patience because of the chilling time, but the result is a high-end pastry experience at home. I like to make the base the night before so I can churn it fresh in the morning.
The Component List
| Ingredient | Role | If You Don't Have It |
|---|---|---|
| Egg Yolks | Binding and richness | Extra cream (makes it denser) |
| Heavy Cream | Smoothness and fat | Coconut cream (adds nutty flavor) |
| Rock Salt | Lowers freezing point | Coarse sea salt (approximate) |
| Pure Vanilla Extract | Primary flavor | Vanilla bean paste (more specks) |
Required Ingredients
- 180 g heavy cream Why this? Provides the essential fat for a creamy feel
- 1½ cups (360 g) whole milk Why this? Balances the richness so it's not too heavy
- ½ cup (100 g) granulated sugar Why this? Sweetens and lowers the freezing point
- ¼ cup (60 g) egg yolks (about 4 large) Why this? Thickens the base into a custard
- 1 tablespoon (15 ml) pure vanilla extract Why this? Adds a deep, floral aroma
- 0.7 g fine salt Why this? Sharpens the vanilla notes
- 850 g crushed ice (for hand-crank only)
- 280 g coarse rock salt (for hand-crank only)
Between the custard and the no-churn versions, there's a big difference in depth.
| Option | Result | Trade-off |
|---|---|---|
| Custard Base | Rich and dense | Needs cooking and tempering |
| Condensed Milk | Sweeter and faster | Less flavor complexity |
And if you need to swap something out, use this guide.
| Original Ingredient | Substitute | Why It Works |
|---|---|---|
| Heavy Cream (180 g) | Coconut Cream (180 g) | Similar fat content. Note: Adds a tropical taste |
| Whole Milk (360 g) | Oat Milk (full fat, 360 g) | Creamy texture. Note: Slightly grainier finish |
Necessary Gear
You'll need a heavy bottomed saucepan to prevent the milk from scorching. A fine mesh sieve is a must to ensure no egg bits end up in your final scoop.
For the churning, use a freezer-bowl machine or a traditional hand-crank canister. A digital thermometer helps you hit that exact custard temp without overcooking.
Putting It Together
Phase 1: Warm the Dairy
Combine the heavy cream and whole milk in a heavy-bottomed saucepan over medium heat. Stir every so often until the liquid is steaming and tiny bubbles appear around the perimeter, roughly 4–5 minutes. Avoid letting it boil. Remove the pan from the heat and keep the mixture warm.

Phase 2: Temper and Cook the Custard
Using a heatproof bowl, whisk the sugar and egg yolks for 1–2 minutes until they become pale and reach a ribbon-like consistency. While whisking steadily, slowly stir in about 60 ml of the warm dairy.
Add another 120 ml of the warm dairy to gradually raise the temperature of the yolks and prevent them from scrambling.
Return the tempered yolk mixture to the saucepan with the rest of the dairy. Stirring continuously with a wooden spoon over medium-low heat, cook for 5–8 minutes until the custard hits 170–175°F (77–79°C) and coats the back of the spoon.
Draw a finger through the coating on the spoon; the path should remain clear. Stop cooking immediately once this is achieved.

Phase 3: Strain, Flavor, and Chill
Filter the custard through a strainer into a bowl to remove any small bits of cooked egg. While the mixture is still warm, stir in the fine salt and vanilla extract.
Lay plastic wrap across the top of the custard, touching the liquid, to stop a skin from forming. Place the bowl inside a larger basin of ice water for 10 minutes, then refrigerate for at least 4 hours or overnight, until the base is below 40°F (4°C).
Phase 4: Churn and Freeze
For those using a freezer-bowl machine, freeze the bowl for a minimum of 24 hours before starting. Pour the chilled base into the ice cream maker and churn for 20–25 minutes until the texture is like thick soft serve.
If using a hand-crank machine, pack crushed ice and rock salt around the canister as directed by the manufacturer, then churn until the paddle becomes difficult to turn. Transfer the ice cream to a freezer-safe container, place plastic wrap on the surface, seal tightly, and freeze for at least 4 hours until it is scoopable.

Fixing Common Issues
Preventing Lumpy Custard
Lumps happen when eggs cook too fast. The fix is slow tempering, which means adding the hot milk to the eggs in tiny amounts first. If you see clumps, run the mixture through a fine mesh sieve immediately.
Fixing a Grainy Texture
Grains usually mean the base wasn't cold enough before churning or it stayed in the machine too long. Make sure your custard is below 4°C. If it's already grainy, you can try softening it slightly and churning it again for a few minutes.
Managing Soft Scoops
If the ice cream feels more like soup, it likely hasn't had enough time in the final freeze. Give it another 2 hours. You can also avoid this by ensuring you used the full amount of sugar, as it keeps the ice cream from freezing into a rock.
Serving Your Creation

Experiment with these different plating levels for a professional, gourmet finish.
| Level | Presentation | Tweak |
|---|---|---|
| Simple | Classic scoop in a chilled bowl | Add a fresh mint leaf |
| Polished | Elegant quenelle with berries | Dust with powdered sugar |
| Restaurant | Chilled stone plate with syrup | Add a vanilla bean pod |
To achieve the polished look, use two warm spoons to shape the ice cream into an oval. This is called a quenelle and adds an immediate touch of joy to the presentation.
Freezing and Storage
Store your ice cream in a freezer-safe container. Lay plastic wrap over the top of the ice cream before closing the lid to prevent ice crystals from forming.
It stays fresh for about two weeks in the freezer. If it is too hard to scoop, let the container sit on the counter for 5 minutes before diving in.
Customizing Your Scoop
You can easily tweak this homemade churned vanilla ice cream recipe for different tastes.
Vanilla Bean Speckle
Instead of extract, scrape the seeds from one whole vanilla bean into the milk. This creates those tiny black dots seen in gourmet versions.
Condensed Milk Vanilla
Add-In Ideas
Fold in crushed cookies, salted caramel swirls, or fresh raspberry puree during the last 2 minutes of churning. This ensures the mix-ins are evenly distributed without overworking the ice cream.
Recipe FAQs
What does it mean when ice cream is churned?
Churning incorporates tiny air bubbles while freezing to keep the texture silky.
Tip: This prevents the dessert from freezing into a solid, hard block of ice.
How do I know when the custard is thick enough?
Drag a finger across the back of the spoon to see if the line holds its shape.
Tip: Ensure the temperature reaches 170–175°F (77–79°C) for the correct consistency.
Is it true that you can add hot dairy directly to egg yolks without tempering?
Actually, no.
Tip: Gradually adding small amounts of warm dairy prevents the eggs from scrambling.
How to avoid an icy texture in the finished scoop?
Chill the base below 40°F (4°C) before putting it in the ice cream maker.
Tip: Fast freezing creates smaller crystals for a smoother mouthfeel.
Can I make this without using egg yolks?
No tested egg-free version is given, because the yolks are needed to thicken the custard.
Tip: This variation results in a denser final texture.
Where should I store the custard base before churning?
Keep the base in the refrigerator with plastic wrap pressed directly onto the surface.
Tip: Refrigerate for at least 4 hours or overnight to ensure it is cold enough.
Does a hand-crank machine differ from an electric one?
It requires layering crushed ice and rock salt around the canister to freeze the base.
Tip: Keep churning until the paddle becomes physically hard to turn.
Churned Vanilla Ice Cream for 6 Servings