Pot Roast: the Great British Slow-Braised Sunday Dinner
- The Ultimate Sunday Pot Roast: Defining Comfort Food
- The Science of Fork-Tender: Mastering the Low and Slow Method
- Essential Ingredients for a Rich Pot Roast
- Step-by-Step Guide: Slow-Braised Pot Roast Perfection
- Troubleshooting Your Pot Roast: Chef’s Secrets for Success
- Storing and Reheating: Making Your Pot Roast Last Longer
- Complementary Sides for The Great British Pot Roast
- Recipe FAQs
- 📝 Recipe Card
The Ultimate Sunday Pot Roast: Defining Comfort Food
The moment this pot roast hits the oven, your kitchen is instantly transformed. That deeply savory aroma of thyme, red wine, and slowly caramelized onions fills every corner of the house. It's the scent of a proper Sunday dinner, cozy and completely unforgettable.
After hours of braising, the meat achieves a texture that doesn't just cut; it literally melts when nudged with a fork.
This pot roast recipe is my culinary secret weapon for busy weekends, honestly. We’re taking a humble, inexpensive chuck roast and turning it into pure gold with minimal effort. It’s the ultimate slow cooker method (even if we're using the oven), delivering max flavor for very little hands-on time.
Plus, it reheats beautifully, giving you glorious leftovers for days.
Forget the dry, bland roasts of the past; we are building serious flavor layers first. This process ensures the gravy is rich, glossy, and intensely savory right from the start. Trust me, once you master this low and slow method, you’ll never look at a Sunday roast the same way.
The Science of Fork Tender: Mastering the Low and Slow Method
I know, cooking sounds like chemistry, but understanding these three simple steps is what separates a tough pot roast from a truly fantastic one. It’s all about heat management and patience, darling. We are working against the nature of a cheap cut, which is packed full of connective tissue.
Why Slow Cooking is Essential for a Tender Result
We choose tougher cuts like chuck because they are rich in collagen, which is basically flavor waiting to happen. High heat makes that collagen seize up, giving you a tough, chewy mess. Slow cooking keeps the meat happy.
By holding the temperature steady and low for hours, we gently coax that tough connective tissue into luscious, gelatinous moisture.
A Quick Look at the Braising Process
Braising simply means cooking partially submerged in liquid, sealed in a heavy pot. The moisture prevents the outside of the roast from drying out while the slow heat melts the interior fats. The liquid, which is the rich beef stock and wine, permeates the meat.
It’s a genius technique that home cooks have relied on for centuries.
Tracing the Humble History of the Pot Roast
The pot roast is the original budget friendly hero. Historically, this dish emerged from necessity, giving cooks a way to make inexpensive, tough cuts palatable for large families. It's a comforting, universal dish found everywhere, from the classic British Sunday roast to French Daube .
It’s a testament to the power of slow, thoughtful cooking.
The Maillard Reaction: Deepening Flavor with a Proper Sear
The sear is not optional. Do not skip this step. Searing the chuck roast develops the Maillard reaction, which is that gorgeous process where proteins and sugars caramelize. This creates hundreds of complex, savory flavor compounds the "umami" backbone of our whole dish.
This dark crust then dissolves into the braising liquid, making the gravy insanely deep and rich.
Breaking Down Collagen for Melt-in-Your Mouth Texture
Collagen starts breaking down around 160°F (71°C) but really needs time at higher internal temperatures (195°F 205°F / 90°C 96°C) to fully dissolve into gelatin. That's why we cook the pot roast far past the normal "done" temperature for other cuts.
We are purposefully overcooking the meat fibers to break down the supporting structure, resulting in that legendary fork tender outcome.
Developing the Perfect Braising Liquid
The secret to killer gravy is using the fond —those brown bits scraped up after searing the meat and vegetables. Deglazing with wine removes those bits and incorporates them into the liquid base.
Using quality, deep beef stock ensures the final gravy isn't watery, but robust and intensely satisfying. You want a liquid that tastes delicious before the braising even begins.
Essential Ingredients for a Rich Pot Roast
This recipe uses straightforward pantry staples, but the quality of your stock makes a huge difference. I always recommend using low-sodium stock so you can control the seasoning yourself.
| Ingredient | Why We Use It | Substitution Idea |
|---|---|---|
| Chuck Roast | Perfect fat/collagen ratio for slow cooking. | Brisket (adjust cooking time slightly) or Oxtail (richer, more involved). |
| Red Wine (Dry) | Adds acidity to balance fat and helps deglaze. | Use 1 cup of Balsamic Vinegar reduced well with 1 cup of Beef Stock. |
| Beef Stock | The primary braising medium. | Quality Bone Broth for extra richness and gelatin. |
| Tomato Paste | Deepens the savory color and acidity. | Ketchup (only 1 Tbsp, watch the sugar!) or a dash of Worcestershire sauce. |
Selecting the Best Cut for Pot Roasting
Chuck roast is the star here, mainly because it's economical and incredibly resilient. It has the perfect marbling and the highest amount of collagen. Because we are cooking low and slow in a moist environment (a Dutch oven or slow cooker pot roast), this tough cut becomes gloriously tender.
Ask the butcher to tie it up for you if you can; it helps the roast cook evenly.
Choosing the Right Root Vegetables (Beyond the Standard Potato)
Carrots, celery, and onions are non-negotiable they are the classic mirepoix that builds the aromatic base. I chop mine into large, 2 inch chunks because anything smaller turns into total mush after 4 hours.
You can throw in parsnips or rutabaga if you like, but keep them big!
Building Depth: Aromatics and Stock
We rely on fresh thyme and bay leaves for that quintessential rustic flavor. A good quality beef stock, ideally homemade or a concentrated version, is key. If you really want a luxurious, dark gravy, sometimes I grab a small Turkey Neck Gravy: Slow Simmered, Deeply Savory Sunday Roast Essential base to mix in. It adds intense depth that stock cubes just can’t touch.
step-by-step Guide: Slow Braised Pot Roast Perfection

This recipe uses a Dutch Oven in the oven (the best pot roast method), but you could adapt this for a slow cooker pot roast or Instant Pot if you need a quicker fix.
Prepping the Roast: Trimming, Tying, and Seasoning
- Pat and Dust: Pat the chuck roast completely dry using paper towels. This is crucial for a great sear, honestly. Season heavily with salt and pepper, then lightly dust all sides with 2 Tbsp of flour.
- Heat: Add the oil to your Dutch oven over medium high heat until it shimmers.
Achieving a Deep Golden Crust on All Sides
- Sear: Sear the roast on all sides for about 4– 5 minutes per side. You want a deep mahogany crust, not just a light tan. Be brave here! Remove the seared meat and set it aside.
- Sauté: Reduce the heat slightly. Add the onions, carrots, and celery. Cook for 5– 7 minutes, scraping up all those beautiful brown bits (the fond ) from the bottom of the pan as you stir.
- Paste: Stir in the minced garlic and tomato paste. Cook for 1 minute until the paste darkens slightly, which concentrates its flavor.
Setting the Temperature and Monitoring Cook Time
- Deglaze: Pour in the red wine. Bring it to a rolling simmer and scrape vigorously to dissolve all the remaining fond. Reduce the wine by half; this takes about 5 minutes and mellows the acidity.
- Add Liquid: Return the chuck roast to the pot. Add the beef stock and herbs (bay leaves, thyme). The liquid should come about two-thirds of the way up the side of the roast.
- Braise: Cover the Dutch oven tightly and transfer it to a preheated oven at 160°C (325° F) . Braise for 3 to 4 hours. I usually check mine after 3 hours, but only once! The pot roast in oven needs to be undisturbed.
Resting the Roast and Thickening the Gravy
- Rest: When the pot roast is absolutely fork tender, remove it carefully and place it on a cutting board. Tent it loosely with foil and let it rest for at least 15 minutes. Don't skip this rest!
Chef's Note: Resting allows the meat fibers to relax and redistribute those amazing juices back into the chuck roast. If you slice it too soon, all that glorious moisture ends up on your cutting board, not in your mouth.
- Gravy Prep: Place the Dutch oven back on the stove. Use a ladle to skim off any excess fat floating on the surface of the braising liquid. This yields a much cleaner, richer gravy, just like finishing a perfect jus for a Beef Loin Roast Recipe: Perfect Herb Crusted Loin with Jus .
- Thicken: Simmer the liquid, reducing it for about 10– 15 minutes until it thickens slightly and tastes intensely flavorful. If you want a truly thick, luxurious gravy, whisk in the optional Beurre Manié (softened butter mixed with flour) slowly until you reach your desired consistency.
Troubleshooting Your Pot Roast: Chef’s Secrets for Success
We’ve all had a dry or chewy roast, haven't we? I certainly ruined a few before I learned the rules. These are the two biggest mistakes I see new cooks make.
Avoiding a Dry Roast: Ensuring Sufficient Braising Liquid
The meat should never be fully submerged, but you do need enough liquid to cover about 2/3rds of the roast. If your oven temperature is slightly high, the liquid will evaporate faster. Check the liquid level halfway through cooking. If it looks low, add a splash more hot stock.
A dry roast often means the temperature was too high, causing evaporation and tough results.
The Crucial Role of Resting Time
I made this mistake my first time; I was so hungry, I sliced right into it. Instant regret. Slicing immediately causes all the internal pressure to release those juices, drying out the center. Set a timer for 15 minutes and walk away.
The resting period lets the meat relax and absorb the liquid back into the fibers, giving you maximum tenderness.
How to Tell When Your Pot Roast Is Truly Done
Forget the meat thermometer (though it should read 205°F). The real test is texture. Gently poke the meat with a fork. It should offer absolutely zero resistance and easily pull apart or shred.
If you have to tug, it needs more time put the lid back on and let it cook for another 30– 60 minutes.
Storing and Reheating: Making Your Pot Roast Last Longer
A good pot roast is arguably better the next day, once the flavors have truly married up. Leftovers are a gift!
Best Practices for Refrigerated Leftovers
Once cooled, store the sliced or shredded pot roast and the gravy together in an airtight container. The gravy acts as a protective barrier, keeping the meat moist. It will keep beautifully in the fridge for up to 4 days.
The Safest Way to Freeze and Thaw the Roast
Pot roast freezes like a dream. Divide the shredded meat and gravy into meal sized portions in freezer safe bags or containers. Label them with the date. It holds quality for about 3 months. When thawing, move the container to the fridge overnight to thaw slowly and safely.
Refreshing the Flavor During Reheating
My favorite way to reheat is low and slow. Place the meat and gravy in a covered oven safe dish and bake at 300°F (150°C) until warmed through. If the gravy looks too thick, add a small splash of stock or water. This method prevents the meat from drying out, unlike nuking it in the microwave.
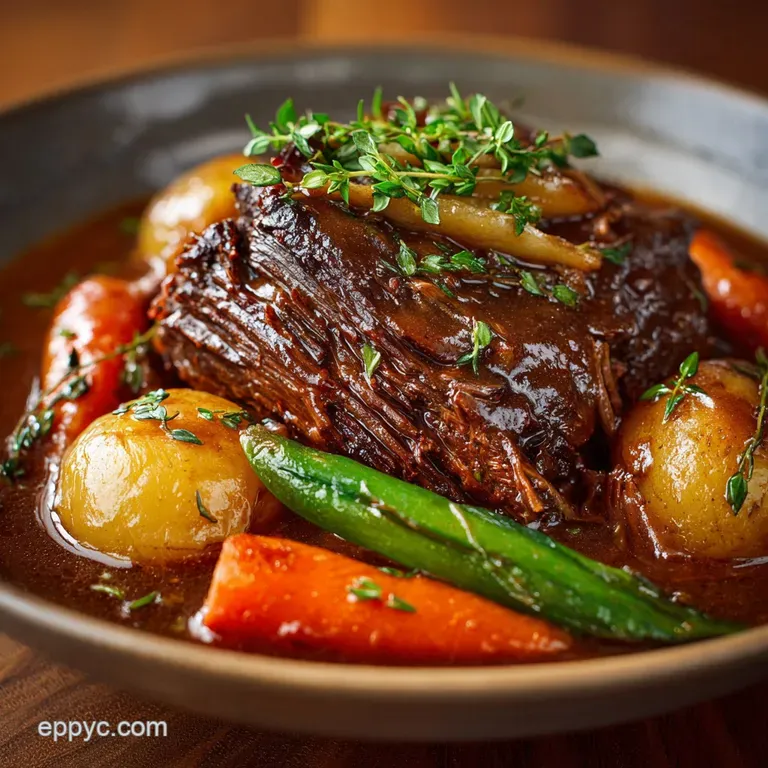
Complementary Sides for The Great British Pot Roast
This pot roast recipe demands a starchy side capable of soaking up every last drop of that incredible gravy.
- Creamy Potato Perfection: I love serving this with creamy mashed potatoes, but if I’m feeling fancy, I make a batch of Au Gratin Potatoes: Ultra Creamy Béchamel Gratin with Gruyère Cheese .
- Greens: Simple steamed green beans or broccoli, tossed with a bit of lemon zest and butter, provides a crucial color and textural contrast.
- The Classic: Yorkshire Puddings are essential for that traditional, puffy crunch.
- Wine Pairing: Serve the rest of the Cabernet Sauvignon you used for the braise it complements the deep savory flavor perfectly.

Recipe FAQs
Why is my pot roast tough or dry?
Toughness is almost always a result of insufficient cooking time or a lack of moisture, preventing the collagen from breaking down into gelatin. Ensure your oven temperature is low (around 300°F) and the meat reaches an internal temperature of 195°F 205°F, which is well past safe, but necessary for fork tender texture.
Which cut of beef works best besides chuck roast?
While chuck roast is the gold standard due to its excellent marbling and collagen content, great alternatives include bottom round, shoulder clod, or brisket. Brisket requires slightly longer cooking time to achieve the same tenderness, but it offers a fantastic flavor profile when done correctly.
Is searing the meat absolutely necessary before braising?
Searing is highly recommended as it initiates the Maillard reaction, developing deep, complex, savory flavor notes that significantly enhance the final gravy. While you can skip this step in a pinch, be aware that the overall depth and color of the dish will be noticeably diminished.
How long can I store leftover pot roast, and can I freeze it?
Properly stored leftovers will keep well in the refrigerator for 3 to 4 days when sealed in an airtight container. Yes, pot roast freezes exceptionally well; portion the meat along with a good amount of the gravy to prevent drying, and it will remain high-quality for up to 3 months.
Can I adapt this recipe for an Instant Pot or pressure cooker to save time?
Absolutely, pressure cooking is an excellent time saver for pot roast, reducing the cook time to about 60 75 minutes under high pressure, plus natural release time. To ensure even cooking in the pressure cooker, it helps to cut the meat into two or three slightly smaller chunks before searing.
How can I deepen the gravy flavor without using wine or alcohol?
To achieve a rich, deep gravy without wine, first caramelize two tablespoons of tomato paste during the browning of the aromatics. Alternatively, incorporate a spoonful of high-quality balsamic vinegar or use concentrated beef stock base (demi glace) dissolved in hot water for immediate umami depth.
When should I add softer vegetables like peas or mushrooms?
Root vegetables are added early because they require long cooking, but softer vegetables should be held back until the final phase of cooking. Add delicate items like sliced mushrooms or frozen peas during the last 15 to 20 minutes of heating, after the roast has already been removed and rested.
Classic Sunday Pot Roast Recipe

Ingredients:
Instructions:
Nutrition Facts:
| Calories | 390 kcal |
|---|---|
| Protein | 50.5 g |
| Fat | 13.9 g |
| Carbs | 10.6 g |
