Managed Perfection Lowandslow Duck Leg Confit
- Hey There, Ready for Real French Fancy?
- Understanding the Magic
- The Secret Weapon: Temperature Control
- Why This Effort is Worth Every Minute
- Getting Started: Gear and Goodies
- The Secret to Perfection: Prep and Controlled Cooking
- Just the Nitty-Gritty: Tips and Tricks from My Kitchen
- Plating Up & Contrast is King
- Keeping It Fresh: Storage & Fat Reuse
- Mix It Up! Dietary Swaps
- Nerd Corner: Nutrition Notes
- You Nailed It!
- Frequently Asked Questions
- 📝 Recipe Card
Hey There, Ready for Real French Fancy?
Have you ever scrolled past a recipe that looked amazing but seemed totally out of reach? That’s exactly how I felt about Duck Confit for ages.
Honestly, it screams fancy French bistro, right? Oh my gosh, I thought it was only for professional chefs with complicated equipment.
But what if I told you that once you learn how the entire process is properly managed , it’s absolutely achievable at home? It requires patience, not panic.
This isn't just cooked duck. It's the most glorious, buttery, flavour packed poultry you will ever eat, all thanks to the low-and-slow confit technique .
Understanding the Magic
Confit is an ancient classic French preservation method originating in Gascony. It literally means preserving the meat by slow cooking it submerged in its own fat.
The final result is impossibly tender meat sheathed in a crisp, deeply flavourful skin.
This isn't a quick weeknight throw together, mind you. We are talking about a total time commitment of around 28 hours, but don’t let that scare you! Most of that is passive time, dedicated to the mandatory duck leg curing process in the fridge.
The active cooking itself is incredibly simple.
The Secret Weapon: Temperature Control
The trickiest bit in this whole operation is maintaining precision temperature management . We rely on controlled low-heat oven settings . Your oven needs to stay consistently low we're aiming for that sweet spot between 190° F and 210° F .
This is why I consider a reliable essential digital probe thermometer completely non-negotiable. I learned this the hard way years ago, trying to cook my first batch only to find out my old oven thermostat was lying, and I ended up essentially frying the duck rather than confiting it.
Tough as old boots! Don't be like me; manage that temperature from the start!
Why This Effort is Worth Every Minute
Why go to all this effort? Because the payoff is pure magic. When you are mastering duck confit timing , you get meat that truly melts off the bone.
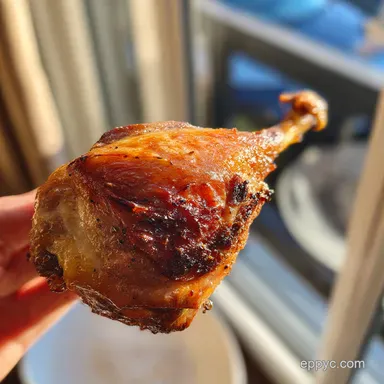
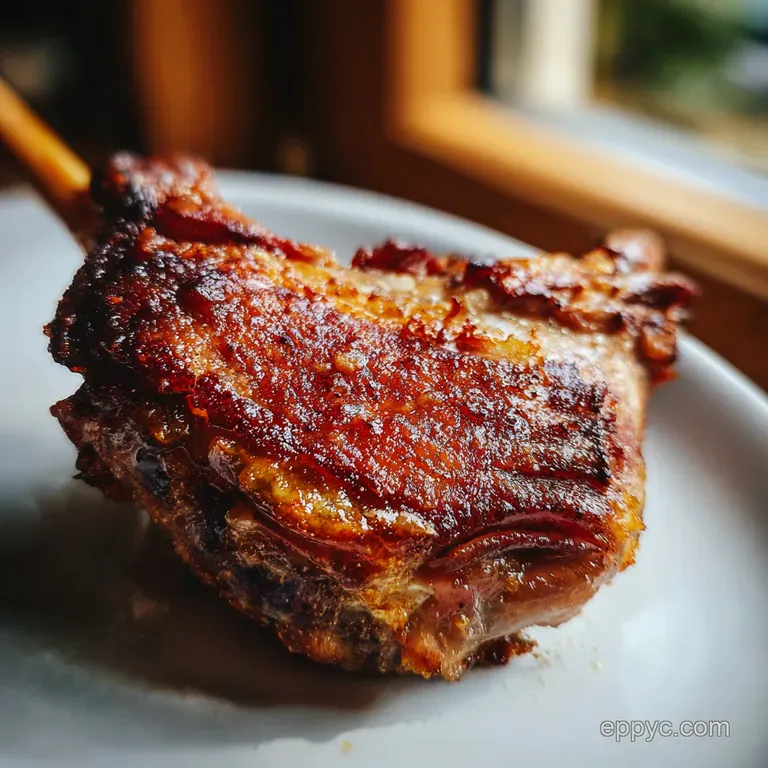
The final, glorious step is achieving perfect crispy duck skin . That contrast tender meat, shatteringly crisp skin is what makes this dish legendary.
This is a foolproof poultry preparation method for impressing dinner guests or just elevating a classic Sunday roast. Plus, there’s a major bonus: we get the delicious rendered duck fat reuse ! That liquid gold is perfect for the absolute best roast potatoes you will ever make.
Trust me, the flavour profile makes the time investment completely worthwhile.
Right, enough chat. Let's get down to the duck leg curing process so we can start building flavour!
Getting Started: Gear and Goodies
Honestly, this recipe isn't rocket science, but it demands respect. Think of it like a fancy baking project. You need the right tools and the right measurements.
The success of the whole Low-and-slow confit technique hinges on having great ingredients and being able to maintain precision temperature management .
Don't worry, you’ve got this!
Ingredients That Matter
This dish is about pure flavor, so the quality of your duck legs and your fat really count. We need 4 large duck legs (about 1.
2 kg / 2.6 lbs total). Look for legs with thick, unblemished skin that skin is where the magic happens later, helping us in Achieving perfect crispy duck skin .
The Soul of the Cure
The Duck leg curing process is mandatory. Seriously, don’t skip it. For this stage, we need precise weighting for foolproof poultry preparation .
Grab 60g (4 Tbsp) of coarse sea salt. I once used fine salt by mistake and the duck tasted like it swam in the Dead Sea.
Too harsh! Mix that with 10g (2 tsp) of sugar, fresh thyme, and sliced garlic. This isn't just seasoning; it's the Classic French preservation method at work.
Liquid Gold
Next up is the fat. You need enough rendered duck fat about 900g (2 lbs) to fully submerge those legs. If you're short, goose fat works just as well, but please, no olive oil! It needs to be pure animal fat to truly achieve the confit texture.
Oh my gosh, the best bit? You get amazing Rendered duck fat reuse afterward. Strain that stuff and save it!
Essential Kit for Temperature Control
If there is one thing you must buy for this recipe, it’s a good thermometer. For Mastering duck confit timing , you simply can’t guess.
First, you need an Essential digital probe thermometer . It keeps an eye on the internal temperature of the fat bath itself.
This is how the temperature is managed so closely. We are talking about maintaining Controlled low-heat oven settings between 190° F and 210° F ( 88° C 99° C) .
If you spike above 225° F ( 107° C) , you're frying, not confiting.
You'll also need a heavy bottomed Dutch oven. That heft helps keep the heat stable it’s crucial for holding that low temperature steady.
If you don't have a Dutch oven, a heavy casserole dish that fits the legs snugly will do. Just make sure it has a tight lid!
The Secret to Perfection: Prep and Controlled Cooking

Honestly, when I first heard "Duck Confit," I pictured some complicated, black magic French technique. Turns out, it's just patience and a thermometer.
This is absolutely achievable. Don't stress. We are aiming for foolproof poultry preparation .
Getting Organized: The Curing Stage
First things first: organization is your friend. This isn't just chopping veg; it’s essential mise en place . Before you touch the bird, mix your cure.
Remember, the mandatory chilling time is non-negotiable. This crucial duck leg curing process takes at least 24 hours . That salt cure draws out moisture and concentrates the duck's flavor profile.
It sets up everything for the final crisp.
While you prep, locate your essential tools. You need that essential digital probe thermometer . Seriously, don't even start without it.
Ovens are notorious liars. If you think your oven is accurate, check again. We need to know exactly what is happening inside that fat bath.
Mastering the Low-and-Slow Confit Technique
Once the legs are cured, rinsed, and bone dry, it’s time for the immersion. We are entering the realm of the low-and-slow confit technique .
- Melt the rendered duck fat reuse gently.
- Submerge the duck legs completely. They must be swimming!
- Transfer the pot to the oven. We need controlled low-heat oven settings . Set your oven to 225° F ( 107° C) .
- Monitor the fat temperature immediately. Use your probe to maintain strict precision temperature management . We need the fat to sit right between 190° F and 210° F ( 88° C– 99° C) .
- If you see rapid bubbling, pull it out! Your heat is too high. You’re frying, not confiting.
- Bake for a huge chunk of time about 3.5 to 4 hours . The meat should feel utterly tender.
This process is the classic French preservation method . It requires diligence, but once you’ve managed the temperature, the rest is smooth sailing.
The Final Flourish: Crisping and Reuse
I used to panic about the finishing step. How do you get that skin like glass? Simple: dry and hot.
The secret to achieving perfect crispy duck skin is zero moisture. Scrape off the fat before searing. Pat the legs dry again, like you’re preparing them for a photoshoot.
Get a heavy pan super hot. Place the legs skin side down. Press gently. Listen to that sound! Sear for 5 to 8 minutes .
This is mastering duck confit timing . You are rendering out the remaining fat and getting that brittle, perfect crunch. When the skin is mahogany, you are ready.
One last tip: don't throw away the fat! That rendered duck fat reuse is liquid gold. Use it for roasting potatoes next week. You’ve earned it.
Just the Nitty Gritty: Tips and Tricks from My Kitchen
You did it! Mastering duck confit timing and getting those legs into the oven is the hardest step. Now that the low-and-slow confit technique is underway, let’s talk about maximizing the goodness and making sure those leftovers shine.
This is where we ensure the whole process is properly managed .
Plating Up & Contrast is King
Oh my gosh, I love this part. After all the effort, presentation matters. The trick is to play up the crunch of the achieving perfect crispy duck skin against something creamy.
I remember serving this once with just heavy potato dauphinoise it was honestly too much richness! Now, I always pair it with something acidic.
Go for a sharp Frisée Salad tossed with a strong Dijon vinaigrette. That sharp tang cuts right through the richness of the duck and the fat.
For a side starch, my absolute favourite is creamy celeriac root mash. It has an earthy sweetness that is just perfect.
Keeping It Fresh: Storage & Fat Reuse
This recipe relies on the classic French preservation method , which is brilliant for leftovers. If you cooked extra, ensure the legs are fully covered in the cooled, solidified fat before you put them in the fridge.
This fat layer creates a perfect seal, meaning your confit will stay amazing for up to three weeks! It’s all part of the careful time managed system.
Before refrigeration, immediately strain your used fat through a fine sieve. This rendered duck fat reuse is non-negotiable. Seriously, use it for your Sunday roast potatoes it turns them into liquid gold!
Mix It Up! Dietary Swaps
The beauty of this is its fundamental simplicity, but you can definitely tweak it. The only non-negotiable is maintaining controlled low-heat oven settings .
For those who need to avoid high sodium, adapting the duck leg curing process is simple. Skip the intense salt cure and just season lightly before submersion.
This might not be the traditional way, but it works as a surprisingly foolproof poultry preparation option.
You can also switch fats! Goose fat yields a slightly richer, darker flavour than duck fat alone. For something completely different, add five spice powder to the fat bath for the last hour to give it an Asian twist.
Nerd Corner: Nutrition Notes
Okay, let’s talk fat. Yes, we used a lot! But here's an interesting stat: Duck fat is actually around 35% monounsaturated fat, which is the same type found in heart healthy olive oil!
Since we monitored the temperature with our essential digital probe thermometer we know the meat hasn’t been blasted. Duck meat is incredibly rich in protein and iron, making this a satisfying, luxurious meal.
It’s certainly not everyday food, but as a celebratory treat, the nutritional boost is worth it. Remember, enjoyment is key!
You Nailed It!
This recipe requires dedication and precision temperature management , but look what you accomplished! Take a minute to appreciate the results of this glorious low-and-slow confit technique .
Go forth and enjoy your ridiculously delicious, perfectly crisped duck confit. You earned it.
Frequently Asked Questions
Why do I have to bother with the 24-hour salt cure? Isn't that a bit of a faff?
That long cure isn't just a tradition; it’s structural! The salt draws out surface moisture, which prevents the meat from spoiling, tenderizes the meat fibres, and seasons the duck right to the bone.
Skipping this step means you miss the unique silky texture and the essential flavour preservation that defines proper confit it’s absolutely crucial prep work before the low-and-slow cook.
I’m running low on duck fat. What if my duck legs aren't fully submerged?
Full submersion is absolutely key to the confit process, ensuring the meat cooks gently and evenly without drying out, as the fat acts as a gentle heat buffer. If you're short on rendered duck fat (the culinary equivalent of liquid gold!), top up the vessel with goose fat or high-quality lard.
If you really can't get more fat, you can use less, but you must meticulously turn the legs every 45 minutes during the cooking time to ensure equal coverage.
Can this "managed" confit be made ahead of time for a proper feast?
Absolutely, making confit ahead is brilliant and highly recommended, as the flavour profile settles and deepens dramatically overnight. Once cooked, store the legs fully submerged in their fat in a sealed container in the fridge.
They will keep happily for several weeks, meaning the hardest part of your dinner party is already "managed" and sorted well in advance.
The duck skin is soft after the oven how do I achieve that perfect, brittle crispness?
Don't fret, the oven stage is purely for tenderness; the proper brittle crispness happens right at the end! You must ensure the legs are thoroughly patted dry after they leave the fat bath moisture is the enemy of a crisp skin.
Sear the legs aggressively, skin side down, in a separate hot pan for 5 8 minutes, applying gentle pressure with a spatula until the skin goes golden and shatters like glass job's a good un!
Is this recipe ridiculously unhealthy given the amount of fat used?
While duck confit is undeniably rich, it’s not as dire as you might think, as the meat cooks in the fat, rather than absorbing all of it. Duck fat is predominantly monounsaturated fat, similar to olive oil, and you should scrape off as much excess solidified fat as possible before the final crisping.
To manage the richness of the entire meal, serve it alongside a sharp, vinegary salad like Frisée, which cuts through the flavour beautifully.
Managed Perfection Lowandslow Duck Leg Confit