Pioneer Woman Garlic Bread: the Ultimate Comfort Loaf
- Embracing Comfort Food: An Overview of the Pioneer Woman's Best Garlic Bread
- What You'll Need: Ingredients and Essential Substitutions
- The Science of Indulgence: Why This Garlic Bread Excels
- Step-by-Step Guide: Making Ree Drummond Style Garlic Bread
- Chef's Secrets: Achieving the Perfect Crust and Creamy Center
- Maximizing Freshness: Storage and Freezing Instructions
- What to Serve With Cowboy Kitchen Garlic Bread
- Recipe FAQs
- 📝 Recipe Card
Embracing Comfort Food: An Overview of the Pioneer Woman's Best Garlic Bread
That smell when fresh garlic and copious amounts of butter melt together is a total, immediate addiction. When this cheesy Pioneer Woman Garlic Bread comes out of the oven, your entire house is going to smell like pure, unadulterated comfort food it’s glorious.
The golden crust crackles satisfyingly, holding onto a steam softened, unbelievably creamy interior.
Honestly, this recipe is the ultimate dinner cheat code. It requires about 15 minutes of actual hands-on work and instantly transforms any regular weeknight meal into a celebratory feast.
Pioneer Woman recipes are deservedly legendary for being straightforward, focusing on big, bold flavor, and never being too fussy; this easy garlic bread appetizer is the absolute perfect example of that generous cowboy kitchen spirit.
Forget those sad, pale blocks of mediocre frozen garlic bread you sometimes buy at the store. We are going to make the real deal right now: deeply garlicky, compound butter magic, stuffed into every single crevice of a hearty loaf. Get your butter softening immediately because we are cracking on!
What Makes This Recipe Different?
Most quick recipes simply melt butter and drizzle it over bread before baking it, which often results in burnt garlic tips and a dry crust. This Pioneer Woman Garlic Bread recipe uses a two-step baking method that completely changes the game.
First, we infuse the bread by baking it tightly wrapped in foil, essentially steaming the centre and melting the butter deep into the crumb. Then, we open it up for a quick blast of high heat to guarantee that crunchy, golden brown crust.
Prep Time and Total Cook Duration
You won't be spending all afternoon fussing over this indulgent side dish. The active prep time is minimal, mostly involving mincing the fresh garlic and mixing the spread. You'll spend about 15 minutes prepping the loaf, followed by a total bake time of less than 20 minutes, making the total project time around 30 to 35 minutes.
Essential Tools for Baking
You really don't need fancy equipment for this cowboy classic. A sharp serrated knife is crucial for creating those perfect accordion slices without tearing the bread. Beyond that, you’ll just need a sturdy baking sheet, a mixing bowl for the spread, and some heavy duty aluminum foil to ensure a tight, steamy seal during the first bake.
What You'll Need: Ingredients and Essential Substitutions
We are using a truly generous, unapologetic amount of butter here, so please don't skimp on quality. This cheesy garlic bread recipe hinges on fresh ingredients, especially the Parmesan. Here is what you need, along with my tested substitution recommendations:
| Ingredient | Why We Use It | Tested Substitution |
|---|---|---|
| Unsalted Butter | Serves as the rich, creamy flavor base. | high-quality, unsalted vegan butter or block margarine (avoid spreads). |
| Fresh Garlic | Robust, pungent flavour. | 1 tablespoon of pre-minced jarred garlic (use less, as the flavour is more intense). |
| Parmesan Cheese | Provides salt, umami, and texture contrast. | Pecorino Romano for a sharper, saltier flavour, or nutritional yeast for dairy-free richness. |
| Italian Loaf/Baguette | Robust crust holds up to the stuffing. | Thick sliced Texas Toast or even a good gluten-free Bread Recipe: The Best Psyllium Husk Loaf for Sandwiches if necessary. |
| Dried Herb Mix | Essential for that classic Italian American depth. | You can use a pre-mixed Italian seasoning blend; check the sodium level if you do! |
The Science of Indulgence: Why This Garlic Bread Excels
This isn't just a basic recipe; it's smart cooking. The richness comes from layering flavor and controlling how the fat interacts with the bread crumb. We create depth right at the beginning, meaning you get massive flavour payoff for very little effort.
Choosing the Right Loaf (Italian vs. French)
You need bread with integrity. A soft sandwich loaf will just collapse and become a greasy mess, which we absolutely do not want. I prefer a robust Italian loaf (sometimes called a country loaf or ciabatta shape) because its slightly thicker, sturdy crust creates a wonderful textural contrast.
A long, skinny French baguette works beautifully too, especially if you prefer smaller, individual slices.
Butter and Cheese Quality (No Skimping!)
The quality of the butter is arguably more important than the bread itself in this recipe. Use proper, full fat butter, not a blend or a low-fat spread. For the Parmesan, always grate it fresh —the pre-shredded stuff contains powders that keep it from melting smoothly into the garlic bread spread.
Recommended Dried Herb Blends
The standard blend here is oregano and basil, which provides that recognizable, comforting Italian American flavour. For a slight twist, I often throw in a pinch of dried thyme or a tiny bit of smoked paprika for earthy warmth. Remember, dried herbs are potent, so stick to the listed measurements!
The Magic of Compound Butter (The 'Secret' Flavor Base)
This rich garlic butter is the heart of the Pioneer Woman Garlic Bread. By thoroughly mixing the softened butter with all the herbs, cheese, and minced garlic before baking, you create an emulsion.
This compound butter ensures that every slice gets an equal amount of flavour, and the fat content helps insulate the delicate garlic from scorching in the hot oven.
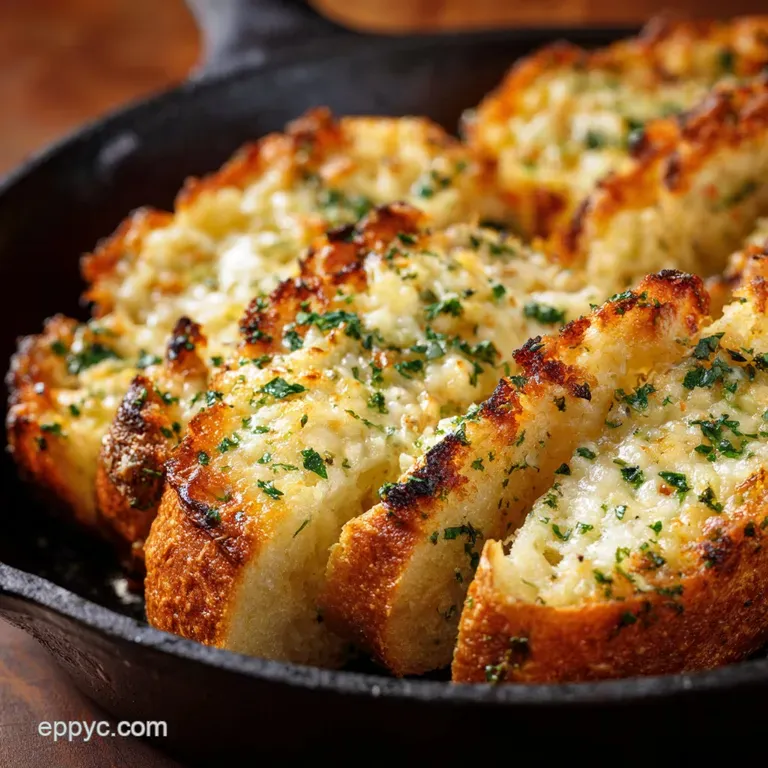
Achieving the Perfect Golden Brown Crust
The golden crust is all about that final, exposed bake. After the covered "steaming" step, you are going to open the foil and let the dry heat caramelize the cheese and toast the edges of the bread.
If your oven has a broiler that you trust, a quick 60 second blast can deliver incredible crunch, but watch it like a hawk burnt bread makes me sad.
step-by-step Guide: Making Ree Drummond Style Garlic Bread

This process is straightforward, but focusing on the technique will give you the best, most decadent result.
Preparing the Aromatic Garlic Butter Spread
First, ensure your butter is truly at room temperature; it should be very soft, almost creamy. Combine the soft butter, minced fresh garlic (lots of it!), finely grated Parmesan, salt, pepper, and dried herbs in a large mixing bowl.
Mix vigorously with a wooden spoon or spatula until everything is evenly distributed and the mixture smells absolutely fantastic.
Chef's Note: If you want an incredibly creamy result, add 1 tablespoon of mayonnaise to the compound butter mix. That’s a classic Cowboy Kitchen trick to keep the spread from hardening up too much!
Slicing and Stuffing the Loaf Correctly
Place the loaf on your cutting board. Using a long serrated knife, slice the bread crosswise into 1 inch thick sections. Crucially, do not slice all the way through the bottom crust. The loaf needs to remain attached at the base, acting like a hinged accordion.
Now, spoon generous amounts of the compound butter into the gaps, pushing it deep down and ensuring the cut surfaces are well coated.
The Initial Covered Bake for Creaminess
Tear off a large sheet of heavy duty aluminum foil. Wrap the stuffed loaf tightly, ensuring the foil seams are sealed at the top and the ends are crimped shut. Place the foil wrapped loaf directly onto a baking sheet and bake at 375°F (190°C) for 10 minutes.
This steam baking step fully infuses the garlic and keeps the bread wonderfully moist inside.
Final Uncovered Broil for Crispness
Remove the bread from the oven and carefully peel back the foil (watch out for steam!). If you are adding extra mozzarella, sprinkle it on now. Return the loaf to the oven, unwrapped, for another 5 to 8 minutes. You are looking for a deep, golden brown color and bubbling cheese.
If you need a faster crisp, switch to the broiler for 30 60 seconds, staying right there until it achieves perfection.
Chef's Secrets: Achieving the Perfect Crust and Creamy Center
Even simple recipes can sometimes trip you up, especially when rich ingredients are involved. Here are the common fails and how we fix them.
Troubleshooting Soggy or Dry Bread
If your bread is soggy, you used too much butter for the size of your loaf, or you didn't bake it long enough uncovered. If it's dry, the bread was likely sliced too thin, or you overbaked it during the final crisping stage.
Always finish with at least 5 minutes of uncovered baking to dry out the surface and develop the crust.
How to Prevent Burnt Garlic Tips
The number one culprit for burnt garlic is mincing it too finely or baking it uncovered right from the start. Since we use the foil technique, the garlic is protected during the initial melt. If you notice tiny bits of garlic browning too fast in the final stage, loosely tent the bread with foil again immediately.
Adjusting the Butter-to-Garlic Ratio
My recipe calls for 6 8 cloves, and I stand by that serious level of flavor. If you find the flavor too intense, simply blanch your minced garlic quickly in boiling water for 30 seconds before adding it to the butter. This softens the raw bite without compromising the essential garlic punch.
Maximizing Freshness: Storage and Freezing Instructions
Garlic bread is best fresh, of course, but sometimes you need to prep ahead or save leftovers.
Storing Baked vs. Unbaked Loaves
Unbaked: You can assemble the entire loaf, wrap it tightly in plastic wrap (then foil), and store it in the refrigerator for up to 2 days. When ready to bake, unwrap and bake as instructed, adding 3- 5 minutes to the initial covered time since it's cold.
Baked: Once baked and cooled completely, wrap leftovers tightly in foil and keep in the fridge for up to 3 days.
Reheating Tips for Day-Old Bread
Never reheat garlic bread in the microwave it turns sad and chewy. The best way is to wrap the day-old slices back in foil and bake them in a 350°F (175°C) oven for about 8 minutes. If you want the crunch back, open the foil for the last 2 minutes.
What to Serve With Cowboy Kitchen Garlic Bread
This richly satisfying Pioneer Woman Garlic Bread is the ideal partner for anything involving a delicious, savory sauce. It’s perfect for scooping up every last drop!
Simple Sauce Pairings That Shine
This bread absolutely demands a red sauce. Think about pairing it with a big batch of rich Pioneer Woman Meatballs: The Tender Big Batch Freezer Classic , or maybe spooning some hearty tomato sauce from a Chicken Recipes Pioneer Woman Style: Creamy Biscuit Casserole over the top. If you’re serving it as an appetizer, a simple side of warm marinara sauce is always a winner for dipping.

Recipe FAQs
Can I prepare the compound butter ahead of time, and how should I store it?
Absolutely, the compound butter is perfect for prepping ahead, which saves significant time before a party or dinner. Mix all the ingredients fully, roll the butter into a tight log using parchment paper or plastic wrap, and refrigerate it for up to one week.
Alternatively, you can freeze the butter log for up to three months, ensuring it is well wrapped to prevent freezer burn.
Why did the center of my garlic bread turn out mushy or soggy?
A soggy interior usually results from trapped steam or using bread that is too fresh and soft. Ensure you are using a slightly day-old, robust Italian or French loaf, as fresh bread holds too much moisture and collapses easily.
Furthermore, make sure to open the foil completely for the final 5 to 8 minutes of baking to allow the moisture to escape and the crust to crisp up properly.
What is the best type of bread to use for this rich, buttery recipe?
The ideal foundation is a sturdy, artisan style French baguette or Italian loaf, avoiding very airy or overly flat breads like Ciabatta. The loaf needs a slightly crusty exterior and a dense enough interior structure to absorb the melted butter and cheese without immediately becoming saturated or collapsing.
Using a sturdy loaf ensures the outside develops that desired crackle while the inside stays creamy.
Can I substitute dried garlic powder for the fresh garlic called for in the compound butter?
While fresh garlic provides the sharp, pungent flavor essential to this "Pioneer Woman" style richness, you can substitute with quality garlic powder if necessary. Use about 1 teaspoon of garlic powder for every 3 cloves of fresh garlic listed, but be mindful that the flavor will be less robust and more subtle.
We recommend always using fresh herbs like parsley, as the dried versions lose too much color and brightness during baking.
How should I freeze the prepared, unbaked garlic bread for later use?
To freeze the loaf, wrap the buttered and stuffed loaf tightly in plastic wrap, then add an outer layer of heavy duty aluminum foil to prevent freezer burn. Label the package and store it in the freezer for up to 3 months.
When ready to bake, remove the plastic, thaw the loaf for about 30 minutes, rewrap it loosely in the foil, and bake 10-15 minutes longer than the original recipe specifies.
How can I adapt this recipe to be dairy-free or vegan?
This recipe relies heavily on dairy for richness, but successful substitutions are achievable. Replace the traditional butter with a high-quality, firm vegan butter stick, avoiding softer tub spreads which may melt too quickly.
For the Parmesan, substitute a mixture of nutritional yeast, a pinch of salt, and a tablespoon of ground cashews to replicate the savory, cheesy flavor profile.
Pioneer Woman Garlic Bread Recipe

Ingredients:
Instructions:
Nutrition Facts:
| Calories | 677 kcal |
|---|---|
| Protein | 31.8 g |
| Fat | 18.5 g |
| Carbs | 95.9 g |
