Brisket: the Ultimate Oven-Braised Sunday Beef Feast
- Mastering the Sunday Roast: Why Brisket Demands Patience
- The Secrets to a Perfect Brisket Crust and Meltdown
- Essential Components for Flavorful Brisket
- Essential Components for Flavorful Brisket: Substitutions
- Step-by-Step Guide to Oven-Braised Brisket
- Troubleshooting and Expert Tips for the Best Brisket
- Planning Ahead: Storing and Reheating Brisket
- What to Serve with Classic Slow-Braised Brisket
- Recipe FAQs
- 📝 Recipe Card
Mastering the Sunday Roast: Why Brisket Demands Patience
When the air in your kitchen starts to thicken with the scent of wood smoke, black pepper, and melting fat, you know it’s a good Sunday. That rich, almost earthy aroma promises something truly special: a crunchy, blackened bark yielding to a cascade of incredibly juicy, fork tender meat.
This isn't just a recipe; it's a sensory experience that defines comfort food.
Now, I know what you’re thinking: Brisket is difficult, stressful, and takes a million hours. It absolutely takes time, but the active cooking is maybe 25 minutes total, making this slow braised brisket a lifesaver for easy weekend hosting.
You just pop this bad boy in the oven, walk away, and come back hours later to a perfectly tender result that easily feeds ten people it’s actually cheaper per serving than almost any other substantial roast.
Forget trying to rig up a smokehouse in your backyard; we are going to achieve that quintessential, fall apart tender brisket right in a standard home oven. If you’ve struggled with dry or chewy results before, trust me, my foolproof method focuses on trapping the moisture and letting science do the heavy lifting.
Let's crack on with the secrets to the ultimate Sunday roast brisket recipe.
The Science of Tenderness: Collagen Breakdown
Brisket, the pectoral muscle of the cow, starts off tougher than old boots, thanks to thick layers of connective tissue called collagen. This isn't a fast cooking cut like a tenderloin.
The magic happens when you hold the meat between 93°C and 96°C (200°F and 205° F) for several hours. At this specific temperature, that tough collagen dissolves into gelatin.
That gelatin is what coats the muscle fibers, turning dry, chewy meat into moist, luxurious, melt-in-your mouth perfection.
Oven vs. Smoker: Achieving Barbecue Flavor Indoors
While a smoker provides constant wood smoke, our home oven method relies on a heavily seasoned, aggressive crust and a tightly sealed braise. By searing the brisket first, we create a complex foundation of flavour.
The combination of smoked paprika in the rub and the long, slow cook mimics some of that smoky depth, creating an intense, dark "bark" that traditional barbecue fans adore. We essentially trick the oven into becoming an extremely effective, low-temperature cooking chamber.
Understanding the Brisket Flat Cut
Brisket actually comes in two parts: the leaner flat and the fattier point. This recipe focuses on the flat cut because it slices beautifully, making it perfect for a classic tender beef brisket centerpiece. You want to look for a piece around 4 to 5 lbs (2 kg). If you end up using the fattier point, remember it’s better suited for shredding, maybe for a batch of my favourite The Ultimate SlowCooked Smoky Brisket Sandwich Recipe .
The Secrets to a Perfect Brisket Crust and Meltdown
This isn't just about heat; it's about control. Achieving that dark, peppery crust (the bark) while maintaining internal moisture is the balancing act of perfect brisket in the oven . The heavy dry rub is key here, absorbing moisture on the surface to create that texture contrast.
Essential Components for Flavorful Brisket
The Crucial Role of the Sear (Maillard Reaction)
Don't skip the sear, seriously. Searing the brisket in the pan before adding the liquid develops the Maillard reaction that deep, savory, browned flavor that you simply can't achieve any other way. We sear, remove the meat, sauté the onions in the fat, and then deglaze the pan.
This process locks every bit of flavour right back into the braising liquid.
Low and Slow: Temperature Control for Home Ovens
We start a little higher (325°F/160°C) for the first three hours to really punch the heat into the meat and develop the crust. Then, we drop the temperature down to a gentle 275°F (135°C).
That temperature drop is essential for the long haul, preventing the exterior from drying out while ensuring the collagen has all the time it needs to convert inside. Remember: low and slow is non-negotiable for tender results.
Sourcing and Trimming Your Brisket Flat
When you buy your brisket recipe meat, ask for a flat cut that already has some fat cap on top, but not massive, hard chunks. Trimming is crucial. Use a sharp knife to remove any super hard, silvery connective tissue (silverskin).
You want to leave about 1/8 inch (3 mm) of fat remaining on the top side. This fat melts slowly during cooking, basting the meat from above.
Crafting the Signature Pepper Based Rub
This is the famous Texas style foundation, focusing heavily on coarse pepper and salt. The key is using coarse ground ingredients because they stand up to the long cook time without dissolving instantly. I always recommend using quality Kosher or sea salt and fresh, coarsely cracked black pepper for maximum flavor punch. If you want to amp up that savory, deep flavor, a small scoop of a special bouillon blend works wonders. I even have a whole post about it: Ultimate Savory Brisket with Beef Bouillon Blend: Tender, Juicy Perfection! .
Essential Components for Flavorful Brisket: Substitutions
If you don't have everything on hand, don't worry. Here are a few swaps that still deliver serious flavor depth.
| Component | Standard Ingredient | Viable Substitution |
|---|---|---|
| Brisket Cut | Flat Cut | If using Point Cut, plan to shred the final result. |
| Smoked Paprika | Smoked Paprika (Ahumado) | Use 1/2 tsp Liquid Smoke + 1 tbsp standard Sweet Paprika. |
| Beef Stock | Low-Sodium Beef Stock | Dark Beer (Stout or Porter) or strong black coffee for depth. |
| Apple Cider Vinegar | Cider Vinegar | Red Wine Vinegar or Balsamic Vinegar (use slightly less). |
step-by-step Guide to Oven Braised Brisket
Preparation and Dry Rub Application (The Night Before)
- Pat it dry. Pat your trimmed brisket completely dry using paper towels. Moisture is the enemy of a good crust.
- Make the rub. Combine all the rub ingredients in a small bowl. Do not be shy with the application.
- Rub liberally. Rub the entire surface with a light coating of oil, then press the rub mixture onto all sides of the brisket, ensuring the bark forms a solid, beautiful layer.
- Wait for the magic. Place the seasoned brisket on a wire rack over a tray and refrigerate overnight (or at least 4 hours). This allows the salt to start tenderizing the meat and drawing moisture out of the surface, ensuring a crispier bark later.
Searing, Braising Setup, and Initial Cook
- Set the heat. Preheat your oven to 325°F (160°C).
- Sear aggressively. Heat a tablespoon of oil in your roasting pan or Dutch oven over medium high heat. Sear the brisket (fat-side down first) for 3– 4 minutes per side until you have a deep, uniform crust. Remove and set the brisket aside.
- Build the flavor base. Add the chopped onions and smashed garlic to the pan, scraping up all those delicious brown bits (that's the deglazing). Sauté until fragrant and softened, about 5 minutes.
- Add liquid. Pour in the vinegar, Worcestershire sauce, stock, and bay leaf. Bring the liquid to a simmer.
- Seal the deal. Place the seared brisket (fat-side up) back into the pan. The liquid should cover about one-third of the meat's side. Cover the pan tightly with heavy duty aluminium foil and place the lid on top. You want zero steam escaping.
- The long haul begins. Place the pan in the oven and cook for 3 hours undisturbed.
Testing for Doneness and the Rest Period
- Temperature drop. Reduce the oven temperature to 275°F (135°C). Continue cooking for another 3 to 5 hours.
- The probe test. Start checking the internal temperature after 6 total hours. The brisket is ready when it reads between 200°F and 205°F (93°C and 96° C) . More importantly, it should feel like you're inserting the thermometer into room temperature butter it should slide in with no resistance.
- The crucial rest. Remove the pan from the oven. Do not peek, unwrap, or slice it! Let the brisket rest, still tightly sealed in the pan, for a minimum of 60 minutes. This allows the juices to settle back into the meat fibers instead of leaking out onto your cutting board.
Finishing the Pan Juices (A Sauce Reduction)
- Strain and skim. Carefully lift the rested brisket out of the pan and place it on a clean cutting board. Strain the pan juices into a saucepan, discarding the cooked onions and garlic.
- Make the sauce. Skim off any excess fat floating on the surface of the liquid. Bring the liquid to a simmer and reduce it until it thickens slightly into a glorious, savory gravy.
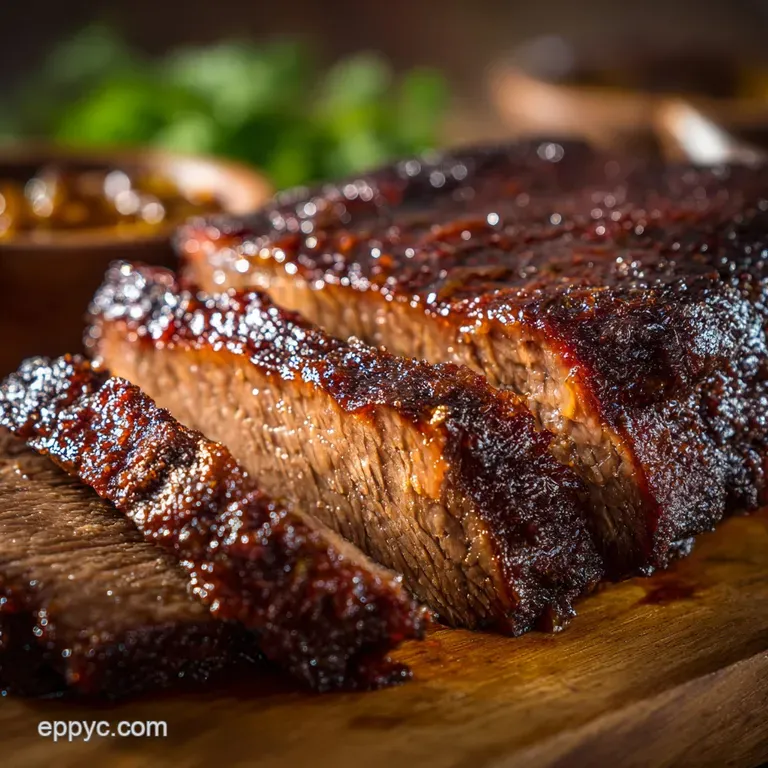
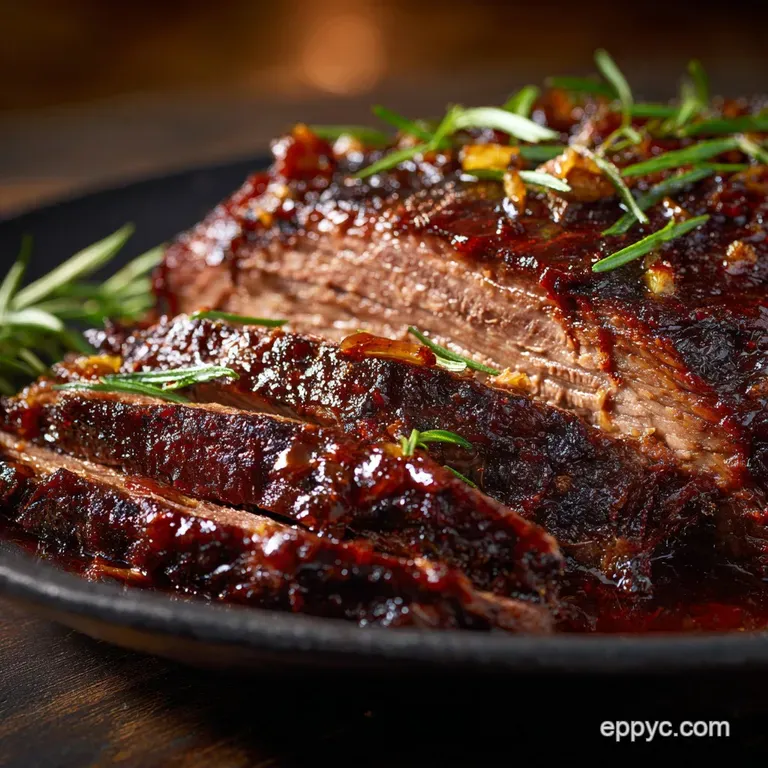
- Slice and serve. Locate the grain of the meat (the direction the fibers run) and slice against it, thinly. Serve the slices immediately, drizzled with the warm pan sauce.
Crucial Chef's Note: If you are unsure of how long the cook time will be, you can always finish your brisket hours early. Once rested, wrap the sealed brisket tightly in towels and place it in a cooler box (not plugged in, just insulated).
It will safely stay hot and juicy for up to four hours while you wait for your guests.
Troubleshooting and Expert Tips for the Best Brisket
Avoiding the "Stall" (Managing Moisture Loss)
The "stall" is terrifying, but common. This happens when the internal temperature gets stuck around 150°F 160°F (65°C 71°C) for over an hour, due to evaporative cooling on the surface. To push past it, employ the "Texas Crutch": remove the brisket, wrap it even tighter in a fresh double layer of foil along with a small splash of braising liquid, and return it to the oven. If I’m in a hurry, sometimes I even throw it into the slow cooker for this phase. Have you seen my Easy Crock Pot Brisket Recipe Texas BBQ FallApart Tender ?
How to Slice Brisket Against the Grain
Slicing correctly is the difference between tender brisket and chewy shoe leather, even if you cooked it perfectly. Before you season the raw brisket, find the grain (the direction the muscle fibers run) and score a small notch perpendicular to it.
After cooking, you'll know exactly which way to slice: perpendicular to that score mark . Slices should be about a quarter inch thick.
Saving Overly Salty or Dry Results
If your final result is too salty (I've been there, I oversalted once right before a holiday), there's a quick fix: slice the brisket and gently re-immerse the slices in a batch of fresh, unsalted beef stock for 10 minutes before serving.
If the brisket is dry, the only real solution is to slice it, smother it heavily in your finished, warm pan gravy, and serve it fast.
Planning Ahead: Storing and Reheating Brisket
Optimal Refrigerator and Freezing Techniques
Cooked brisket will last safely in the refrigerator for 3 to 4 days. Always store the slices submerged in the residual pan juices or gravy; this helps maintain moisture and flavor.
For freezing, make sure the brisket slices are fully cooled, then transfer them to a freezer safe bag or container, again, topped with plenty of sauce. It will keep beautifully for 3 months.
Reheating Slices vs. Reheating Whole Pieces
For Slices: The best way to reheat is to place the sauce covered slices in an oven safe dish, cover tightly with foil, and warm them low and slow (250°F/120°C) until heated through, about 20 minutes. Microwaving tends to dry them out terribly.
For Whole Pieces: If you froze or refrigerated the whole leftover portion (still wrapped), you can warm it gently in the oven (250°F/120°C) until the internal temperature reaches 160°F (71°C). This takes longer, often an hour or more, but yields the best texture.
What to Serve with Classic Slow Braised Brisket
Classic Side Dish Pairings
You need sides that can stand up to this rich, smoky brisket recipe —and sides that can soak up every last drop of that incredible gravy.
- Creamy mashed potatoes (a non-negotiable classic).
- A vibrant, vinegar based coleslaw or pickled red onions to cut through the richness.
- Roasted root vegetables, like carrots or parsnips.
- Crispy, oven baked fries, because sometimes you just want that extra crunch.

Recipe FAQs
Why is my brisket tough or dry, even after slow cooking?
This usually means it hasn't reached the temperature required to fully break down connective tissue, which is typically between 200°F and 205°F. If the meat is dry, it may have lost too much moisture during the "stall" period; ensure it is tightly wrapped in foil or butcher paper during the final hours of cooking to trap steam.
How do I know when the brisket is truly done?
Brisket is judged by texture, not strictly temperature. When a thin probe inserted into the thickest part of the flat meets almost no resistance feeling like inserting it into warm butter it is ready. This desired tenderness usually occurs when the internal temperature hits 200°F to 205°F.
Should I use the Flat cut or the Point cut for this oven braised recipe?
This recipe focuses on the leaner Flat cut, which yields uniform slices perfect for serving a crowd and is easier to manage in a standard oven. If you opt for the fattier Point, which is excellent for shredding, be aware it may require a slightly longer cooking time to render the excess fat.
How long must I rest the brisket, and why is this step so critical?
Resting is arguably the most critical step for achieving a juicy, tender brisket, requiring a minimum of one hour, or ideally two to three hours. This allows the muscle fibers to relax and redistribute the internal juices, which would otherwise pour out immediately upon slicing, resulting in dry meat.
Can I prepare the brisket ahead of time, and how should I store leftovers?
Brisket keeps exceptionally well in the refrigerator for 3 4 days; store it unsliced, wrapped tightly, along with some of the braising liquid to maintain moisture. Leftovers can be sliced, vacuum sealed, and frozen for up to 3 months, though thawing and reheating may slightly impact the texture.
What is the "stall," and how does the oven braising technique manage it?
The stall occurs when the meat's internal temperature plateaus, typically between 150°F and 170°F, due to evaporative cooling on the meat's surface. Oven braising, particularly by tightly wrapping the meat in foil (the "Texas Crutch"), manages the stall by trapping steam and heat, ensuring a faster, more predictable temperature rise to completion.
Can I use a slow cooker or smoker instead of the oven?
While the seasoning rub and braising liquids are adaptable, cooking times and final results will vary dramatically. A slow cooker provides moisture but lacks the ability to create a crispy bark, while a smoker requires careful heat management and significantly longer cook times (12 16+ hours) to achieve authentic smoke flavor.
Ultimate Oven Brisket Recipe

Ingredients:
Instructions:
Nutrition Facts:
| Calories | 325 kcal |
|---|---|
| Protein | 42.9 g |
| Fat | 10.8 g |
| Carbs | 10.2 g |
