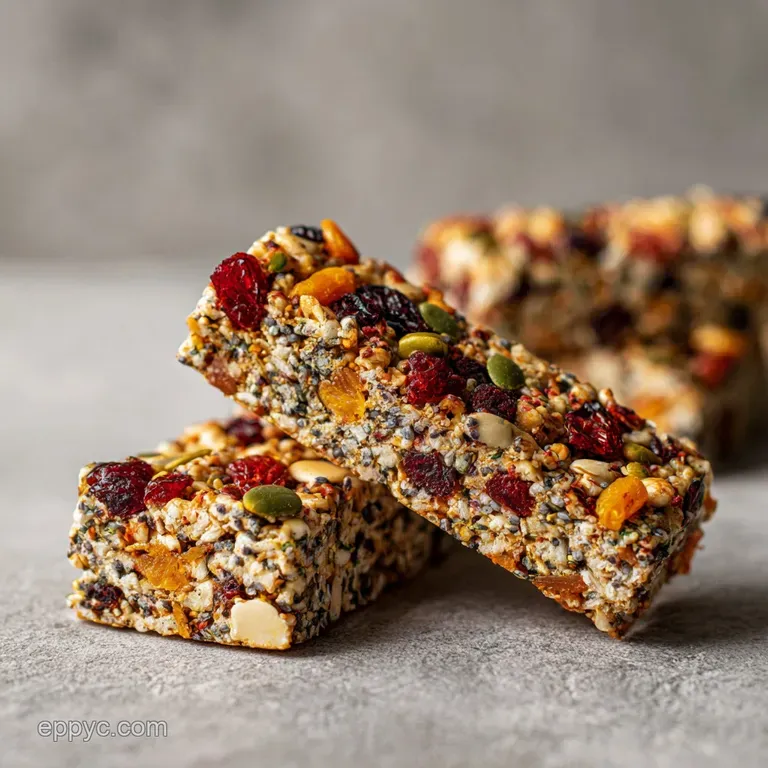
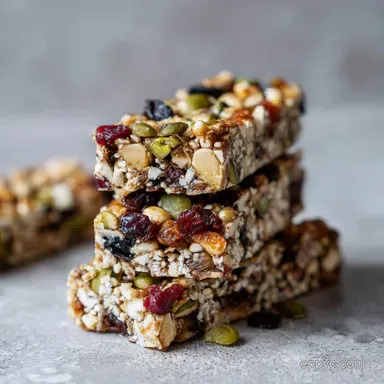
Trail Mix Granola Bars: Dense & Chewy
- Time: Active 15 minutes, Passive 1 hours, Total 1 hours 15 mins
- Flavor/Texture Hook: Chewy, salty sweet, and dense with a satisfying oat crunch
- Perfect for: High energy hiking, school lunches, or busy morning fuel
- Mastering My Favorite Trail Mix Granola Bars
- The Science of Creating the Best Texture Possible
- Analyzing the Components of Hearty Trail Mix Granola
- Crucial Precision Checkpoints for Your Homemade Snack Bars
- The Building Blocks
- Essential Tools for Hassle Free Batch Cooking Success
- Step by Step Guide to Crafting Chewy Bars
- Fixing Common Issues with Your Homemade Granola Bars
- Smart Ways to Customize Your Healthy Snack Options
- Debunking Kitchen Myths
- Best Practices for Long Lasting Freshness and Storage
- Creative Ideas for Enjoying Your Nutritious Energy Bars
- Recipe FAQs
- 📝 Recipe Card
Mastering My Favorite Trail Mix Granola Bars
The smell of toasting oats is basically my kitchen's version of a warm hug. I remember sitting on a jagged rock halfway up a trail last summer, reaching into my bag for a snack, and pulling out a handful of what used to be a granola bar. It had completely disintegrated into expensive dust.
I was hungry, frustrated, and ended up eating oat crumbs out of the corner of the bag like a bird.
That was the moment I realized most recipes just don't have the structural integrity for real life. Since then, I've been tinkering with ratios in my own kitchen to empower home cooks to make something that actually survives the journey. We've moved past the "hope it stays together" phase and into digital precision.
You'll love how the honey and almond butter create a velvety binder that keeps everything tucked in tight.
The Science of Creating the Best Texture Possible
Getting these bars to stay together isn't magic, it's chemistry. We are essentially creating a flexible matrix that traps dry particles without letting them become brittle.
- Sugar Recrystallization: Heating honey allows it to flow into every gap before it cools into a tacky, structural "glue."
- Starch Gelatinization: Toasting the oats slightly breaks down surface starches, helping them bond better with the wet ingredients.
- Emulsification Stability: The fats in the almond butter and coconut oil combine with the honey to create a thick syrup that resists moisture.
| Method | Time | Texture | Best For |
|---|---|---|---|
| Stovetop Toast | 8 mins | Extra nutty and crisp | Quick afternoon snacking |
| Oven Toasted | 15 mins | Even, deep golden color | Maximum structural strength |
| No Toast | 0 mins | Soft and slightly doughy | Busy mornings with no time |
Using the oven method is my personal favorite because it ensures every single oat flake has that toasted, popcorn like aroma. If you're looking for a different texture profile entirely, you might enjoy my Crunchy Oil Free Granola Recipe which focuses on a looser, pourable cluster. But for these bars, we want that solid, chewy bite that doesn't shatter when you take a corner.
Analyzing the Components of Hearty Trail Mix Granola
Understanding your ingredients is the first step to kitchen confidence. We aren't just tossing things in a bowl, we are building a snack that lasts.
| Ingredient | Science Role | Pro Secret |
|---|---|---|
| Old-Fashioned Oats | Primary structure | Never use "instant" oats or they turn to mush |
| Raw Honey | Sticky binder | Spray your measuring cup with oil first |
| Almond Butter | Fat source | Stir the jar well to incorporate the natural oils |
| Coconut Oil | Temperature stabilizer | Use virgin oil for a subtle tropical scent |
The Power of Binding
The honey and almond butter are the "mortar" here. Without the right heat, they won't fuse. I've found that using a small cast iron skillet (like a Lodge) to melt these together makes the heat more even.
High Protein Density
Adding the hemp hearts and almonds isn't just for crunch. It provides a slow release energy source that prevents the "sugar crash" you get from store-bought versions.
Crucial Precision Checkpoints for Your Homemade Snack Bars
To get these right every single time, I rely on a few specific numbers. Guessing is fine for soup, but for bars, we want technology level accuracy.
- Temperature: Heat your honey and almond butter mixture until it just begins to bubble at the edges (about 160°F if you're using a thermometer).
- Pressure: When you put the mix in the pan, use the bottom of a flat glass to press down with about 10 lbs of force. It should look like a solid brick.
- Weight: Ensure you have exactly 225g of oats. Too many and the bars will be dry and crumbly; too few and they'll be greasy.
The Building Blocks
- 2 ½ cups (225g) Old-Fashioned Rolled Oats
- ½ cup (30g) Crisp Brown Rice Cereal Why this? Adds lightness and a "shatter" crunch without density.
- ½ tsp Fine Sea Salt
- ½ cup (70g) Raw Almonds, roughly chopped Why this? Provides essential fats and a chunky, rustic texture.
- ¼ cup (35g) Raw Pepitas
- ¼ cup (40g) Dried Cranberries Why this? Chewy tartness balances the heavy sweetness of honey.
- ⅓ cup (60g) Mini Dark Chocolate Chips
- 2 tbsp (20g) Hemp Hearts
- ½ cup (125g) Creamy Natural Almond Butter Why this? Acts as a secondary binder with high protein.
- ½ cup (170g) Raw Honey
- 1 tsp Pure Vanilla Extract
- 1 tbsp (13g) Virgin Coconut Oil
| Original Ingredient | Substitute | Why It Works |
|---|---|---|
| Raw Honey | Brown Rice Syrup | Extremely sticky, but less sweet. Note: Bars will be firmer. |
| Almond Butter | Sunflower Seed Butter | Keeps the recipe nut free. Note: Can turn slightly green. |
| Dried Cranberries | Chopped Dried Apricots | Provides a more floral, summer like acidity. |
Essential Tools for Hassle Free Batch Cooking Success

You don't need a pantry full of gadgets, but two things make this recipe significantly easier. First, a heavy bottomed saucepan for the syrup. Thin pans will scorch the honey before it can emulsify with the almond butter. Second, use a 9x9 inch square baking pan.
If you use a larger pan, the bars will be too thin and won't hold their shape.
Chef's Tip: Freeze your chocolate chips for 20 minutes before folding them in. Since the oat mixture will still be slightly warm, this prevents them from melting completely and turning your bars into a brown, muddy mess.
step-by-step Guide to Crafting Chewy Bars
- Toast the oats. Spread the oats and almonds on a tray and bake at 350°F (180°C) for 10 minutes until they smell like toasted nuts. Note: This step is non negotiable for flavor.
- Combine dry goods. Toss the toasted oats, chopped almonds, rice cereal, pepitas, hemp hearts, and sea salt in a large bowl.
- Heat the binder. Combine the almond butter, honey, and coconut oil in a small saucepan over medium heat.
- Whisk the syrup. Stir constantly until the mixture is smooth and bubbling gently.
- Add aromatics. Remove the syrup from heat and stir in the vanilla extract.
- The big fold. Pour the warm syrup over the dry ingredients and stir until every oat is glistening.
- Cool slightly. Let the mixture sit for 5 minutes until it's no longer steaming. Note: This protects the chocolate chips.
- Add chocolate. Fold in the cranberries and mini chocolate chips quickly.
- The firm press. Transfer to a lined 9x9 pan and press down until the surface is completely flat and compact.
- Chill and set. Refrigerate for at least 1 hour until the bars feel rock solid to the touch.
Fixing Common Issues with Your Homemade Granola Bars
I've had my share of kitchen "disasters" where I ended up with a tray of loose granola instead of bars. Usually, it comes down to either the temperature of the syrup or the pressure of the press.
Why Your Bars Are Crumbly
If your bars fall apart the moment you cut them, the honey probably didn't get hot enough to reach the "tacky" stage. It needs to actually bubble. Another culprit is not pressing down hard enough. You really have to put your weight into it to force the air out.
My Chocolate Melted Everywhere
This happens when you're too eager! If you add the chips while the oats are still hot from the stove, they will liquefy. Wait until the mixture is just barely warm to the touch.
| Problem | Root Cause | Solution |
|---|---|---|
| Bars are too sticky | Too much honey or oil | Increase the amount of oats by 1/4 cup. |
| Bars are too hard | Over boiled the syrup | Only let the syrup bubble for 30 seconds max. |
| Ingredients didn't mix | Cold almond butter | Ensure the binder is fully liquid before pouring. |
Common Mistakes Checklist: ✓ Using "natural" honey that is too thin; thicker honey bonds better. ✓ Forgetting to line the pan with parchment paper (they will stick forever). ✓ Cutting the bars while they are still warm; they must be cold.
✓ Chopping the almonds too large, which creates weak points in the bar. ✓ Not stirring the almond butter jar before measuring the half cup.
Smart Ways to Customize Your Healthy Snack Options
If you want to scale this recipe down for a solo weekend trip, you can easily halve everything and use a standard loaf pan. For a 2x batch, I recommend doing it in two separate bowls. When you double the syrup, it can be harder to get an even coating on all the oats, and you might end up with dry pockets.
If you're making these for a crowd, keep in mind that the salt and vanilla don't need to be doubled exactly. I usually go for 1.5x the salt to prevent them from becoming overly savory.
For the baking step, if you're toasting 5 cups of oats at once, you'll need to stir them every 5 minutes to prevent the edges from burning while the center stays raw.
Debunking Kitchen Myths
"You must bake granola bars to make them stay together." This isn't true at all. While some recipes require an egg binder and baking, this version relies on the cooling of the sugar and fat. In fact, over baking these can make them break your teeth. The "chill set" method is much more reliable for a chewy texture.
"Honey and maple syrup are interchangeable." Not in this specific recipe. Honey is significantly more viscous and "sticky" than maple syrup. If you swap them 1:1, your bars will likely crumble because maple syrup lacks the necessary tension to hold the heavy oats and nuts.
Best Practices for Long Lasting Freshness and Storage
Store your bars in the fridge for up to 2 weeks. I like to wrap them individually in parchment paper so I can just grab one and go. If you're heading out on a long hike, they'll stay perfect in your pack for the day, but they do get a bit softer as they reach room temperature.
For long term storage, these freeze beautifully. You can keep them in a sealed container for up to 3 months. Just pull one out the night before you need it. If you end up with scraps or "ugly" pieces, don't throw them away. I love crumbling the leftovers over a bowl of yogurt or even using them as a topping for a Lemon Cream Cheese recipe for a bit of unexpected crunch. It's a great way to ensure zero waste in your kitchen while keeping your snacks interesting.
Creative Ideas for Enjoying Your Nutritious Energy Bars
While these are incredible on their own, I've found a few ways to make them feel like a real treat. Try dipping the bottoms in a little extra melted dark chocolate and letting them set on wax paper. It gives them a professional look that’s great for gifting.
If you’re at home, try warming a bar for 10 seconds in the microwave. It softens the almond butter just enough to make it feel like a fresh from the oven cookie. They are the ultimate "emergency snack" to keep in your car or desk drawer.
Trust me, once you start making your own, you'll never be able to go back to the boxed stuff again. It's all about that heartfelt connection to what you're eating!

Recipe FAQs
Why do my trail mix bars always crumble when I cut them?
The binder ratio is likely too low or wasn't heated enough. The honey must be heated until bubbling to achieve the correct viscous "tackiness" needed to glue the dry ingredients. Also, ensure you press the mixture very firmly into the pan.
How to store homemade granola bars to maintain chewiness?
Refrigerate them in an airtight container for best results. Storing them below 40°F (4°C) prevents the fats from softening and keeps the structure firm. They will remain fresh for up to two weeks this way.
Can I substitute maple syrup for honey in this recipe?
No, substitution will significantly alter the texture. Honey is much more viscous and provides stronger binding tension than maple syrup. Using maple syrup will result in a softer, more crumbly bar, unlike the dense texture achieved here.
How do I ensure the chocolate chips don't completely melt during mixing?
Freeze the chocolate chips for 20 minutes before folding them in. Since the oat base retains heat from the syrup, this quick chill prevents the chocolate from liquefying. If you are looking for a recipe where chocolate is the main binder, check out the Foolproof NoBake Peanut recipe which handles melted chocolate differently.
Is it necessary to toast the oats first?
Yes, toasting is critical for both flavor and texture. Toasting develops a nutty depth that un-toasted oats lack, and it also slightly alters the surface starches to bond better with the liquid binder.
What is the best technique for pressing the mixture into the pan?
Use the bottom of a flat, wide measuring cup or glass to apply significant downward pressure. You want to compress the mixture until all air pockets are eliminated, creating a dense foundation for structure.
Can I make these bars vegan by swapping the honey?
No, a direct swap for honey is challenging due to structural needs. While you can use vegan sugar substitutes, you risk losing the essential binding stickiness that honey provides. If you want a fully vegan, sticky bar, review the binding logic in the Seven Layer Dream recipe for alternative non-dairy stabilizers.
Chewy Trail Mix Granola Bars
Ingredients:
Instructions:
Nutrition Facts:
| Calories | 295 kcal |
|---|---|
| Protein | 7.7 g |
| Fat | 14.8 g |
| Carbs | 35.9 g |
| Fiber | 3.8 g |
| Sugar | 16.1 g |
| Sodium | 108 mg |
