Chocolate Coffee Syrup Recipe: Rich and Pourable
- Time: 5 min active + 10 min cook + 10 min cooling
- Flavor/Texture Hook: Glossy, mahogany finish with a deep cocoa punch
- Perfect for: Morning lattes, dessert coffees, or a quick drizzle over ice cream
- The Best Chocolate Coffee Syrup Recipe
- Why This Texture Works
- Ingredient Deep Dive
- Essential Ingredients and Swaps
- The Gear You'll Need
- Making Your Chocolate Syrup
- Fixing Common Syrup Issues
- Troubleshooting Common Issues
- Fun Flavor Twists
- Adjusting the Batch Size
- Syrup Misconceptions
- Storage and Scrap Tips
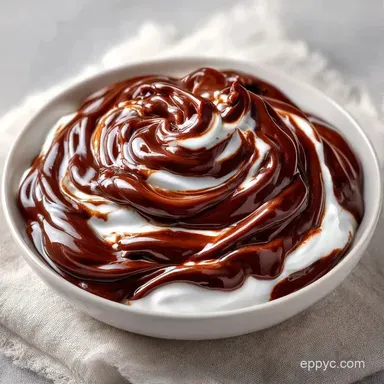
- Serving with Artistry
- Recipe FAQs
- 📝 Recipe Card
The Best Chocolate Coffee Syrup Recipe
The smell of a roasting espresso machine and the sight of a perfectly swirled mocha always remind me of the small cafes in Florence. There is something about the way those baristas treat coffee like an art form, focusing on the contrast of deep browns and creamy whites.
It isn't just about the caffeine, it's about that brief moment of luxury in a porcelain cup.
I wanted that same artistry at home, but store-bought syrups always tasted too metallic or overly sweet. I started playing with different sugars and fats to get that heavy, clinging texture that doesn't just sink to the bottom of the mug.
This Chocolate Coffee Syrup Recipe gives you that exact feeling. It’s a deep, dark sauce that blends into hot milk or clings to ice cubes, turning a standard morning brew into something that feels like a treat.
Why This Texture Works
- Dry Whisking: Mixing the cocoa and sugar before adding liquid breaks up those stubborn cocoa clumps. This ensures you don't end up with bitter powder pockets in your drink.
- Gentle Simmer: Heating the syrup slowly allows the coconut sugar to fully dissolve. It creates a glossy, cohesive liquid rather than a grainy sauce.
- Added Fat: Stirring in coconut oil at the end provides a reflective sheen. This fat also carries the chocolate flavor across your palate longer.
| Feature | Homemade Syrup | store-bought Shortcut | Impact |
|---|---|---|---|
| Ingredients | Real cocoa & coconut sugar | Corn syrup & artificial flavors | Better taste, cleaner label |
| Texture | Heavy and glossy | Thin and sticky | Better cling to the glass |
| Control | Adjust sweetness easily | Fixed sugar levels | Personalized flavor |
Ingredient Deep Dive
| Ingredient | What It Does | Best Swap |
|---|---|---|
| Cocoa Powder | Provides the base chocolate flavor | Dutch process cocoa for a darker hue |
| Coconut Sugar | Adds a caramel like sweetness | Brown sugar (adds more moisture) |
| Coconut Oil | Creates a glossy finish | Unsalted butter (richer, creamier) |
| Vanilla Extract | Rounds out the bitterness | Maple syrup (adds woody notes) |
Essential Ingredients and Swaps
- 1/2 cup (45g) unsweetened cocoa powder Why this? Gives a bold, unsweetened chocolate foundation.
- Substitute: Dutch process cocoa for a more mellow, alkaline taste.
- 3/4 cup (150g) coconut sugar Why this? Adds a deep, molasses like flavor.
- Substitute: Coconut syrup or brown sugar.
- 1 cup (240ml) filtered water Why this? Neutral base that lets chocolate shine.
- Substitute: Strong brewed coffee for an extra caffeine kick.
- 1/4 tsp (1.5g) fine sea salt Why this? Cuts the sweetness and pops the cocoa.
- Substitute: Kosher salt (use a pinch more).
- 1 tsp (5ml) pure vanilla extract Why this? Adds aromatic warmth.
- Substitute: Almond extract for a cherry like hint.
- 1 tbsp (14g) melted coconut oil Why this? Gives the syrup a professional sheen.
- Substitute: Melted butter.
The Gear You'll Need
You don't need a fancy lab here, just a few basics. A small saucepan is a must so the liquid doesn't evaporate too quickly. I prefer a whisk over a spoon because cocoa powder loves to hide in corners and form lumps. A glass jar with a tight lid is the best for storage, as it keeps the syrup airtight and easy to pour.
Making Your Chocolate Syrup
- Combine the cocoa powder, coconut sugar, and sea salt in a small saucepan. Whisk vigorously for 30 seconds until the mixture is a uniform brown color.
- Slowly pour in the water. Whisk constantly until you have a smooth, thick paste.
- Set the heat to medium. Bring the mixture to a gentle simmer.
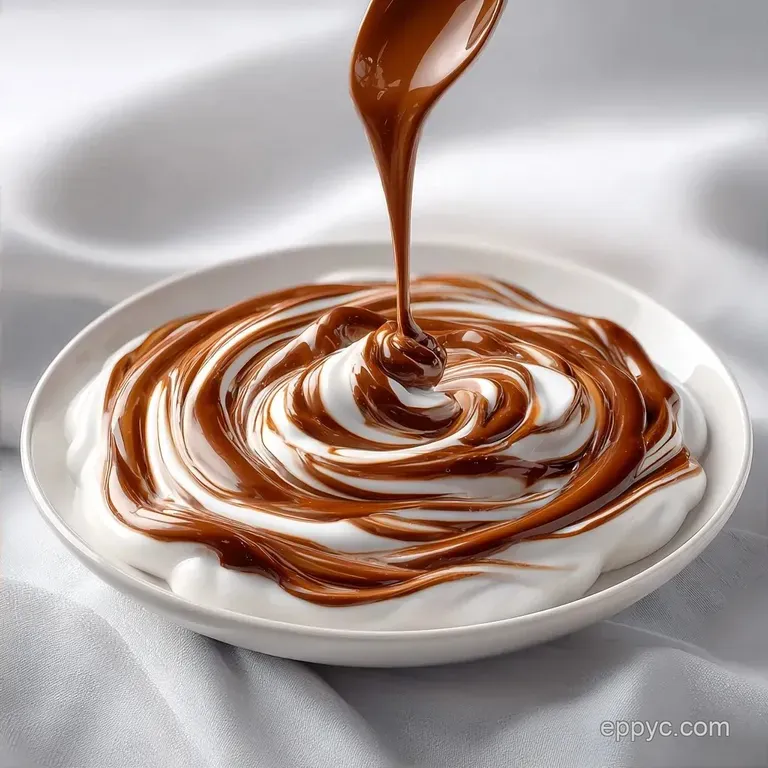
- Whisk occasionally for 5–8 minutes until the syrup thickens slightly and develops a glossy, mahogany sheen.
- Remove the pan from the heat immediately. Note: This prevents the sugar from scorching.
- Stir in the vanilla extract and melted coconut oil.
- Whisk until the fat is fully incorporated and the syrup is velvety.
- Let the syrup cool in the pan for 10 minutes.
- Transfer the liquid to a glass storage jar.
Chef's Note: To get that professional look, try "painting" the inside of your glass with the syrup using a spoon before pouring in your coffee. It creates those beautiful, organic streaks.
Fixing Common Syrup Issues

If your syrup isn't behaving, it usually comes down to temperature or mixing. If it feels gritty, the sugar likely didn't reach a full simmer. If it's too thin, you might have simmered it for too short a time. According to Serious Eats, the way you incorporate fats into cocoa can change the final viscosity of the sauce.
Troubleshooting Common Issues
| Issue | Solution |
|---|---|
| Syrup grainy | This happens when the coconut sugar doesn't fully dissolve. It's usually because the heat was too low or the simmer time was too short. You can fix this by gently reheating it for another 2 minutes. |
| Why is it too thin | If the syrup runs like water, it didn't reduce enough. Simmer it for an additional 3-5 minutes. Keep in mind that it thickens significantly as it cools. |
| Why did the syrup separate | Coconut oil can solidify in cold fridges. This isn't a failure, just physics. Give the jar a good shake or microwave a small portion for 10 seconds to bring it back to a pourable state. |
If you find you're struggling with the consistency, you might enjoy my homemade hot chocolate mix, which uses a different ratio for a drinkable powder.
Fun Flavor Twists
Once you have the base down, you can play with the profile. For a Dark Chocolate Coffee Syrup Recipe, replace half of the coconut sugar with a bit of maple syrup and use extra dark cocoa. It creates a more bitter, sophisticated edge that pairs well with a light roast coffee.
If you want a White Chocolate Coffee Syrup Recipe, you'll need to swap the cocoa powder for melted white chocolate chips and reduce the sugar. This version is much creamier and tastes like a dessert.
For those wanting a Keto friendly version, use a monk fruit sweetener and replace the water with a splash of heavy cream. Just be careful with the heat, as alternative sweeteners can sometimes turn bitter if boiled too hard.
Adjusting the Batch Size
Scaling Down
To make a half batch, use a very small saucepan. Because there is less liquid, it will evaporate faster, so reduce your simmer time by about 20%. If you're using an egg based garnish for a fancy drink, beat one egg first and use half.
Scaling Up
When doubling or tripling the recipe, don't just multiply the salt. Go to 1.5x for the salt and spices to avoid over seasoning. You can reduce the water by about 10% since a larger volume of liquid takes longer to reduce. Work in batches if your saucepan is too small, as overcrowding can lead to uneven heating.
| If you want... | Do this... | Result |
|---|---|---|
| More bitterness | Add 1 tsp instant espresso | Intense mocha flavor |
| Nutty notes | Add a drop of almond extract | Marzipan like finish |
| Extra richness | Use butter instead of oil | Heavier, creamier mouthfeel |
Syrup Misconceptions
Some people think you need to boil the syrup for a long time to make it thick. This is actually a mistake. Boiling too long can burn the cocoa and make the syrup taste acrid. The thickness comes from the reduction of water and the cooling process, not aggressive boiling.
Another myth is that you should add the vanilla at the start. Vanilla is volatile, meaning the flavor evaporates with heat. Adding it at the end preserves that floral aroma and sweetness.
Storage and Scrap Tips
Store your syrup in a glass jar in the fridge for up to 2 weeks. If you see a layer of coconut oil solidify on top, just stir it back in. This syrup doesn't freeze well because the water content can cause it to separate, so it's best kept fresh in the refrigerator.
To avoid waste, use any leftover syrup that's nearing its expiration date as a glaze for roasted carrots or a swirl in oatmeal. If you have a bit left in the bottom of the jar, pour in some hot coffee, shake it up, and you've got a quick mocha without wasting a drop.
Serving with Artistry
To make your coffee look show stopping, focus on color balance. A dark mocha needs bright accents to pop. I use three specific color accents to create a visual experience.
First, add a cloud of stark white whipped cream or frothed milk. This creates a high contrast base for the dark syrup. Second, add a tiny pinch of bright red cinnamon or a single raspberry on top. The red cuts through the brown and white perfectly. Finally, add a sprig of mint green or a dusting of green matcha powder.
When you layer these, you get a vibrant, artistic drink. If you're feeling adventurous, try using this as a drizzle for my easy homemade coffee drinks to add a layer of decadence.
For a classic iced mocha, swirl the syrup around the glass, fill with ice, add your espresso, and top with milk. The way the white milk swirls into the dark chocolate is a joy to watch. For a more subtle treat, try an espresso drizzle over a piece of dark chocolate cake.
Recipe FAQs
What's the best chocolate syrup for coffee?
A homemade blend of cocoa powder and coconut sugar. It provides a rich, mahogany sheen and a deeper flavor profile than processed store-bought alternatives.
How to make this chocolate syrup at home?
Combine cocoa powder, coconut sugar, and sea salt in a small saucepan. Whisk vigorously, slowly stir in water, and simmer for 5 8 minutes before finishing with vanilla and melted coconut oil.
Is it true that homemade syrups are always grainy?
No, this is a common misconception. Graininess only occurs if the coconut sugar doesn't fully dissolve, which can be easily fixed by reheating the syrup for another 2 minutes.
Why is my chocolate syrup too thin?
It likely didn't reduce enough during the simmering process. Simmer the mixture for an additional 3 5 minutes, though remember that the syrup thickens significantly as it cools.
How do you make flavored coffee syrups at home?
Whisk a sweetener and flavor base over medium heat until glossy. For this recipe, the key is whisking the dry ingredients first to eliminate clumps before adding liquid.
How to store the finished syrup?
Transfer the cooled syrup to a glass jar and refrigerate for up to 2 weeks. If the coconut oil solidifies on top in the cold, simply stir it back in before using.
What are some great DIY coffee recipes using this syrup?
Mix the syrup with cold brew and milk for a homemade iced mocha. If you enjoyed the rich chocolate profile here, you can use the same flavor layering technique in a homemade cocoa mix.
Chocolate Coffee Syrup Recipe