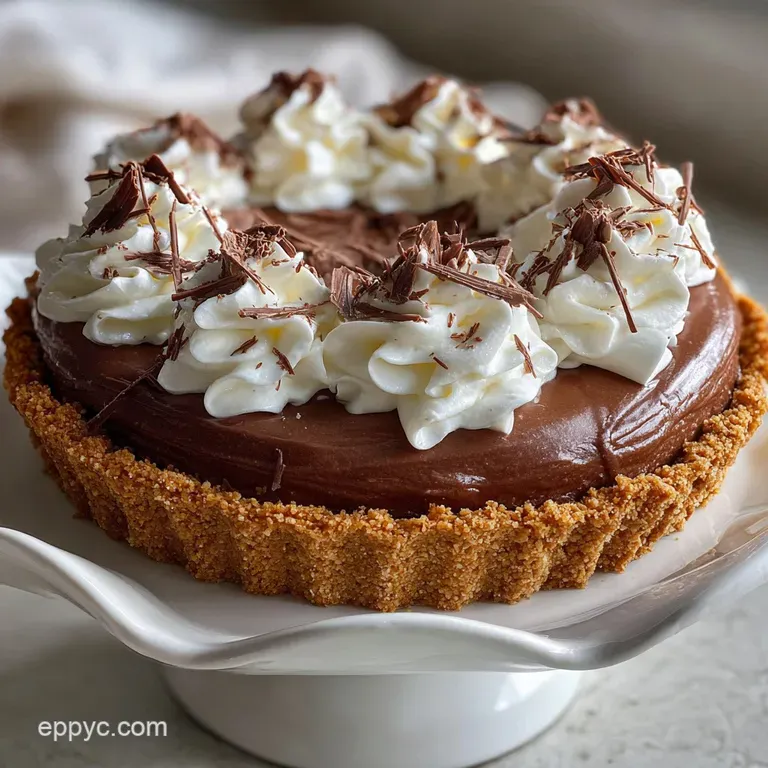
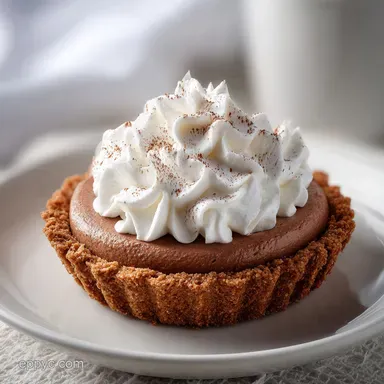
Chocolate Mousse Pie
- Time: Active 30 minutes, Passive 4 hours, Total 4 hours 30 mins
- Flavor/Texture Hook: A velvety chocolate center paired with a shatter crisp Oreo base.
- Perfect for: Show stopping dinner parties or artistic weekend baking.
- The Ultimate Decadent Chocolate Mousse Pie
- Why This Silky Texture Succeeds
- Essential Recipe Metrics and Yields
- Sourcing Your Chocolate Essentials
- Essential Gear for Pastry Artists
- Crafting the Perfect Velvet Mousse
- Fixing Common Texture Errors
- Creative Dietary Recipe Adaptations
- Storing for Maximum Freshness
- Plating and Color Contrast Ideas
- Recipe FAQs
- 📝 Recipe Card
The Ultimate Decadent Chocolate Mousse Pie
I remember the first time I tried to create a truly beautiful Chocolate Mousse Pie. I was obsessed with getting that specific "snap" from the crust while keeping the filling as light as a whisper. I spent hours in my kitchen, surrounded by dusting of cocoa and the rhythmic sound of a whisk hitting glass.
It felt less like cooking and more like painting with flavors, trying to find the point where sugar and fat create something breathable yet intensely rich.
The joy of this dish isn't just in the eating, it's in the assembly. There is something meditative about watching the heavy cream transform into stiff, snowy peaks, and then seeing those peaks disappear into a pool of glossy, melted 60% cacao.
I once made the mistake of rushing the cooling process, ending up with a soup rather than a mousse. But that failure taught me the most important lesson in pastry artistry: patience is the secret ingredient that ensures every slice holds its shape on the plate.
When you finally pull this pie from the fridge, the aroma of dark chocolate hits you first, followed by the sweet, familiar scent of vanilla. It’s a dish that demands attention. You’ll see the light catching the ridges of the whipped topping, and you'll know that the effort was worth it.
We aren't just making a dessert here; we’re creating a moment of pure, unadulterated decadence that lingers long after the last bite is gone.
Why This Silky Texture Succeeds
The Physics of the Peak: Heavy whipping cream contains fat globules that, when agitated, trap air bubbles to create a stable foam structure. This aeration is what provides the mousse its characteristic lightness and prevents it from becoming a dense chocolate block.
Emulsification Stability: By combining chopped chocolate with warm cream, we create a ganache which acts as the structural spine of the pie. The cocoa butter in the chocolate sets at room temperature, providing the necessary firmness to support the airy whipped cream.
The Barrier Effect: Melting the butter for the crust creates a fat coated moisture barrier. This prevents the moisture from the mousse from migrating into the Oreo crumbs, ensuring the base remains crisp rather than soggy.
| Method | Time | Texture | Best For |
|---|---|---|---|
| Stovetop Melting | 5 minutes | Glossy & Fluid | Creating the chocolate base |
| Microwave Melting | 2 minutes | Quick & Matte | Fast preparation |
| Oven Baking (Crust) | 10 minutes | Snap & Toast | Maximum structural integrity |
The choice between a chilled or baked crust often depends on the humidity in your kitchen. I find that a quick 10 minute bake at 350°F really locks the Oreo base in place, giving it that professional "crunch" that contrasts so beautifully with the velvety filling.
Essential Recipe Metrics and Yields
When we look at the components of a great dessert, the quality of the ingredients acts as our palette. This Chocolate Mousse Pie relies on the high fat content of the cream and the specific cacao percentage of the chocolate to achieve its artistic balance.
| Component | Science Role | Pro Secret |
|---|---|---|
| Oreo Cookies | Texture Contrast | Pulse to a fine sand for the best "snap" |
| 60% Cacao Chocolate | Structural Matrix | Chop finely to ensure even melting without scorching |
| Heavy Whipping Cream | Aeration Agent | Keep it at 38°F until the very second you whip it |
| Sea Salt | Flavor Enhancer | A tiny pinch breaks through the sugar to highlight the cocoa |
While you can technically use any chocolate, I highly suggest using a bar like Ghirardelli or Guittard rather than chocolate chips. Chips often contain stabilizers meant to help them keep their shape when heated, which can lead to a less silky mouthfeel in a mousse.
Sourcing Your Chocolate Essentials
To begin your artistic journey with this Chocolate Mousse Pie, you will need to gather your elements. Precision is everything in pastry, so ensure your measurements are exact.
- 24 Oreo cookies: These provide the dark, crunchy foundation. (Substitute: Chocolate wafers for a less sweet base). Why this? The creme filling acts as a binder for the crumbs.
- 5 tbsp unsalted butter: Melted to hold the crust together. (Substitute: Salted butter, but omit the extra sea salt pinch).
- 8 oz semi sweet chocolate (60% cacao): The heart of the mousse. (Substitute: Bittersweet chocolate for a deeper, less sweet profile). Why this? High cacao content ensures the mousse sets firmly.
- 0.5 cup heavy cream: For creating the initial ganache melt.
- 1.5 cups heavy whipping cream: Chilled and ready for aeration. (Substitute: Full fat coconut cream for a dairy-free twist).
- 0.25 cup powdered sugar: To gently sweeten the mousse without adding grit.
- 1 tsp pure vanilla extract: For aromatic depth.
- 1 pinch sea salt: To balance the richness.
- 1 cup heavy whipping cream: Cold, for the final cloud topping.
- 2 tbsp powdered sugar: For the topping's sweetness.
If you are looking for more no bake inspiration, you might enjoy my Decadent No Bake Chocolate Mousse recipe which focuses on a similar aeration technique but served in elegant glasses.
Essential Gear for Pastry Artists

You don't need a professional kitchen to make this, but a few specific tools will make the process much more joyful. I personally swear by a metal mixing bowl for the whipped cream because it retains the cold much better than plastic or glass.
- Food Processor: Necessary to turn those Oreos into a fine, uniform crumb.
- 9 inch Pie Dish: Glass or ceramic works beautifully here for presentation.
- Stand Mixer or Hand Mixer: To achieve those stiff peaks without exhausting your arm.
- Offset Spatula: This is the artist’s brush for smoothing the top of the mousse and the cream.
- Fine Mesh Sieve: If you want to dust the final product with cocoa powder for a professional finish.
I’ve found that using a stand mixer such as a KitchenAid allows you to multitask, which is helpful when you’re trying to keep an eye on your melting chocolate while the cream whips.
Crafting the Perfect Velvet Mousse
1. Construct the Foundation
Pulse the 24 Oreo cookies in a food processor until they resemble fine damp sand. Mix with the 5 tbsp melted butter and press firmly into the bottom and up the sides of your pie dish. Note: Use the bottom of a measuring cup to get a flat, even surface.
2. Melt and Emulsify
Place the 8 oz chopped chocolate in a heat proof bowl. Heat the 0.5 cup heavy cream in a small saucepan until it just begins to simmer. Pour the hot cream over the chocolate and let it sit for 3 minutes before stirring gently into a glossy ganache.
3. Achieve the Perfect Peak
In a chilled bowl, whip the 1.5 cups heavy whipping cream, 0.25 cup powdered sugar, vanilla, and salt until stiff peaks form. Note: The cream should hold its shape when you lift the whisk.
4. The Delicate Fold
Add a third of the whipped cream into the cooled chocolate ganache to lighten it. Then, gently fold in the remaining cream until no white streaks remain.
5. The Set and Chill
Pour the mousse into the prepared crust and smooth the top with your offset spatula. Chill in the refrigerator for at least 4 hours until the center is firm to the touch.
6. The Cloud Topping
Whip the final 1 cup heavy cream with 2 tbsp powdered sugar until lush and pillowy. Spread or pipe this over the set mousse just before serving.
7. Artistic Garnishing
For the final touch, consider your color balance. I love adding a few fresh raspberries for a pop of crimson, a sprig of mint for emerald green, and a light dusting of cocoa powder for texture.
For those who want to practice their crust making skills further, my Homemade Pie Crust recipe offers a traditional alternative if you ever want to swap the Oreos for a buttery, flaky pastry.
Fixing Common Texture Errors
Pastry can be temperamental, but most issues are easily solved if you know what to look for. The most common heartbreak with a Mousse Pie is a filling that doesn't set, which usually comes down to temperature.
Why Your Mousse Is Soft
If your mousse is runny, the chocolate ganache was likely too warm when you folded in the cream, causing the air bubbles to collapse. Or, the cream wasn't whipped to a true stiff peak.
| Problem | Root Cause | Solution |
|---|---|---|
| Grainy Mousse | Chocolate scorched or seized | Melt chocolate slowly; ensure no water touches it. |
| Soggy Base | Butter was too hot | Let the melted butter cool slightly before mixing with crumbs. |
| Weeping Cream | Over whipped topping | Stop whipping as soon as the cream looks smooth and matte. |
One trick I learned the hard way: if your chocolate seizes (turns into a dry clump), adding a teaspoon of boiling water and whisking vigorously can sometimes bring it back to a silky state, though it’s better to avoid the moisture in the first place!
Common Mistakes Checklist
- ✓ Chill your bowl and whisk for at least 15 minutes before starting.
- ✓ Use room temperature chocolate to ensure it folds into the cream without clumping.
- ✓ Never use "light" cream; the fat content is essential for the mousse's structure.
- ✓ Let the crust set in the freezer for 10 minutes before adding the filling.
Creative Dietary Recipe Adaptations
This recipe is quite versatile if you need to accommodate different needs. While it is naturally a heavy hitter on the decadence scale, minor swaps can change the entire experience.
- The Vegan Variation: Swap the heavy cream for chilled full fat coconut cream and use dairy-free chocolate and Oreos (which are surprisingly vegan!).
- The Low Sugar Swap: Use a high percentage dark chocolate (85%) and replace the powdered sugar with a powdered erythritol blend.
- gluten-free: Simply use gluten-free chocolate sandwich cookies for the crust; the filling is naturally gluten-free.
| Original Ingredient | Substitute | Why It Works |
|---|---|---|
| Heavy Cream | Coconut Cream | High fat provides structure. Note: Adds tropical flavor. |
| Oreo Cookies | Nut Flour & Cocoa | Creates a grain free crust. Note: Less "snap" than Oreos. |
| Powdered Sugar | Monkfruit Powder | Keeps the texture smooth without the glucose spike. |
If you enjoy the no bake style but want a different flavor profile, check out My Grandmother's No Bake recipe for a white chocolate alternative that is equally joyful to prepare.
Storing for Maximum Freshness
Because of the high dairy content, this pie needs to stay chilled. It’s actually better on the second day as the flavors have had time to truly meld together.
In the Fridge: Keep the pie covered with a loose tent of foil or a cake dome. It will stay fresh and velvety for up to 4 days. If you've already added the whipped cream topping, it may lose some volume after 48 hours.
In the Freezer: This pie freezes beautifully! Wrap it tightly in plastic wrap and then foil. It will last for up to 2 months. To serve, let it thaw in the fridge for about 2 hours it actually tastes wonderful when it's still slightly semi frozen, almost like an ice cream cake.
Zero Waste Tip: If you have leftover Oreo crumbs, don't toss them! Stir them into some softened vanilla ice cream or sprinkle them over yogurt for a little midday treat. Leftover ganache can be rolled into small balls and dusted with cocoa to make quick truffles.
Plating and Color Contrast Ideas
Presentation is where the artistry of the Chocolate Mousse Pie truly shines. I always think about the "rule of three" when garnishing. You want a mix of colors and textures that invite the eye before the fork.
- 1. The Base Note
- Use a vegetable peeler on a block of chocolate to create large, elegant curls over the whipped cream.
- 2. The Color Accent
- Add three fresh raspberries or a sliced strawberry to the center. The red against the white and dark chocolate is classic and sophisticated.
- 3. The Light Reflection
- A very light sprinkle of coarse sea salt or even a dusting of edible gold luster can make the pie look like it’s glowing under dining room lights.
If you are feeling extra creative, you could serve each slice with a small dollop of raspberry coulis on the side of the plate. The tartness of the berries cuts through the richness of the 60% cacao, creating a balanced experience that feels light despite the decadent ingredients.
Decision Shortcut
- If you want a denser, truffle like texture, increase the chocolate to 10 oz.
- If you want a lighter, more airy pie, fold in an additional 1/2 cup of whipped cream.
- If you want a mocha twist, add 1 tsp of espresso powder to the melting chocolate.
This Chocolate Mousse Pie is a testament to the joy of home baking. It’s about taking simple things cookies, cream, and chocolate and turning them into something that feels like a celebration.
Trust your whisk, watch your temperatures, and most importantly, enjoy the process of creating something beautiful.

Recipe FAQs
Can I use a different type of cookie for the crust?
Yes, feel free to experiment. Chocolate wafers offer a less sweet alternative, and if you enjoyed mastering the precise crumb texture for this crust, you can apply the same pulsing technique to create gluten-free crusts for desserts like our Decadent No Bake Chocolate Mousse.
Why is my chocolate mousse filling runny?
Your ganache was likely too warm or your cream not whipped to stiff peaks. The chocolate needs to cool sufficiently before folding in the cream to maintain aeration, and the cream must hold its shape firmly to provide structure.
How do I prevent a soggy crust?
Ensure the butter is slightly cooled before mixing with crumbs. If you enjoyed locking in the structure of this Oreo base, the principle of creating a fat barrier also helps ensure a crisp crust on traditional pies, similar to our Classic Cherry Pie Recipe: A Family Favorite with a Flaky Crust.
What's the best way to store leftover Chocolate Mousse Pie?
Refrigerate it covered for up to 4 days. The flavors meld beautifully overnight, and the pie is also excellent frozen for up to 2 months, thawing partially in the fridge for a delightful semi frozen texture.
Can I make this recipe dairy-free?
Yes, with a few simple swaps. Substitute chilled full fat coconut cream for heavy cream, and use dairy-free chocolate and Oreos (check labels as many Oreos are surprisingly vegan).
What kind of chocolate is best for the mousse?
Use a high-quality 60% cacao chocolate bar. Avoid chocolate chips, as their stabilizers can affect the silky texture. If you mastered the precise melting technique for this ganache, you can apply it to create rich fillings for any chocolate based dessert, such as in our How to Bake Chocolate Cake: Deliciously Classic Treat for Everyone!.
How do I achieve perfect stiff peaks when whipping cream?
Chill your bowl and whisk thoroughly, then whip cold cream until it holds its shape. This aeration is key to the mousse's lightness. If you enjoyed mastering this emulsification technique, you can achieve similarly stable textures in other recipes, like the base of our My Go-To Chess Pie Recipe: Southern Comfort Classic.
Chocolate Mousse Pie
Ingredients:
Instructions:
Nutrition Facts:
| Calories | 548 kcal |
|---|---|
| Protein | 3.2 g |
| Fat | 43.7 g |
| Carbs | 36.9 g |
| Fiber | 2.1 g |
| Sugar | 25.2 g |
| Sodium | 214 mg |
