Sticky Fingers Ultimate Bbq Chicken Drumsticks Oven Grill Ready
- Achieving Backyard Perfection: Why This BBQ Chicken Drumsticks Recipe Reigns Supreme
- The Secret to Juicy Meat: Mastering Texture Before the Glaze
- The Essential Arsenal: Assembling Your Flavour Components
- Step-by-Step Execution: Firing Up for Legendary BBQ Chicken Drumsticks
- Beyond the Basics: Customizing Your Glaze and Spice Profile
- Pairing Prowess: The Best Sides to Complement Your Feast
- Storage and Reheating: Keeping Your Leftovers Magnificent
- Recipe FAQs
- 📝 Recipe Card
Achieving Backyard Perfection: Why This BBQ Chicken Drumsticks Recipe Reigns Supreme
There is something inherently joyous about cracking into a perfectly cooked chicken drumstick dripping with sticky barbecue glaze. It’s the quintessential taste of summer, celebration, and relaxed evenings spent outdoors.
If you’ve ever been served poultry that promised smoky goodness but delivered dry disappointment, fear not. We are tackling the Best BBQ Chicken Drumsticks Recipe head-on, ensuring every single bite is moist, flavour packed, and perfectly caramelized.
This isn't just a method; it’s a technique blueprint designed to rescue your chicken from the dreaded dryness, transforming humble drumsticks into legendary finger food, whether you choose the convenience of the oven or the authentic char of the grill.
The Secret to Juicy Meat: Mastering Texture Before the Glaze
The biggest hurdle when tackling BBQ Chicken Drumsticks is balancing the cooking time required to render the fat and cook the bone-in meat thoroughly with the delicate nature of sugary sauces. Sugar burns quickly, often before the chicken reaches that ideal internal temperature.
Our strategy involves a deliberate two-stage approach: first, building an internal foundation of flavour and tenderness, and second, adding the sticky veneer right at the end. This foundational step is what separates an amateur attempt from truly Juicy BBQ Chicken Drumsticks .
Ditching the Dryness: Our No-Fail Succulence Guarantee
Succulence starts long before the heat source is engaged. The key lies in two fundamental preparation steps: ensuring the skin is utterly dry and using a robust dry rub. We utilize ingredients like brown sugar and smoked paprika in the rub, not just for initial flavour, but because they help draw out just enough surface moisture to encourage a better sear or crust formation later on.
By allowing the seasoned chicken to rest ideally for a minimum of one hour, though longer is always better the salt works its magic, tenderizing the meat fibres internally, guaranteeing moist results regardless of the final cooking environment.
From Oven to Ember: Versatility for Any Weather
While the smell of charcoal on a BBQ Chicken Grill is unmatched, not every day allows for outdoor cooking. This recipe is engineered to perform brilliantly in multiple settings.
For those rainy days or busy weeknights, the BBQ Chicken Drumsticks Oven method provides consistent, hands off heat perfect for slow rendering. When the sun is shining, we leverage the grill for that unmistakable char.
On top of that,, those looking for even quicker results can explore the BBQ Chicken Drumsticks Air Fryer method, which delivers crispiness rapidly without sacrificing much internal moisture, provided you manage the glaze timing carefully.
Why We Choose Drumsticks Over Other Chicken Cuts for Maximum Flavour
Drumsticks, or leg quarters, are structurally superior for high heat cooking compared to breasts or even thighs. They possess more connective tissue and fat, which translates directly into richer flavour and a higher resistance to drying out.
This fat renders during the cooking process, basting the meat from the inside out. For anyone seeking the most flavourful and forgiving BBQ Chicken Drumsticks Recipe , the drumstick is undeniably the champion cut.
The Essential Arsenal: Assembling Your Flavour Components
A truly exceptional batch of barbecue hinges on a powerful flavour pairing: the dry rub and the finishing sauce. Using a high-quality, balanced sauce elevates this dish from simple weeknight fare to something worthy of a proper cookout. We build these components separately to control texture and intensity.
The Dry Rub Deep Dive: Building the Initial Flavour Foundation
The dry rub is the first layer of defense against blandness. Our rub is designed to penetrate the meat initially. It features a foundation of sweet light brown sugar to aid caramelization, balanced by robust, smoky smoked paprika, garlic, and onion powders.
A pinch of cayenne provides background warmth without overpowering the main flavours. Massaging this dry mixture deep into the patted dry chicken skin ensures that every fibre is imbued with seasoning before it ever meets heat.
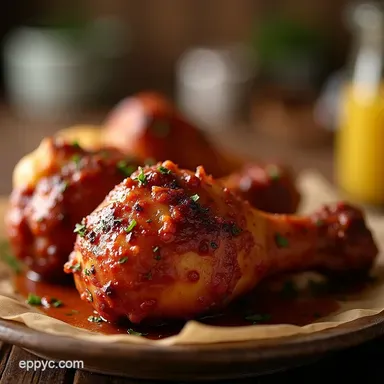
Crafting the Ultimate Sticky BBQ Glaze (Beyond store-bought)
While you can certainly grab a bottle off the shelf, creating your own glaze allows you to hit that perfect trifecta: tang, sweetness, and smoke. Our signature sauce combines rich ketchup with sharp apple cider vinegar for the requisite tang.
Molasses is crucial here; it provides that dark, deep, slightly bitter sweetness that characterises the best barbecue. A dash of Worcestershire sauce adds a necessary umami punch, ensuring the glaze adheres beautifully and tastes complex, creating that iconic sticky coating we crave on our BBQ Chicken Drumsticks .
Ingredient Substitutions: Making the Recipe Work with What You Have
Flexibility is key in the kitchen. If you find yourself missing molasses, a high-quality dark maple syrup serves as a commendable substitute in the sauce, though it offers a slightly different aromatic profile.
If you lack smoked paprika, regular sweet paprika combined with a teaspoon of liquid smoke added to the sauce will bridge the gap. The dry rub ingredients are largely interchangeable; if you run out of garlic powder, a finely minced clove of fresh garlic can be used, but remember to add it directly to the sauce stage, as raw garlic powder needs time to temper in the rub.
Related Recipes Worth Trying
- The Sunday Best Seriously Crispy Buttermilk Fried Chicken — Achieve truly juicy fried chicken with that perfect crunch using this classic buttermilk brine and doubledredge technique Your best homemade fried chicken...
- Best Chicken Fried Rice Recipe Restaurant Style at Home — Stop settling for soggy takeaway This Easy Chicken Fried Rice recipe guarantees perfectly separate grains infused with smoky wok hei flavour Learn how to...
- The Ultimate Creamy Marry Me Chicken Recipe Ready Fast — This easy Marry Me Chicken recipe delivers a rich sundried tomato cream sauce in under 45 minutes A foolproof weeknight winner that tastes utterly luxurious
Step-by-step Execution: Firing Up for Legendary BBQ Chicken Drumsticks

The execution of this Easy BBQ Chicken Drumsticks recipe is streamlined to maximize flavour development while minimizing active cooking time. We will focus primarily on the oven method for foundational cooking, as it guarantees uniform heat penetration, but the finishing steps are easily adapted for the grill or even the BBQ Chicken on Blackstone if you are looking for a massive flat top sear.
Prep Work: Rubbing Down the Chicken for Maximum Absorption
Begin by preparing your 2.5 lbs of drumsticks. This critical first step involves patting them meticulously dry with paper towels. Next, combine all your dry rub ingredients brown sugar, paprika, salt, pepper, and powders and evenly coat the chicken pieces. Ensure every nook and cranny is covered.
Place them in a covered bowl or zip-top bag and let them rest in the refrigerator for at least one hour; this resting time allows the rub to work its magic, creating a better surface for subsequent cooking phases.
Oven Technique: Achieving a Golden Foundation (The Slow Cook Phase)
Preheat your oven to 400° F ( 200° C). Arrange the rubbed drumsticks on a rack set over a baking sheet, or directly on parchment paper.
This initial bake, lasting about 30 minutes, cooks the chicken through slowly, rendering significant fat and ensuring the meat is tender before the sugars hit the high heat. This slow, lower temperature phase is essential for an Easy BBQ Chicken Drumsticks preparation.
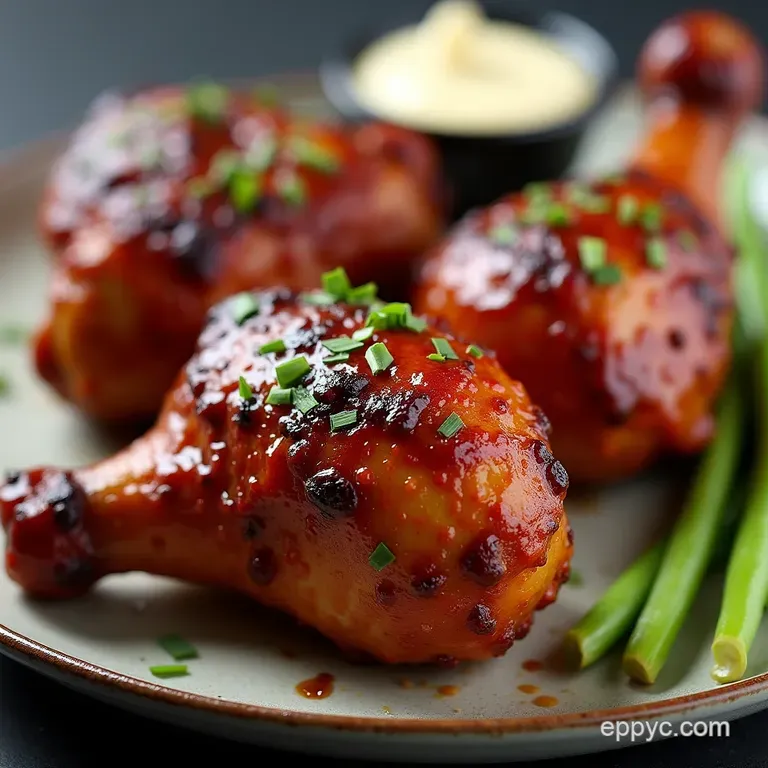
Grill Mastery: Charring and Caramelizing the Sticky Finish
Once the initial bake is complete and the chicken is nearly done, remove them from the oven. This is when we introduce the glaze. Brush a generous, but not drowning, layer of your homemade BBQ sauce onto all surfaces.
Return the chicken to the 425° F ( 220° C) oven, or transfer them to a medium heat grill (indirect heat, if using charcoal). After 10 minutes, apply a second, heavier glaze layer.
For the final 5– 10 minutes, move the chicken to the hottest part of your grill or switch the oven to the broiler setting. Watch constantly; you are aiming for deep mahogany caramelization, not incineration.
Resting Protocol: The Critical Wait Before Serving
Once the exterior is sticky, bubbly, and perfectly charred, remove the BBQ Chicken Drumsticks from the heat. Resist the urge to devour them immediately! Cover them loosely with foil and allow them to rest for five minutes.
This brief pause allows the internal juices, which have been driven towards the surface by the heat, to redistribute back into the meat fibers, sealing in that hard won succulence.
Beyond the Basics: Customizing Your Glaze and Spice Profile
Once you master the core recipe, experimentation becomes your best friend. Spice levels are highly adjustable; if you are catering to a crowd that prefers mild flavours, simply omit the cayenne pepper from the rub and perhaps reduce the amount of black pepper.
For heat seekers, incorporating chipotle powder into the dry rub or adding a teaspoon of hot sauce (like sriracha or your favourite regional vinegar based hot sauce) into the simmering glaze will push the heat profile significantly higher.
This adaptability is why this remains the Best BBQ Chicken Drumsticks Recipe in my repertoire.
Pairing Prowess: The Best Sides to Complement Your Feast
A magnificent plate of sticky, rich chicken demands equally satisfying accompaniments that offer textural or flavour contrast. You need something cool, creamy, or sharp to cut through the richness of the molasses and fat.
Ideal Potato Pairings to Serve Alongside These Drumsticks
No barbecue is complete without potatoes. Skip the plain boiled variety; you need substance. Creamy homemade potato salad, perhaps laced with a touch of mustard and fresh dill, offers the necessary cooling element.
Alternatively, a simple but perfectly baked potato, split open and topped with chives and sour cream, acts as a wonderful canvas for any extra barbecue sauce left on your plate.
Storage and Reheating: Keeping Your Leftovers Magnificent
If, by some miracle, you have leftovers, these drumsticks store beautifully. Place cooled chicken in an airtight container in the refrigerator for up to four days. Reheating is best achieved in a 350° F ( 175° C) oven for about 15 minutes, or until warmed through.
Avoid the microwave if possible, as it tends to dry out the meat, robbing you of that essential juicy texture.
Troubleshooting Common Cooking Pitfalls
The most common issue is a sauce that burns before the chicken cooks. If you notice your glaze turning black too quickly, immediately lower the heat, move the chicken to indirect heat on the grill, or place it back on a lower rack in the oven.
If the meat is cooked but the sauce isn't sticky enough, you can brush on a final, light layer of plain molasses mixed with a splash of vinegar right as you pull the chicken off the heat; the residual heat will set the gloss without burning.
Recipe FAQs
Bbq chicken drumsticks in oven
To ensure those oven baked drumsticks achieve maximum juiciness, pat them thoroughly dry before applying the rub, as this promotes better surface adhesion. For a deeper flavour crust, briefly broil them for the last 3-5 minutes after glazing, watching carefully to prevent burning the sugars.
Leftovers store beautifully in an airtight container in the refrigerator for up to three days and reheat well in a moderate oven.
Bbq chicken drumsticks recipe
For truly juicy results, ensure your drumsticks are patted completely dry before applying the dry rub, allowing the spices to adhere properly. If using the oven, cooking low and slow initially helps render the fat before the final glaze application sets.
Store any leftover glazed drumsticks in an airtight container in the refrigerator for up to three days.
BBQ chicken drumsticks marinade
For optimal flavour penetration, ensure your drumsticks are completely dry before applying the dry rub, as moisture hinders seasoning adhesion. Marinate for at least one hour, but overnight yields the most succulent results. Store leftover marinated drumsticks in the refrigerator for up to two days before cooking.
BBQ chicken drumsticks air fryer
For air fryer success with these drumsticks, ensure they are arranged in a single layer without overcrowding the basket to achieve maximum crispiness. Cook at 380°F (195°C) for about 20-25 minutes, flipping halfway, then brush with sauce and air fry for a final 3-5 minutes until the glaze is sticky and slightly caramelized.
Leftovers store beautifully in an airtight container in the refrigerator for up to three days.
When to put barbecue sauce on chicken drumsticks in the oven?
For those perfectly glazed BBQ Chicken Drumsticks, apply the barbecue sauce during the last 10 to 15 minutes of the total cooking time. This ensures the sauce caramelizes beautifully without burning the sugars onto the chicken skin prematurely.
Baste the drumsticks generously during this final stage, allowing the heat to set that sticky finish you're aiming for.
What BBQ sauce is best for drumsticks?
For truly sensational BBQ Chicken Drumsticks, the best sauce is one that balances tang, smoke, and sweetness, like the signature sticky glaze described. If you prefer store-bought, opt for a thick Kansas City style sauce, as its molasses base adheres beautifully to the meat during the final glaze.
Apply your chosen sauce liberally during the last 10-15 minutes of cooking to ensure it caramelizes without burning.
Easy Juicy Bbq Drumsticks