The Glaze of Glory Foolproof Mirrorshiny Classic Vanilla Donut Glaze
- Unlocking Culinary Perfection: Why This Glaze Triumphs Over All Others
- The Alchemy of Shine: Decoding the Perfect Donut Glaze Consistency
- Assembling Your Arsenal: The Core Components for Ideal Donut Glaze
- The Master Method: Step-by-Step Construction of Mirror-Like Glaze
- Techniques for Dipping: Achieving Uniform Coverage on Fried Delights
- Troubleshooting and Triumphs: Expert Fixes for Common Glazing Setbacks
- Recipe FAQs
- 📝 Recipe Card
Unlocking Culinary Perfection: Why This Glaze Triumphs Over All Others
There is a fundamental truth in baking: the topping often defines the treat. A perfectly fried, airy donut deserves nothing less than a coating that complements its texture, offering a satisfying snap rather than a soggy surrender.
My approach to the donut glaze recipe is rooted in achieving this balance a brilliant, opaque shell that hardens beautifully while delivering profound flavor.
Forget the thin, watery coatings you’ve encountered; this master classic vanilla glaze recipe is engineered for impact. It’s quick enough for a spontaneous baking session, yet refined enough to grace the best bakery display case.
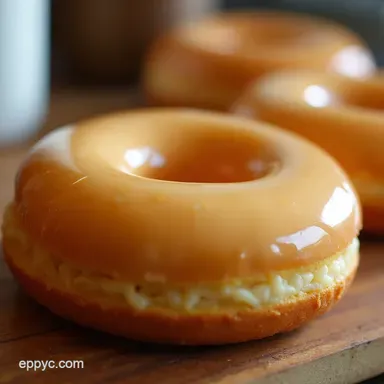
This is the definitive homemade donut glaze you will rely on when you need that perfect, mirror like sheen that shouts "perfection."
The Alchemy of Shine: Decoding the Perfect Donut Glaze Consistency
Achieving that coveted, professional grade finish isn't about secret ingredients; it’s about precision in liquid control. The goal is a shiny donut glaze that adheres immediately and cures into a smooth, non-tacky surface.
This transformation from liquid sugar bath to delicate shell is where many recipes falter, resulting in either a puddle or a crumbly mess.
Why Texture Matters: Moving Beyond the Soggy Coating
Texture dictates the entire eating experience. A glaze that remains too soft will transfer onto your fingers and tear the delicate crumb of the donut when bitten. Our goal is a glaze that sets firm but yields easily a delicate 'crack' rather than a chew.
This is entirely dependent on managing the ratio of sugar to liquid, ensuring the final viscosity is just right before you even think about dipping.
The Essential Blueprint for Flawless Sweetness
To craft this exemplary coating, you begin with the foundation: three cups of finely milled powdered sugar, ensuring it is sifted to prevent any stubborn lumps that resist incorporation. Balancing this intense sweetness requires a tiny pinch of fine sea salt, an element crucial for depth rather than salinity.
The liquid components pure vanilla extract for aromatic complexity and whole milk or half and-half must be introduced with extreme care, as they are the variables that dictate success or failure.
A Chef's Promise: Reliability in Every Batch
This particular donut glaze recipe easy to follow because the ratios are inherently forgiving, provided you heed the liquid addition instructions. Expect this process to take about five minutes of active mixing.
It yields enough of this flawless topping to adorn roughly two dozen standard sized donuts, making it perfect for entertaining or simply ensuring you have plenty for quality control tasting!
Assembling Your Arsenal: The Core Components for Ideal Donut Glaze

Every great culinary result starts with the right tools and high-quality raw materials. While the ingredient list is short, the selection of each element significantly impacts the final appearance and taste of your glaze.
Beyond Sugar: Sourcing Ingredients for Maximum Flavor Impact
When constructing your best donut glaze , resist the urge to use anything less than high-quality vanilla extract. The flavor profile is dominated by this single aromatic component, so using a pure extract, rather than artificial flavoring, is non-negotiable for that sophisticated taste.
Likewise, opting for whole milk or half and-half introduces the necessary fat content that helps the glaze cure with a superior, opaque gloss, unlike thinner skim milk options.
Tool Check: Equipment Required for Seamless Mixing
You won't need a stand mixer for this application; in fact, a simple medium mixing bowl paired with a sturdy balloon whisk is superior. The whisk allows you to incorporate air effectively while breaking down the sugar crystals.
Alongside your measuring cups and spoons, keep a rubber spatula handy for scraping down the sides of the bowl, ensuring every grain of sugar is integrated into the liquid base. Finally, prepare a wire rack set over a baking sheet this is essential for proper cooling and drip management.
Measuring Mastery: Achieving Precision in Ingredient Ratios
The donut glaze recipe begins by placing the three cups (360g) of sifted powdered sugar and the pinch of salt into your bowl. The crucial first addition involves the one teaspoon of vanilla extract followed by the initial four tablespoons (60ml) of your chosen dairy.
This ensures you start with a very thick paste. From this point forward, liquid is added sparingly, which is the secret to avoiding a runny glaze.
Related Recipes Worth Trying
- BakeOff Worthy Yeast Donuts My Easy Recipe — Want Krispy Kreme style donuts at home My yeast donut recipe is easier than you think Get fluffy homemade donuts with my simple glaze recipe
- Easy & Juicy Prime Rib Roast Recipe: My Simple Herb Glazed Method — Discover the best easy prime rib roast recipe! My herb glazed version is succulent and perfect for Sunday dinner or festive feasts. Try it now!
- Easy & Juicy Cooking Beef Tenderloin: My Fail Proof Herb Glazed Method — Craving the best cooking beef tenderloin? Try my simple herb glazed version! So juicy and flavorful, it's perfect for weeknights or holidays. Get my tips...
The Master Method: step-by-step Construction of Mirror Like Glaze
The construction phase is rapid, demanding focused attention during the liquid incorporation. After combining the dry base with the initial liquid core, you whisk vigorously to form that thick, sugar laden paste. The magic happens when you begin adding the remaining liquid, one teaspoon at a time.
Continue whisking until the glaze achieves the perfect thickness: it should slowly ribbon off the whisk, holding its shape momentarily before melting back into the mass below. It needs to be thick enough to coat the back of a spoon heavily, yet fluid enough to dip smoothly.
Techniques for Dipping: Achieving Uniform Coverage on Fried Delights
The application process is just as vital as the mixing. Even the most perfectly formulated glaze will look amateurish if applied sloppily.
Whisking Wisdom: Creating a Lump Free Base
If you encounter lumps during your mixing, do not panic. Continue whisking with slightly more vigor; the friction and incorporation of liquid will usually dissolve them. If resistance persists, a quick pass through a fine mesh sieve can rectify the mixture, though careful sifting beforehand should eliminate this need.
Temperature Tactics: The Secret to Optimal Setting Time
To achieve a glaze that sets correctly and doesn’t simply melt away or absorb entirely into the pastry, temperature control is paramount. Your donuts must be cooled slightly they should feel warm to the touch, not hot and steaming.
If the donut is too hot, the sugar structure breaks down; if it’s cold, the glaze will seize up instantly and create a thick, uneven layer.
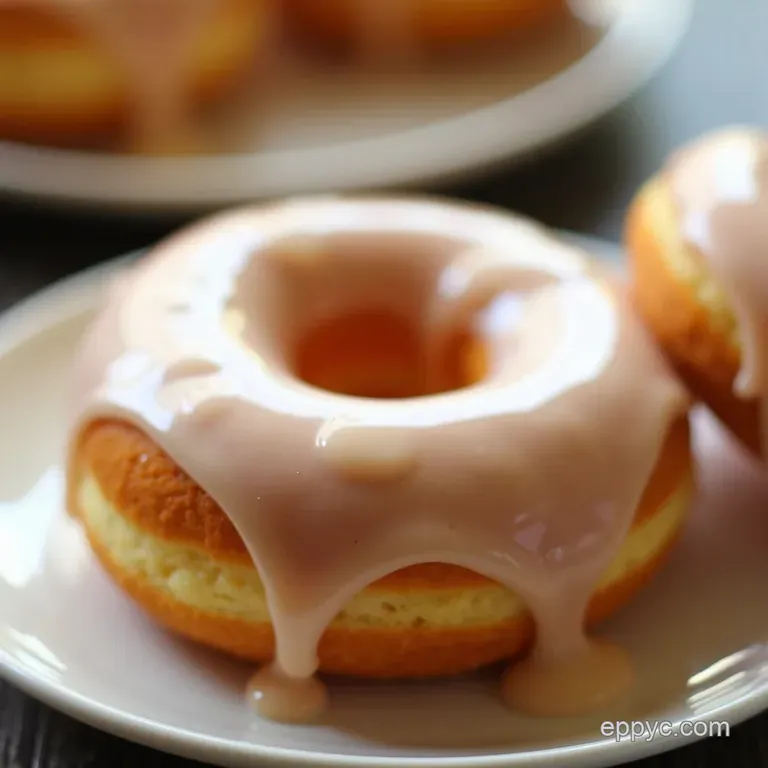
The Crucial Dip: Timing Your Donut Immersion Perfectly
Working quickly, dip the top surface of the donut entirely into the glaze bath. Lift immediately, gently rotating the donut to allow the excess liquid to drip back into the bowl naturally. Place the dipped pastry onto your waiting wire rack.
Allowing this excess to drain ensures that satisfying, thin shell rather than a heavy, clumpy build-up around the base. Allow 15 to 20 minutes for the surface to cure fully before handling or stacking.
Troubleshooting and Triumphs: Expert Fixes for Common Glazing Setbacks
Even when following a proven method, variances in humidity and ingredient density can cause minor issues. Being prepared for these small hurdles means you can salvage any batch.
When Glaze Won't Harden: Advanced Adjustments for Surface Cure
If you find your donut glaze that hardens remains tacky after an hour, you have added too much liquid. To correct this, gently whisk in one tablespoon of additional powdered sugar at a time until the desired slow drip consistency returns.
If the glaze is already applied and won't set, a brief, gentle exposure to a room temperature environment (not hot, direct sun) can sometimes encourage the surface moisture to evaporate and cure.
This is often a sign you’ve created a true easy donut glaze that needs a little more sugar to structure itself correctly.
Preserving the Polish: Storage Solutions for Glazed Goods
Once the glaze is fully set, glazed donuts are best consumed the day they are made for optimal texture. If storage is necessary, place them in an airtight container at room temperature. Avoid the refrigerator, as the humidity often causes the glaze to soften and weep.
From Simple to Spectacular: Variations on Your Base Donut Glaze
While our primary focus is the classic vanilla glaze recipe , this base structure is highly adaptable. For a chocolate glaze, whisk in sifted cocoa powder along with the powdered sugar.
For citrus flavors, substitute a tablespoon of the milk with fresh lemon or orange juice and add the zest of the fruit. This flexibility demonstrates why mastering this fundamental recipe is so valuable.
Nutritional Snapshot: Understanding the Make-up of Your Sweet Topping
As this is a dessert topping relying heavily on sugar, the caloric contribution is focused primarily on carbohydrates. On average, a portion of this glaze contains around 65 calories, primarily sugar, with negligible fat or protein content, confirming its role as a sweet enhancement rather than a nutritional anchor for your treat.
Elevating Your Creation: Flavor Infusions Beyond Classic Vanilla
To push past the standard offering, consider intensifying the vanilla by blooming the extract in the slightly warmed milk for five minutes before mixing, which releases deeper aromatic compounds.
Alternatively, for a refined finish, swirl in a teaspoon of high-quality maple syrup this creates a beautiful, slightly translucent glaze that perfectly complements rich, yeasted doughs, moving your creation into the realm of artisan baking.
Recipe FAQs
My Donut Glaze is too thin and runny how can I save it before it becomes just a sugary puddle?
Ah, the classic 'too much milk' blunder! Don't fret; it’s an easy fix. Whisk in a tablespoon of extra sifted powdered sugar at a time until the glaze thickens up. You’re aiming for a consistency that coats the back of a spoon thickly without immediately dripping off.
Remember, it's always easier to thicken than to thin!
How long does this Classic Donut Glaze actually keep? Can I make it ahead of time?
For best results, it’s best used on the day it’s made, especially if you want that perfect mirror shine. However, you can store leftover glaze in an airtight container in the fridge for up to three days.
Give it a good whisk and perhaps add a tiny splash of milk or water before using it again, as it will thicken considerably upon chilling.
The glaze looks great, but I hate overly sweet treats can I cut the sugariness in this Donut Glaze recipe?
Absolutely, we don't want anything cloyingly sweet, do we? The secret weapon here is that tiny pinch of salt it helps balance the sweetness significantly. For a bigger change, try swapping out a tablespoon of the milk for fresh lemon juice; the acidity provides a lovely counterpoint to the sugar.
Why does my glaze look dull and not shiny after it dries on the donuts?
Dullness usually comes down to one of two things: either the donuts were too hot when you dipped them, causing the sugar structure to melt, or you used too much liquid. Ensure your donuts are merely warm to the touch, not piping hot.
Also, using full fat dairy, as suggested, helps achieve that professional, glossy finish.
I want a different flavour, what are some quick variations I can try instead of vanilla?
You're spoiled for choice! For a sophisticated twist, try substituting the vanilla extract with high-quality maple syrup (reduce the milk slightly). Alternatively, add a teaspoon of instant coffee powder dissolved in a drop of hot water for a brilliant mocha flavour.
Just remember to whisk thoroughly to avoid any gritty bits!
Shiny Vanilla Donut Glaze