The Ultimate Crispyskinned Fluffycentred Jacket Potato
- Elevating Simple Baked Potatoes: The Quest for Perfect Texture
- Selecting Your Spuds: Essential Ingredients and Gear
- Mastering the Technique: Step-by-Step Baking for Fluffy Baked Potatoes
- Verifying Doneness and Achieving the Signature Fluff
- Troubleshooting and Customizing Your Jacket Potato Experience
- Recipe FAQs
- 📝 Recipe Card
Elevating Simple Baked Potatoes: The Quest for Perfect Texture
A proper baked potato, known across the Atlantic as a Jacket Potato, is the cornerstone of comfort dining. Yet, many home cooks settle for a tough, pale skin and a dense, gummy interior.
Achieving the ideal texture aggressively crisp on the outside and impossibly light inside requires a simple shift in methodology, focusing on high heat and maximum airflow.
This baked potatoes recipe is built on those principles, transforming a humble vegetable into a culinary masterpiece worthy of being the main course.
Defining the Perfect Jacket: Crunch Meets Cloud
The standard we strive for demands a complete contradiction: a deeply seasoned, brittle exterior giving way instantly to a steaming, cloud like starch interior. This means the cooking process must simultaneously dry out the potato skin completely while ensuring the high starch interior expands fully without retaining too much moisture.
The secret lies in treating the skin as an ingredient in itself, rather than just a casing.
The Hidden Enemy: Why Airflow Matters More Than Oil
While oil is crucial for achieving that golden brown colour, airflow is the true hero of this technique. High heat alone is insufficient if the potato sits directly on a baking sheet.
Placing your spuds on a wire rack set over a rimmed baking sheet ensures 360-degree air circulation, meaning the base of the potato receives the same intense heat as the top. This prevents the bottom from becoming soft and damp, guaranteeing an even, overall crust a non-negotiable step for truly magnificent baked potatoes in oven conditions.
Dispelling Myths: Why Aluminum Foil is the Enemy of Crispiness
The common practice of wrapping baked potatoes in foil is the quickest way to ruin the potential for a crisp crust. Foil traps the moisture escaping the potato, effectively steaming the skin rather than baking it.
When preparing baked potatoes in foil in oven settings, the resulting skin will be chewy and tough, completely undermining the goal of achieving a signature crunch. For this recipe, we bake them "naked," allowing all that steam to escape freely and dry out the skin surface.
Selecting Your Spuds: Essential Ingredients and Gear
The success of any baked potatoes recipe starts long before the oven is preheated. By selecting the right starch and preparing the surface correctly, we lay the groundwork for ultimate fluffiness and crispness.
Choosing the Right Variety for Maximum Fluff (Russets vs. Marabel)
For the best possible results, you must choose a high starch potato variety. Russets (or Idaho potatoes) are the gold standard because their high starch and low moisture content ensure that when cooked, the starch granules burst open fully, absorbing the added butter and air and creating that desirable fluffy interior.
Avoid waxy or medium starch varieties like Marabels, which tend to hold their shape and result in a dense, gluey texture, rather than a light, airy fluff. Look for potatoes of a similar size (around 10 ounces each) to ensure uniform cooking time.
Pre-Baking Prep: Washing, Piercing, and Oiling Done Right
Proper preparation takes about 10 minutes. First, scrub the potatoes thoroughly under cold running water, removing any blemishes. Crucially, they must be patted bone dry with a clean towel; any surface moisture inhibits the initial crisping process.
Next, use a fork or thin metal skewer to pierce each potato 8 to 10 times all over. This step is vital as it allows internal steam pressure to escape, preventing the spud from bursting and ensuring the interior cooks evenly.
Finally, coat the potatoes vigorously with two tablespoons of high smoke point oil (such as canola or rapeseed) and one tablespoon of coarse sea salt for the flavourful crust.
Simple Tools Required for Achieving Ultimate Crispiness
You don't need specialty equipment, but a few items are necessary for the optimal baked potatoes recipe. You will require a standard baking sheet and a thin wire cooling rack to ensure that 360-degree air circulation.
A fork or metal skewer is needed for the pre-baking aeration, and an oven thermometer is highly recommended to confirm you maintain the precise baked potatoes temperature required.
Related Recipes Worth Trying
- The Ultimate Crispy Baked Potatoes Recipe Fluffy Interior Cracking Skin — Master the British Jacket Potato Achieve that gorgeous crispy jacket potato skin and a cloudlike interior using our expert oven technique Forget foilthis is...
- Best Crispy Herb Garlic Baked Potato Slices Recipe — Forget soggy oven chips Learn how to cook sliced potatoes in the oven for shatteringly crisp flavourpacked potato slices every time Easy weeknight side dish...
- The Best Homemade Baked Macaroni and Cheese Recipe — Forget the box This easy baked macaroni and cheese recipe delivers creamy velvety comfort with a crunchy topping Perfect homemade Macaroni and Cheese awaits
Mastering the Technique: step-by-step Baking for Fluffy Baked Potatoes
The baking process itself is simple, but requires patience and high heat adherence. Preheat your oven to a scorching 425°F (220°C). Once the Russet potatoes have been scrubbed, dried, pierced, and thoroughly coated in seasoned oil, place them evenly spaced onto the prepared wire rack.
The high temperature is essential for achieving a perfect exterior crunch while rapidly converting internal moisture into steam, which cooks the fluffy starch from the inside out. Bake the potatoes for 60 to 75 minutes, depending entirely on their size.
It is critical not to open the oven door during the first hour to maintain the consistent, necessary high temperature for the skin to set hard and crisp.
Verifying Doneness and Achieving the Signature Fluff
The finishing stages are what truly elevate these simple baked potatoes from good to great, ensuring the exterior is maximum crisp and the interior is airy.
Phase One: High Heat for the Initial Skin Setting Blast
The high baked potatoes temperature of 425°F works quickly to set the exterior skin during the initial phase. This process must be undisturbed. Resist the urge to peek or rotate; the wire rack ensures even heat distribution, eliminating the need for mid-bake turning and maintaining thermal consistency inside the oven.
The Mid-Bake Secret: Ensuring Even Cooking and Internal Steam
As the potato bakes through the middle phase (around the 45-minute mark), the sustained heat ensures the dense internal starch is completely cooked. We are looking for an internal temperature of 205°F (96°C).
This high reading confirms the starch has gelatinized fully, eliminating any dense or undercooked patches that can lead to a gluey texture.
The Final Touch: Salting the Skin for a Crunchy Crust
The coarse sea salt applied during the prep stage crystallizes during the bake, creating a hard, aggressive crust. To verify doneness at the 60-minute mark, use an oven mitt to gently squeeze the centre of the potato it should yield easily and feel completely soft.
Once confirmed, remove the potatoes immediately from the oven.
The Fork Trick: Ruffling the Interior for Maximum Air
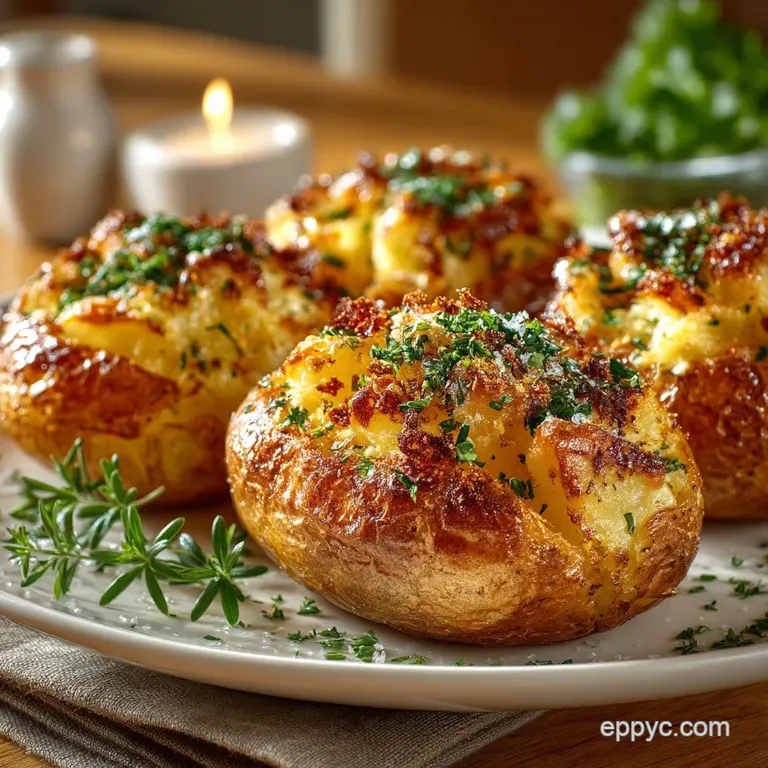
After a brief 5-minute rest, use a paring knife to slice a deep, long slit down the centre of the potato, taking care not to cut through the base. Gently hold the ends and squeeze inward to push the steaming flesh up and open the crack.
Add four tablespoons of softened butter and a generous grind of pepper deep into the exposed flesh. Finally, use a fork to gently rake or "fluff" the interior flesh, whipping the butter and air into the starch to create the signature light and airy consistency before adding your desired fillings.
Troubleshooting and Customizing Your Jacket Potato Experience
While the oven method delivers the classic, crispest result, knowing how to fix common pitfalls and adapt the recipe to different tools (like the popular baked potatoes in air fryer or baked potatoes in instant pot methods) enhances your versatility.
Fixing Common Errors: Why Is My Potato Skin Soft?
If your skin turns out soft, the primary culprit is moisture either residual water from washing, failure to use a wire rack, or cooking at a baked potatoes temperature that was too low (allowing the steam to linger rather than escape quickly).
Remember that low heat leads to a denser, gluey interior and a soft skin. Always adhere to the 425°F setting and ensure the potatoes are completely dry before seasoning.
Storage Solutions: Reheating Leftover Baked Potatoes Safely
Leftover baked potatoes can be stored in the refrigerator for up to four days. Reheating them correctly is key to regaining some crispness. Avoid the microwave, which turns the skin rubbery.
Instead, slice them in half and place them cut-side up in a toaster oven or standard oven at 350°F (175°C) for 10 to 15 minutes until the exterior firms up again. This process is also the perfect starting point for making delicious Twice Baked Loaded Spuds.
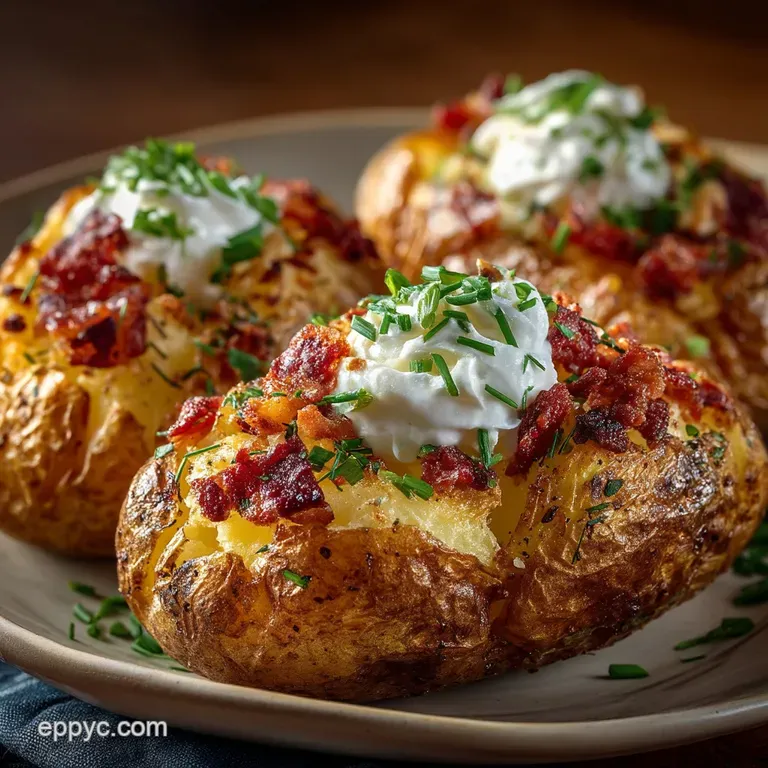
Beyond Butter: Classic British Topping Combinations
The Jacket Potato is an ideal canvas for creativity. For truly authentic results, pair your fluffy spud with classic British fillings like simple cheddar cheese and baked beans, or creamy tuna mayonnaise mixed with sweetcorn.
For outdoor cooking enthusiasts, you can achieve delicious flavour cooking baked potatoes on bbq coals, although they may need to be wrapped briefly in foil to protect them from ash, which sacrifices some crispness.
Calorie Considerations and Healthy Topping Alternatives
A plain 10-ounce potato cooked according to this baked potatoes recipe contributes approximately 350 kcal, offering a high amount of dietary fiber (7g) and complex carbohydrates, making it a satisfying and nutritious base.
If you are watching your intake, substitute the finishing butter with a high-quality olive oil or plain Greek yogurt for fluffing. For fillings, opt for lean protein and vegetable combinations, such as a hearty lentil ragù, instead of heavy sour cream or excessive melted cheese.
If time is severely constrained, while they lack the crisp skin, you can speed up the cooking process substantially by utilizing the baked potatoes in instant pot method, which yields a tender interior in under 20 minutes, or turn to the baked potatoes in air fryer technique for smaller batches, which actually excels at creating a beautiful, crispy skin in less time than a conventional oven.
Recipe FAQs
Why is my jacket potato skin chewy instead of aggressively crisp, like in a proper pub lunch?
Achieving that glorious, aggressively crisp skin is often down to moisture management and high heat. Firstly, ensure the potatoes are bone dry before oiling them; any surface water will turn to steam and ruin the crust.
Crucially, avoid using foil, and bake them on a wire rack so the air can circulate completely around the spud, guaranteeing a crisp base.
What are the best types of potatoes for baking? Do Russets work for these classic Baked Potatoes?
Absolutely, high starch varieties are your best bet for fluffy interior success. In the US, Russets (Idaho) are perfect, as their dry, floury texture easily breaks down into a light fluff.
Across the pond, look for varieties like King Edward or Maris Piper, which offer the necessary high starch content to prevent a dense, gluey centre.
I've made too many! How should I store and reheat leftover jacket potatoes safely?
Jacket potatoes need to cool down quickly after baking, as starches held at warm temperatures can develop bacteria if left out. Once cooled, wrap them tightly and store them in the fridge for up to three days.
For reheating, an oven or air fryer at 350°F (180°C) is best; this revitalises the crispy skin while ensuring the interior heats thoroughly.
Why do I need to prick the potatoes before baking? Is it just to stop them exploding?
Pricking is vital for two main reasons: safety and quality. As the starch heats up inside, a great deal of steam builds pressure; pricking allows this steam to escape, preventing the potato from dramatically bursting in your oven!
More importantly, it helps the moisture release slowly, resulting in a drier, fluffier interior rather than a wet, dense one.
Can I speed up the cooking process if I’m short on time for dinner?
While patience is key for the ultimate crispy jacket, you can certainly cut the active cooking time. Microwave the pricked potatoes on high for 5-8 minutes per spud until slightly softened, which cooks the interior quickly.
Then, transfer them immediately to the pre-heated, high temperature oven for a final 25-30 minutes to achieve that glorious, crunchy skin.
Crispy Skin Baked Potatoes Recipe

